Introduction to HTML & The Web
Mapping the Web
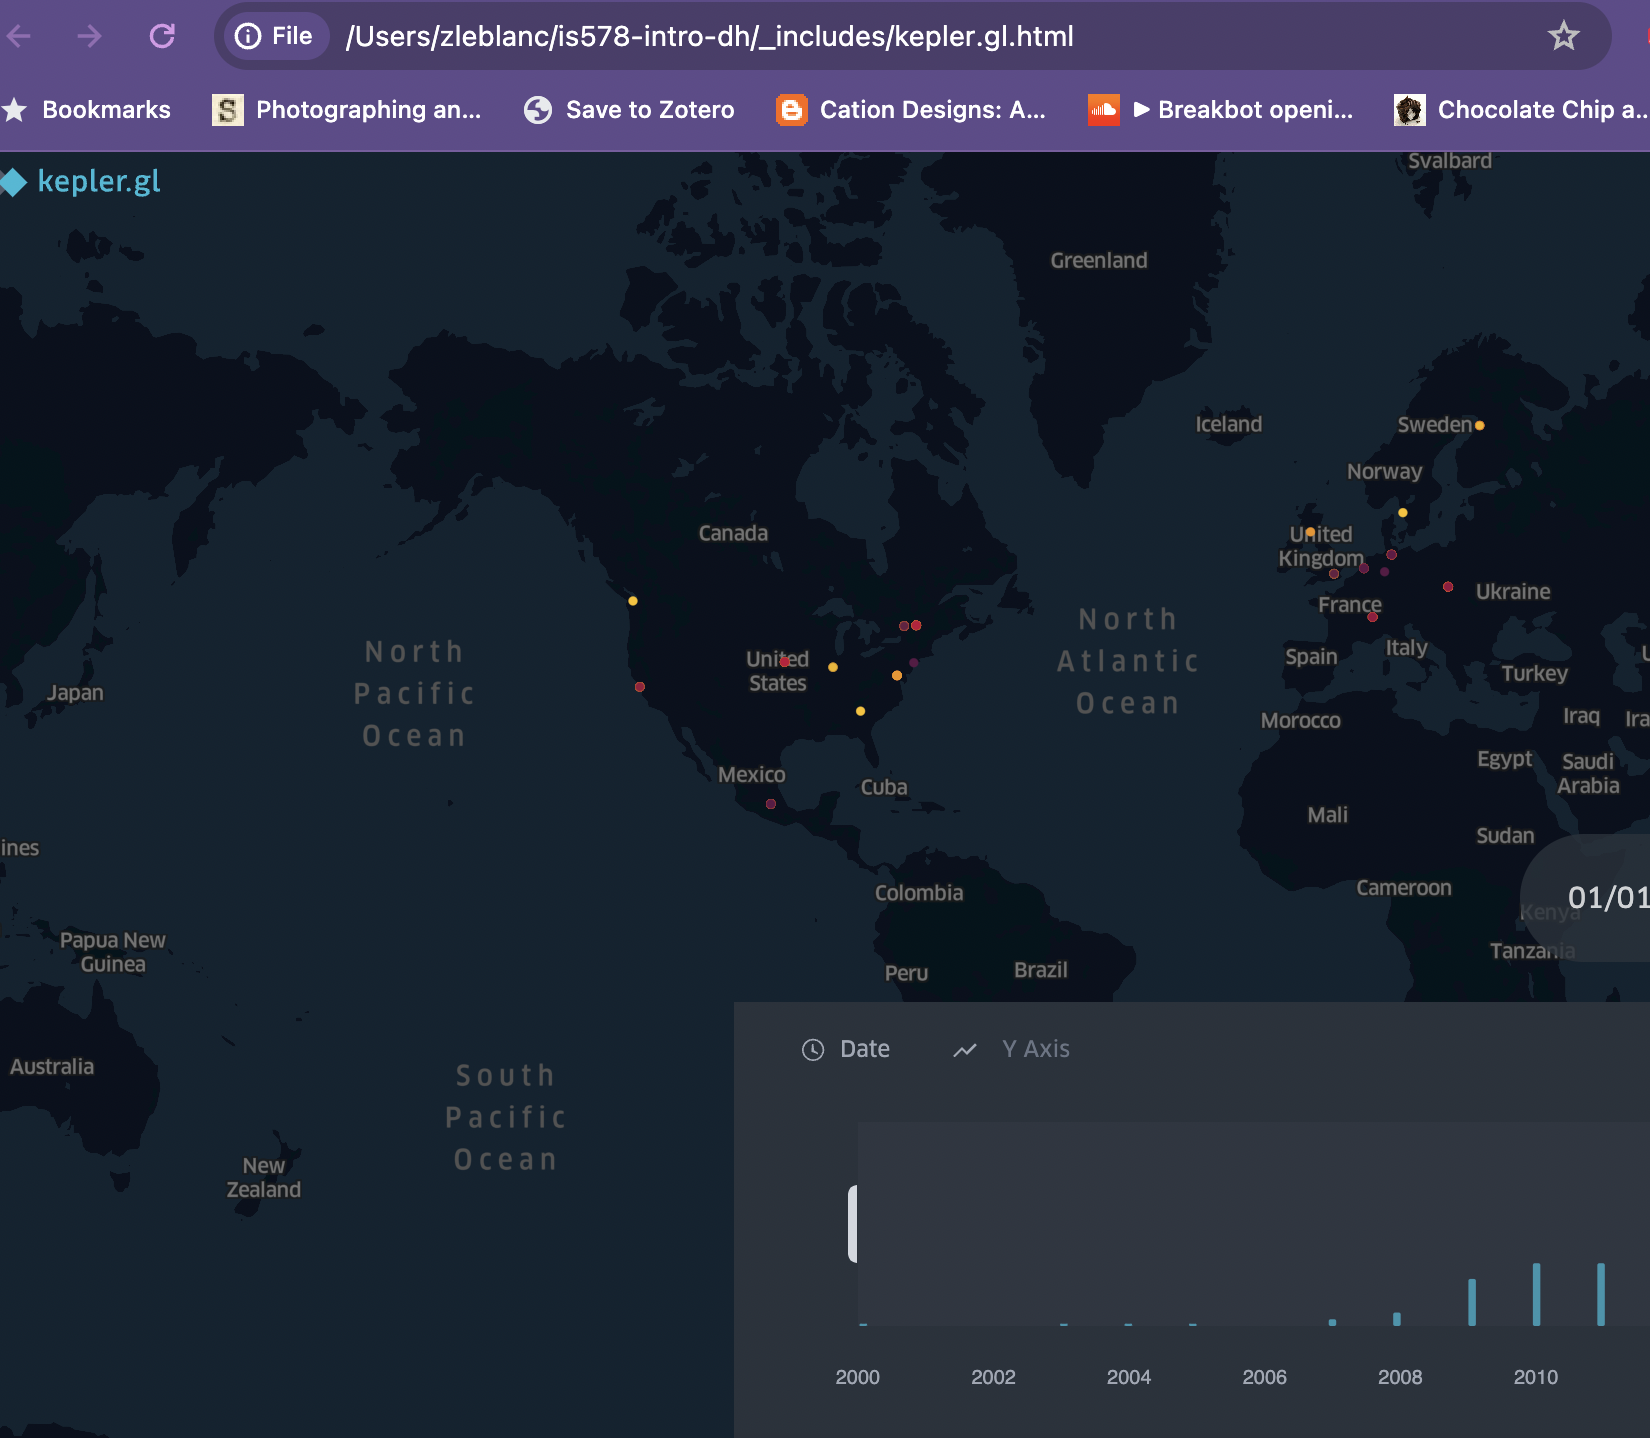
In our workshop last week, I not only demonstrated how I would create a map but also embedded it on our webpage, which you can see below again.
While we detailed how we could build such a map in Kepler, how I got it on this website remains unclear. So let’s work through these steps.
First, you need to complete your map. Once done, you can click on export icon, which offers a few different options Export Image, Export Data, Export Map, and Share Map URL

Explanations of these options are available in Kepler’s documentation https://docs.kepler.gl/docs/user-guides/k-save-and-export.
To create the map above, I used the Export Map option. If you click on that, you will see a pop-up window with a few different options.
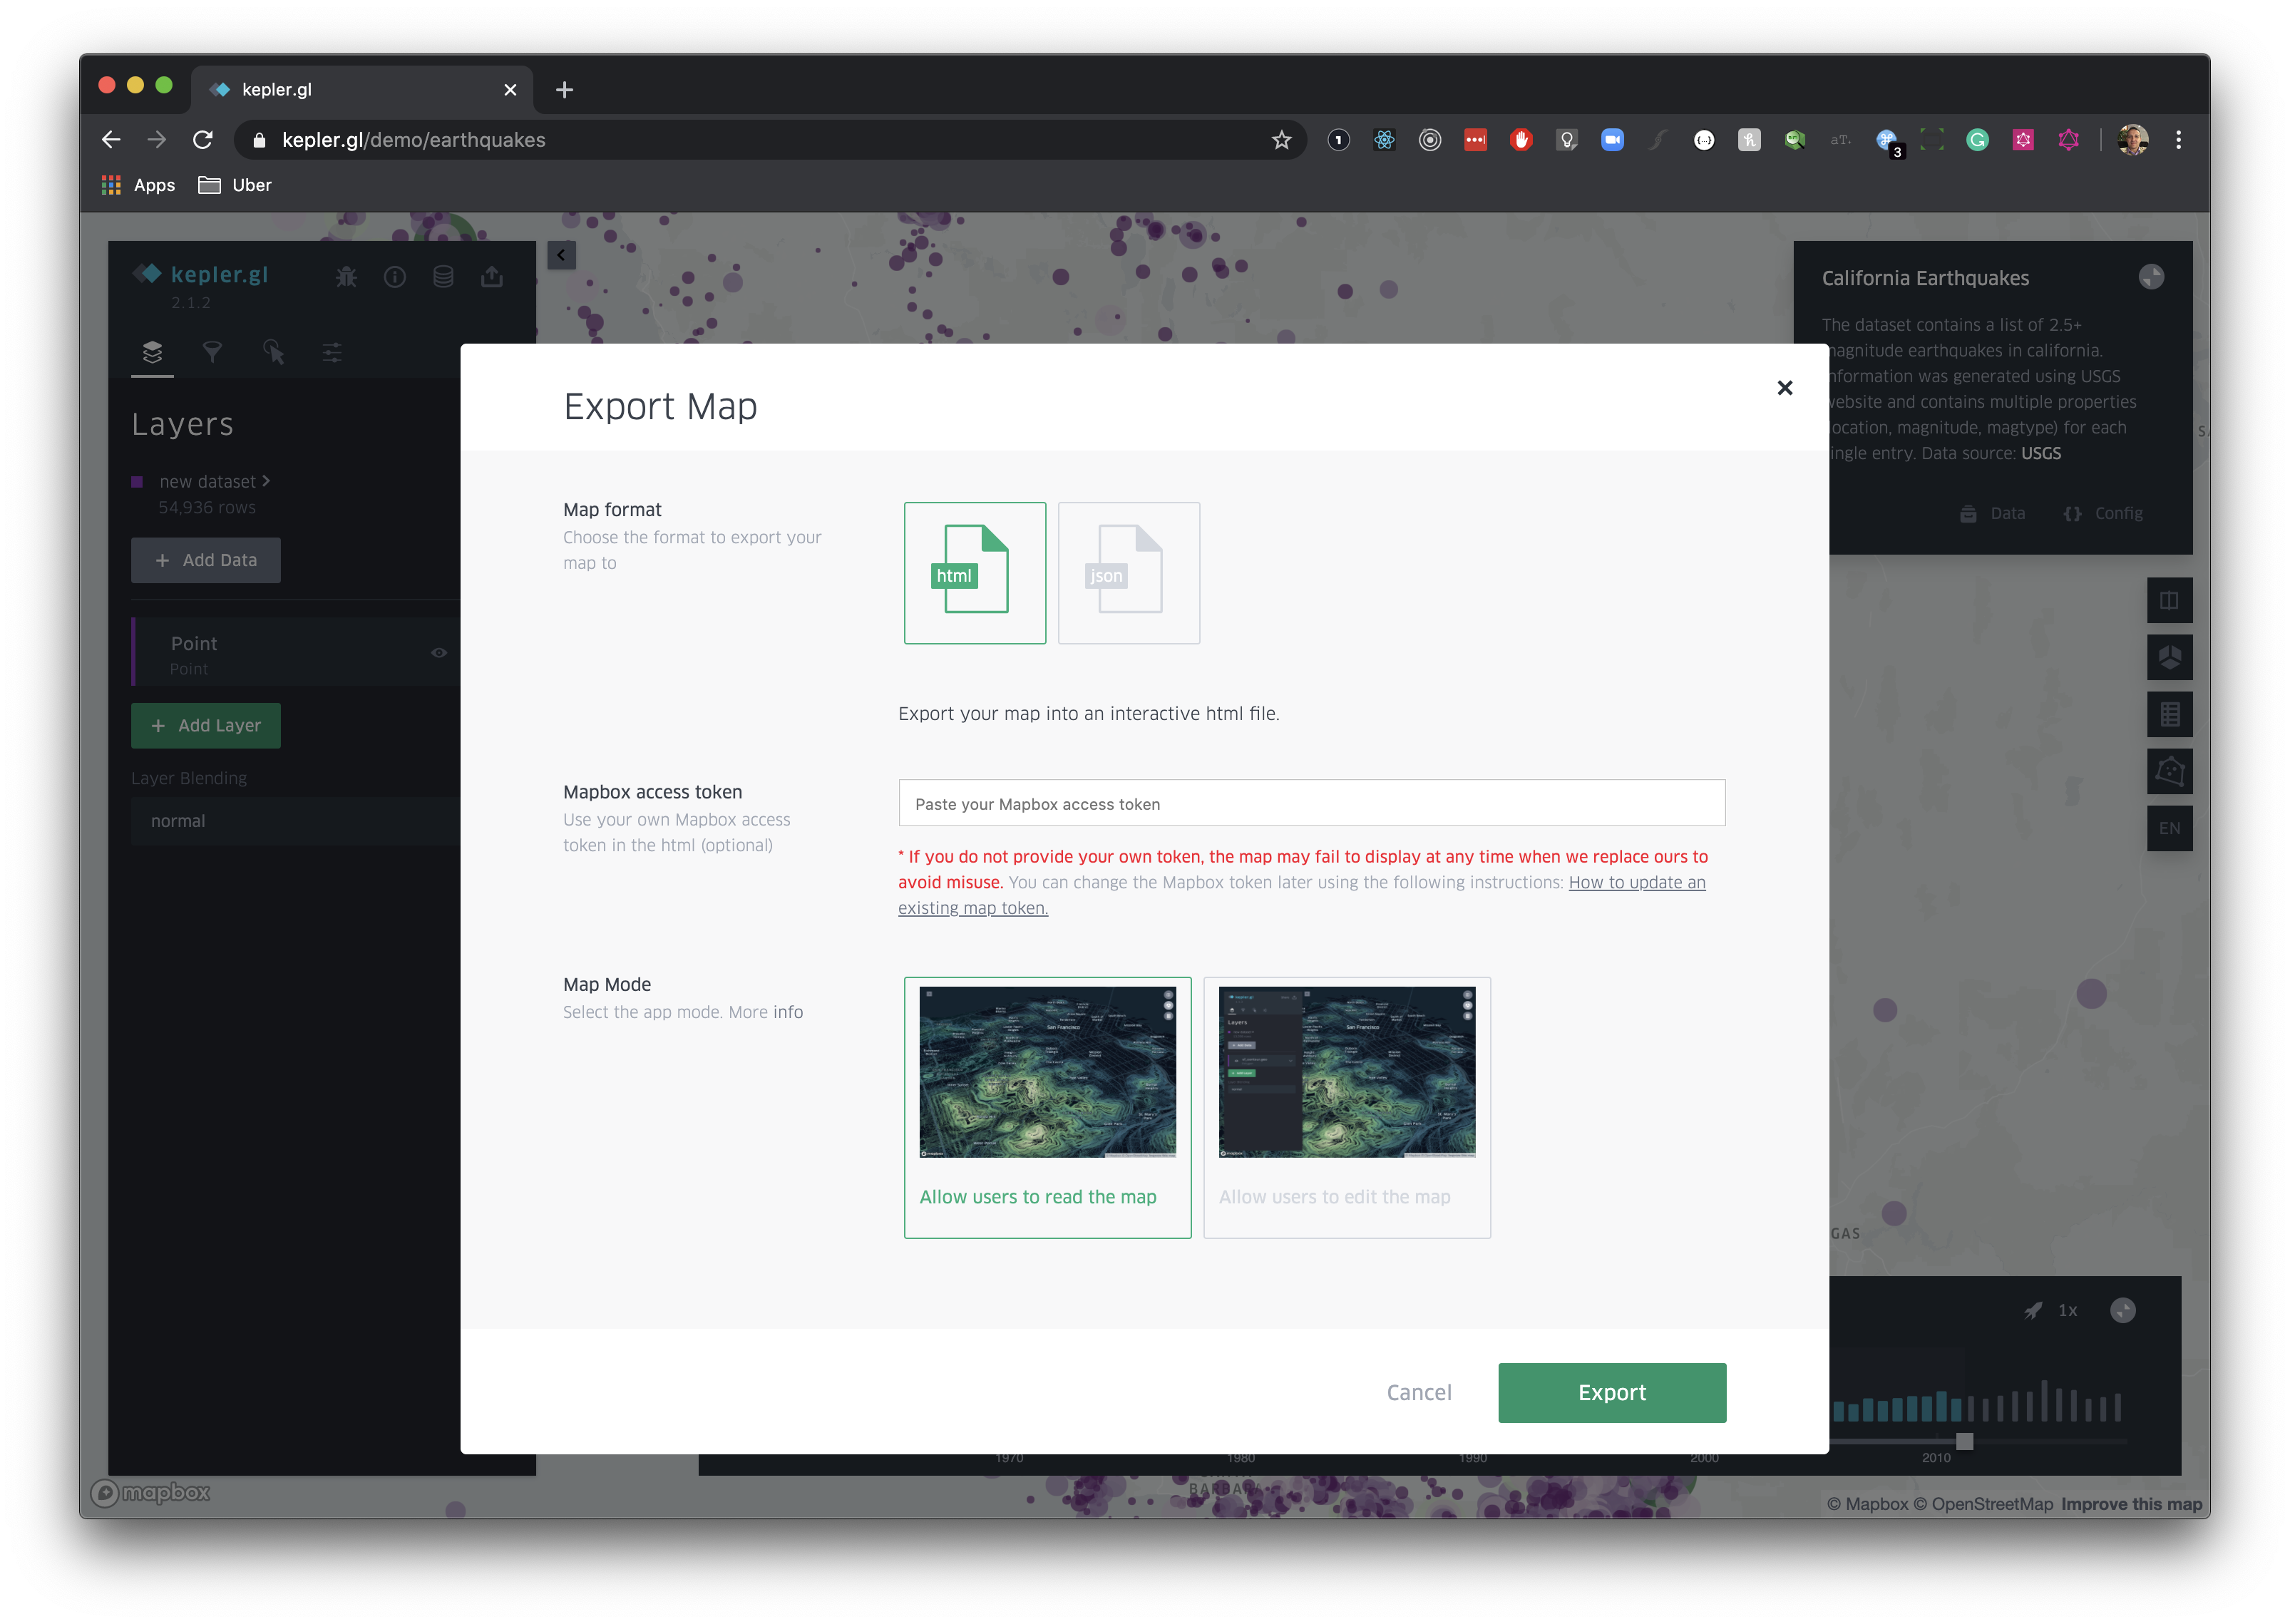
We have the option of exporting as two different file formats: .html and .json, as well as the option of making our map either just viewable or editable. But before we can do either of those, we have to make sure we have a MapBox token.
We briefly mentioned MapBox last week, but you’ll have likely seen it on many of the mapping tools you’ve used. MapBox is a company that provides mapping services, and many of the mapping tools we use rely on MapBox to provide base maps or geocoding.
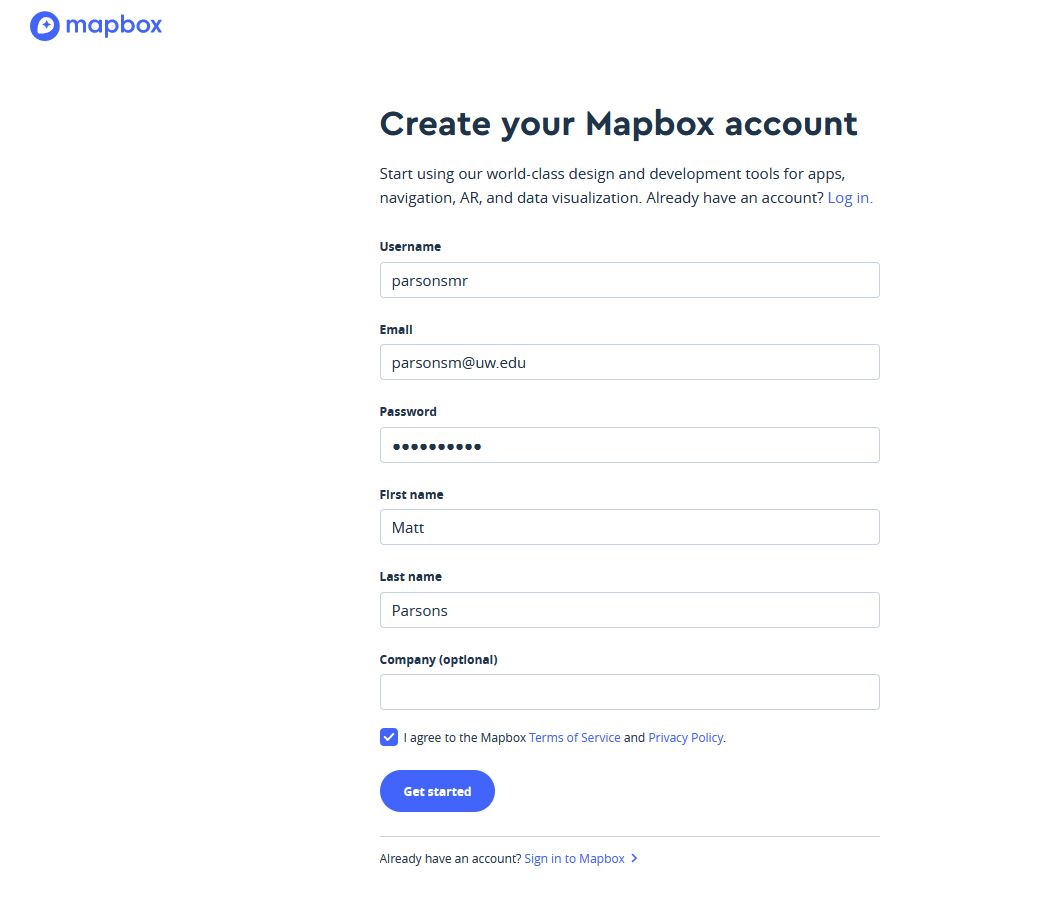
To create a token, first you need to create an account, which you can do here https://account.mapbox.com/auth/signup/.
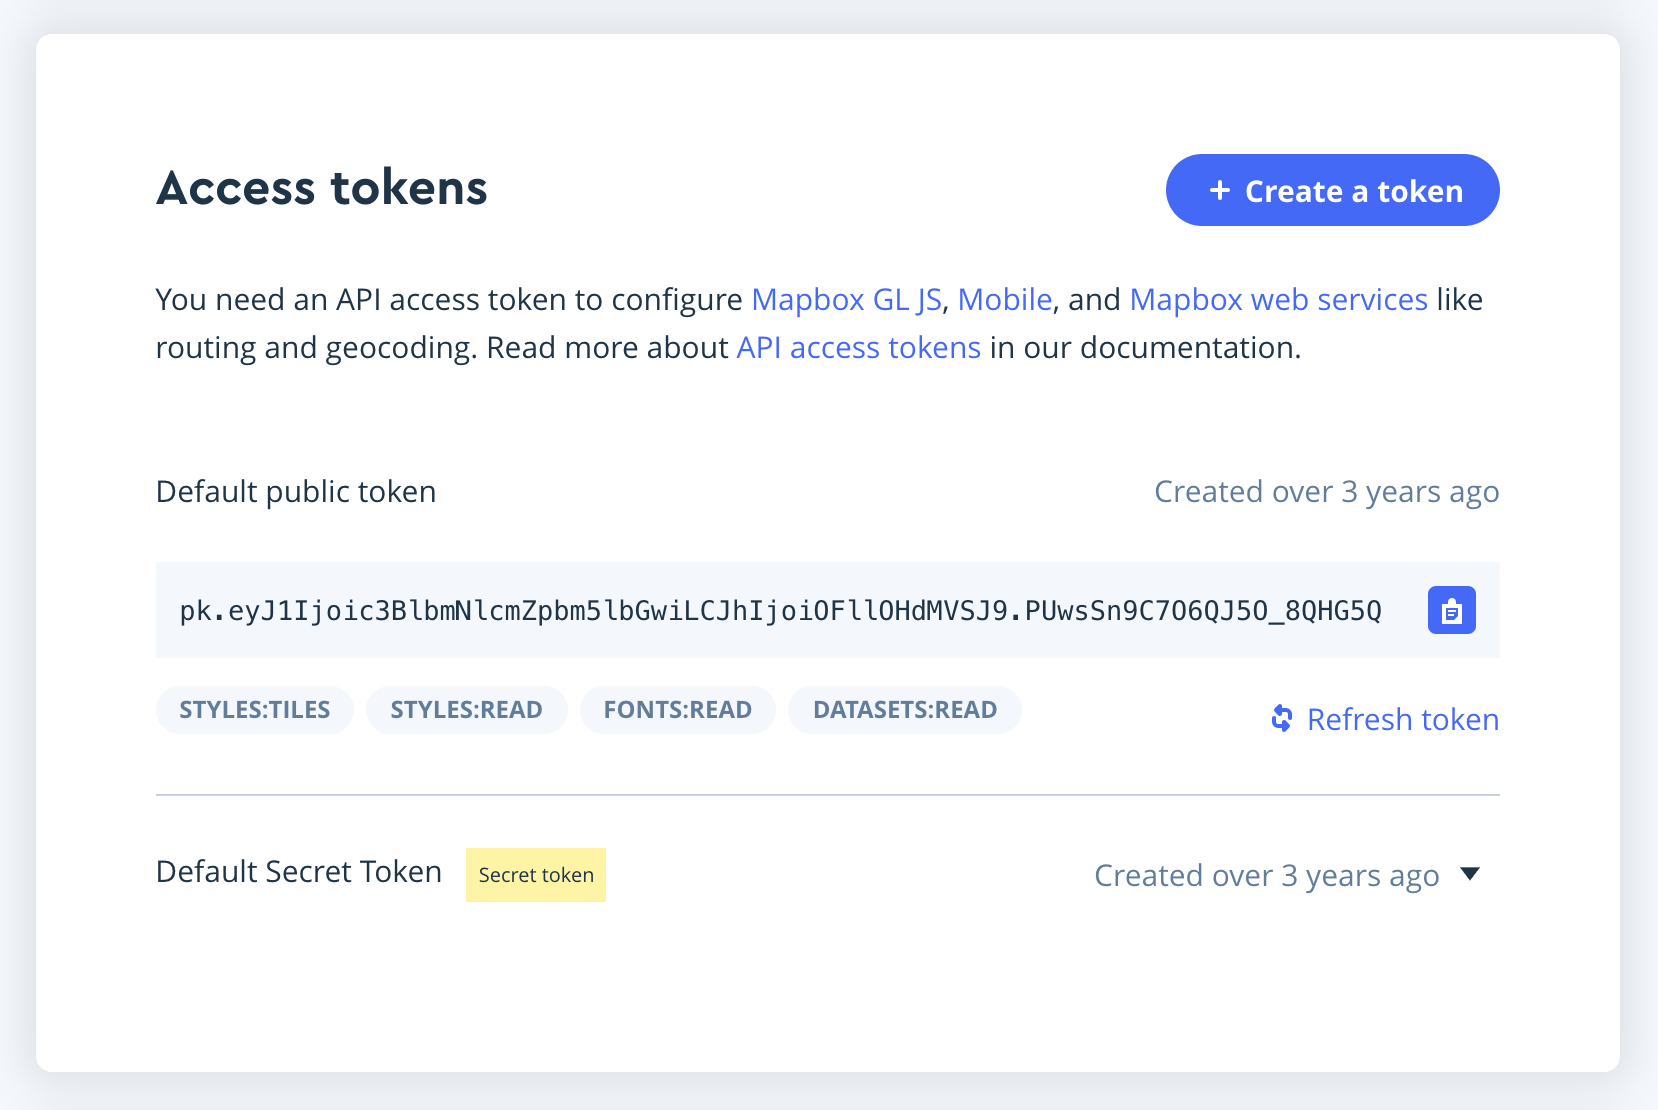
Once you have an account, you can create a token, which you can do here https://account.mapbox.com/access-tokens/. You can name your token whatever you want, but make sure you copy it down somewhere safe, as you will need it to export your map.
Once we have generated the token, we can paste it into the Kepler interface, which we can then use to download an HTML file called kepler.gl.html.
If you click to open the file, it should open in your default web browser, which might be Chrome, Firefox, Safari, or something else. If you’re seeing a blank screen that’s ok, you just need to complete the following the steps to get this map working.
Based on this GitHub issue on the Kepler.gl repository https://github.com/keplergl/kepler.gl/issues/2311#issuecomment-1742650368, we can see that we need to replace one of the lines in our file.
<!-- Load Kepler.gl -->
<script src="https://unpkg.com/kepler.gl@3.0.0-alpha.0/umd/keplergl.min.js" crossorigin></script>
with
<!-- Load Kepler.gl -->
<script src="https://unpkg.com/kepler.gl/umd/keplergl.min.js" crossorigin></script>
We can do that by opening our file in something called a text editor and then saving it. Once we’ve done that, we can open the file again, and we should see our map.
While this isn’t quite how I embedded the map into this website, it is a good way to start thinking about how we put maps, or really anything, on the web.
What is HTML?
Our Kepler map is saved in a file format that has the extension .html. But even if you’ve heard of HTML, what is it actually? When we open this file in programs other than our browsers, we see the following code:
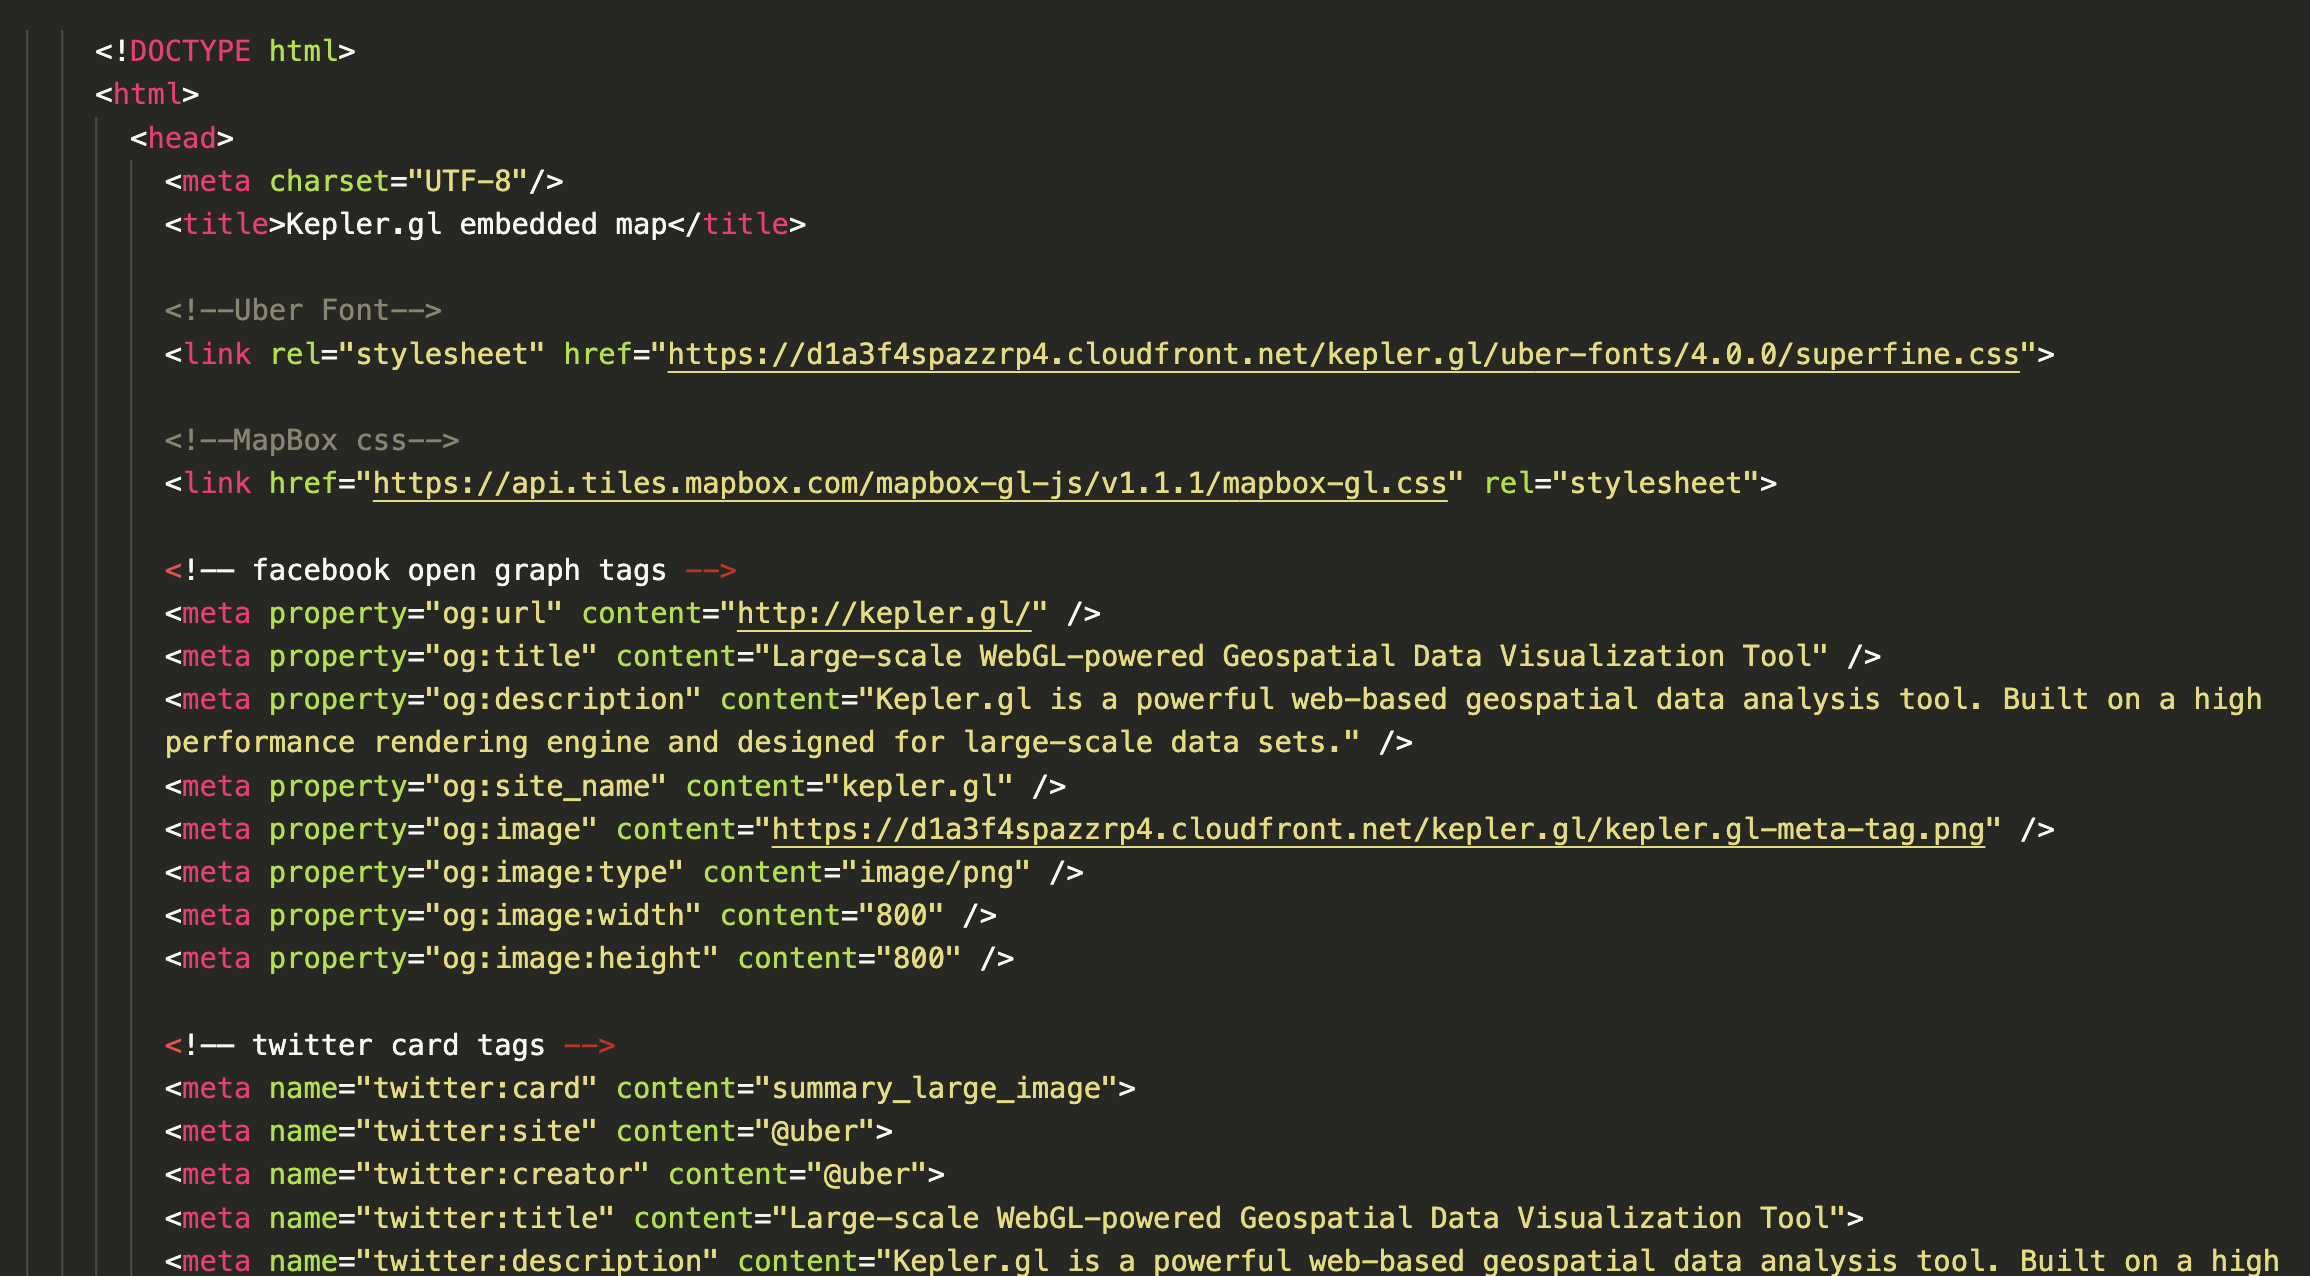
This is HTML, but we first need to learn how to read and interpret it.
According to the Mozilla website,
“HTML (Hypertext Markup Language) is not a programming language; it is a markup language used to tell your browser how to structure the web pages you visit. It can be as complicated or as simple as the web developer wishes it to be. HTML consists of a series of elements, which you use to enclose, wrap, or mark up different parts of the content to make it appear or act a certain way. The enclosing tags can make a bit of content into a hyperlink to link to another page on the web, italicize words, and so on.”
Wondering what a Markup Language is?
We’ve already encountered a markup languages in this course, Markdown, so you’re all generally familiar with the concept.
From handy Wikipedia, “a markup language is a system for annotating a document in a way that is syntactically distinguishable from the text, meaning when the document is processed for display, the markup language is not shown, and is only used to format the text.”
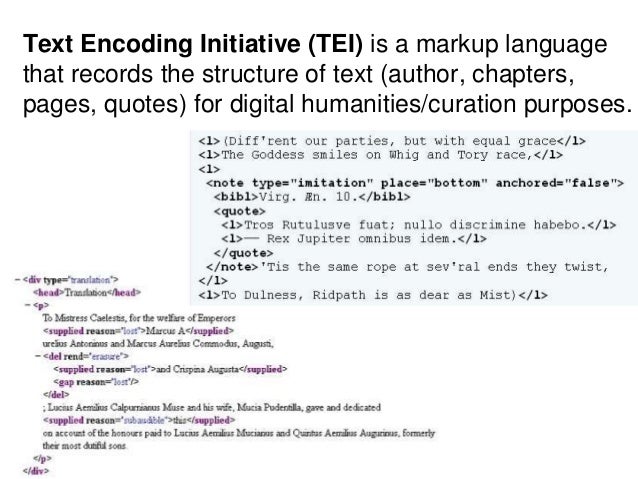
For example, the DH tool TEI, which we’ve been studying, stands for Text Encoding Initiative and is an example of a markup language. Unlike a Markdown file which ends in .md, HTML files end in .html. If you need a referesher on Markdown and file formats, I would recommend revisiting our workshop on Intro to Formatting and Organizing Data.
So what is HTML, actually?
Similar to Markdown, HTML is a document. So when you visit a website, you are actually looking at a document (not identical but similar to ones in Google Docs or Word).
So just like in Google Docs or Markdown, you write text, but in HTML documents, you can also write HTML to help structure how that text appears on the screen.
For example, when we write in Markdown, we use # to indicate that the text is a heading. A similar principle applies to HTML.
Instead of hash symbols, HTML consists of a series of tags. Tags have a name, a series of key/value pairs called attributes, and some textual content. Attributes are optional.
Let’s try an example. Say you wanted to create a website. To start off you might write some very basic text:
My first page
We can try rendering this on a webpage by creating a new HTML document.
Text Editors and Integrated Development Environments (IDEs)
Before you start writing HTML, you need to open a text editor. A text editor is a program that allows you to write and edit plain text. You can use any text editor you like, but I would recommend using one that is designed for writing code.
Some examples of text editors include:
I personally use Visual Studio Code, but you can use whichever one you prefer. You don’t need it for today, but you may need it depending on which assignment you choose to complete.
Creating an HTML Document
It has been a while, but I am going to return to the command line and my terminal to create a new file in my workspace.
touch first_page.html
Now, I’m going to open the file in a text editor (VSCode or whichever one you’re using) and add the text above. Then save it and open the file in the browser. You should see the text we wrote!
Now, in that same file, try altering the code to include some HTML tags.
<p>My first page!</p>
Save it and open the file in the browser again, what do you see? Notice anything different? Probably not!
But we added those tags? So how can we see them…
The trick is to inspect your webpage. To do that let’s right click on our page and select inspect.
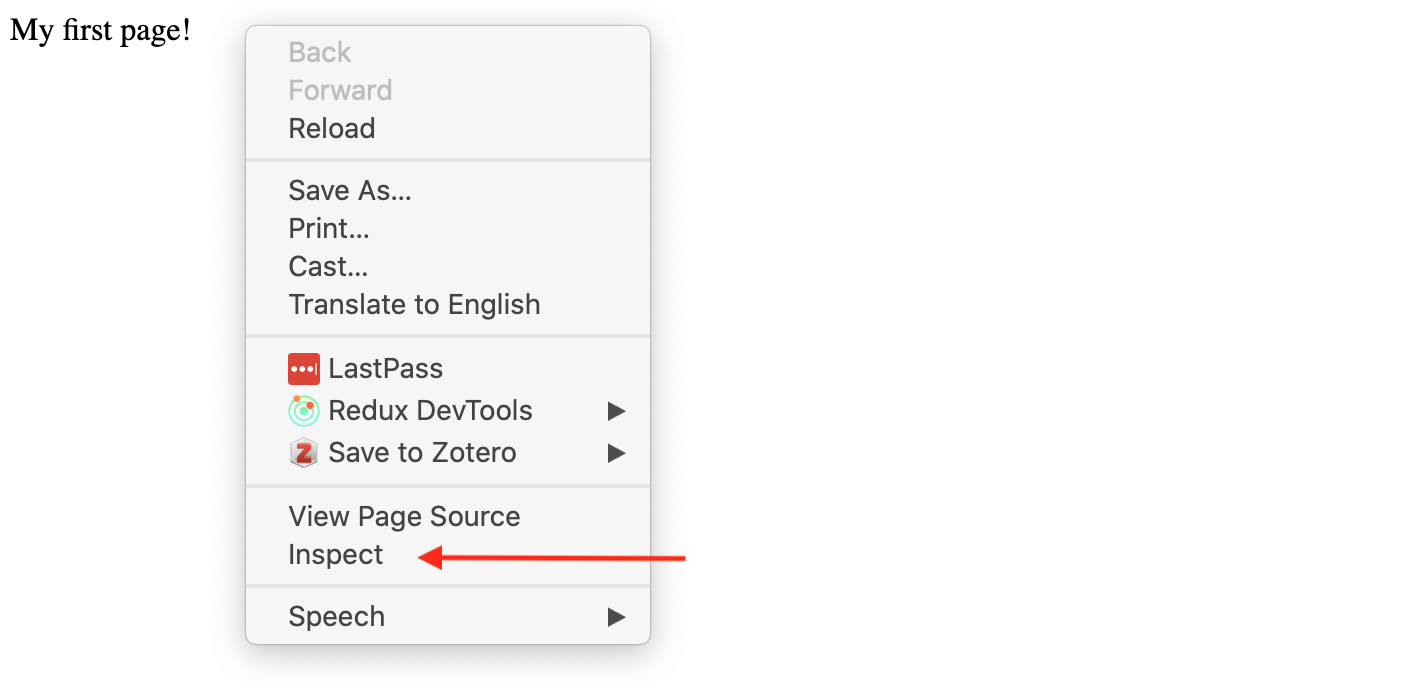
What we’re using is called the Developer Tools Console (you can find more info on Chrome’s version here and instructions for Firefox here). What we’re seeing is called the source code.
Now we can see that our tags do exist, but what exactly are they doing and why do they look like that?
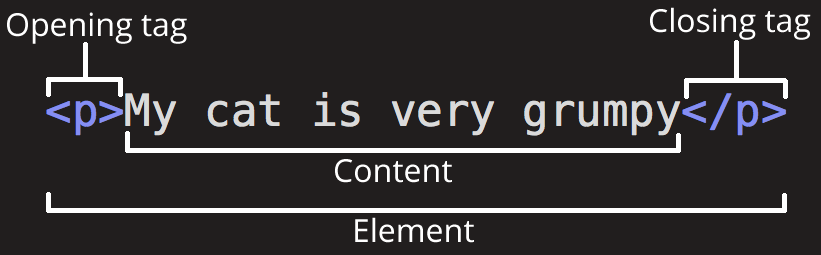
This diagram is from that same Mozilla docs, where they describe the anatomy of an “HTML element”.
The anatomy of our element is:
- The opening tag: This consists of the name of the element (in this example, p for paragraph), wrapped in opening and closing angle brackets. This opening tag marks where the element begins or starts to take effect. In this example, it precedes the start of the paragraph text.
- The content: This is the content of the element. In this example, it is the paragraph text.
- The closing tag: This is the same as the opening tag, except that it includes a forward slash before the element name. This marks where the element ends. Failing to include a closing tag is a common beginner error that can produce peculiar results. The element is the opening tag, followed by content, followed by the closing tag.
That’s a lot of information, so let’s break it down further using our example.
In our HTML page, we created an HTML element using the HTML <p> tag (p means “paragraph”). This example has just one tag in it: a <p> tag. The source code for a tag has two parts, its opening tag (<p>) and its closing tag (</p>). In between the opening and closing tag, you see the tag’s contents (in this case, the text says “My first page!”).
Let’s take a look at some of the more common HTML tags that we can use to create HTML elements https://www.w3schools.com/tags/ref_byfunc.asp
How would we make it into an HTML heading?
<h1>My first page!</h1>
Great now what if we wanted to add a link so that you could click on that heading and go to another page (say the iSchool home page https://ischool.illinois.edu/)?
Well then we need to add an attribute.

This diagram is also from the Mozilla docs and you can read more about how HTML elements can also have attributes here. Some of the guidelines for using attributes are:
Attributes contain extra information about the element that won’t appear in the content. In this example, the class attribute is an identifying name used to target the element with style information.
An attribute should have:
- A space between it and the element name. (For an element with more than one attribute, the attributes should be separated by spaces too.)
- The attribute name, followed by an equal sign.
- An attribute value, wrapped with opening and closing quote marks.
Let’s try using the anchor tag and href attribute to create an HTML element that links to https://ischool.illinois.edu/
You can find a list of HTML attributes here https://www.w3schools.com/tags/ref_attributes.asp
<h1><a href="https://ischool.illinois.edu/">My first page!</a></h1>
How does this new tag change our html page?
Here’s another example that we should add to our html page, using the HTML <div> tag:
<div class="header" style="background: blue;">Digital Humanities Tools and Projects</div>
In this example, the tag’s name is div. The tag has two attributes: class, with value header, and style, with value background: blue;. The contents of this tag is Digital Humanities Tools and Projects.
Tags can contain other tags, in a hierarchical relationship. For example, here’s some HTML to make a bulleted list:
- Python
- HathiTrust
- Gephi
The <ul> tag (ul stands for unordered list) in this example has three other <li> tags inside of it (li stands for list item). The <ul> tag is said to be the parent of the <li> tags, and the <li> tags are the children of the <ul> tag. All tags grouped under a particular parent tag are called siblings.
HTML’s shortcomings by Alison Parrish
HTML documents are intended to add markup to text to add information that allows browsers to display the text in different ways—e.g., HTML markup might tell the browser to make the font of the text a particular size, or to position it in a particular place on the screen.
Because the primary purpose of HTML is to change the appearance of text, HTML markup usually does not tell us anything useful about what the text means, or what kind of data it contains. When you look at a web page in the browser, it might appear to contain a list of newspaper articles, or a table with birth rates, or a series of names with associated biographies, or whatever. But that’s information that we get, as humans, from reading the page. There’s (usually) no easy way to extract this information with a computer program.
HTML is also notoriously messy—web browsers are very forgiving of syntax errors and other irregularities in HTML (like mismatched or unclosed tags). For this reason, we need special libraries to parse HTML into data structures that our Python programs can use, libraries that can make a “good guess” about what the structure of an HTML document is, even when that structure is written incorrectly or inconsistently.
For more information, read through this introduction from Mozilla on HTML.
Web Styling and Interaction
So far we’ve been either working with very simple HTML documents (like our example above) or very complex ones (like our Kepler.gl.html example). To find a middle ground, let’s return to our very first week and take a look at whatisdigitalhumanities.com.

If we open the inspector, we can see that the page is made up of a series of HTML elements.
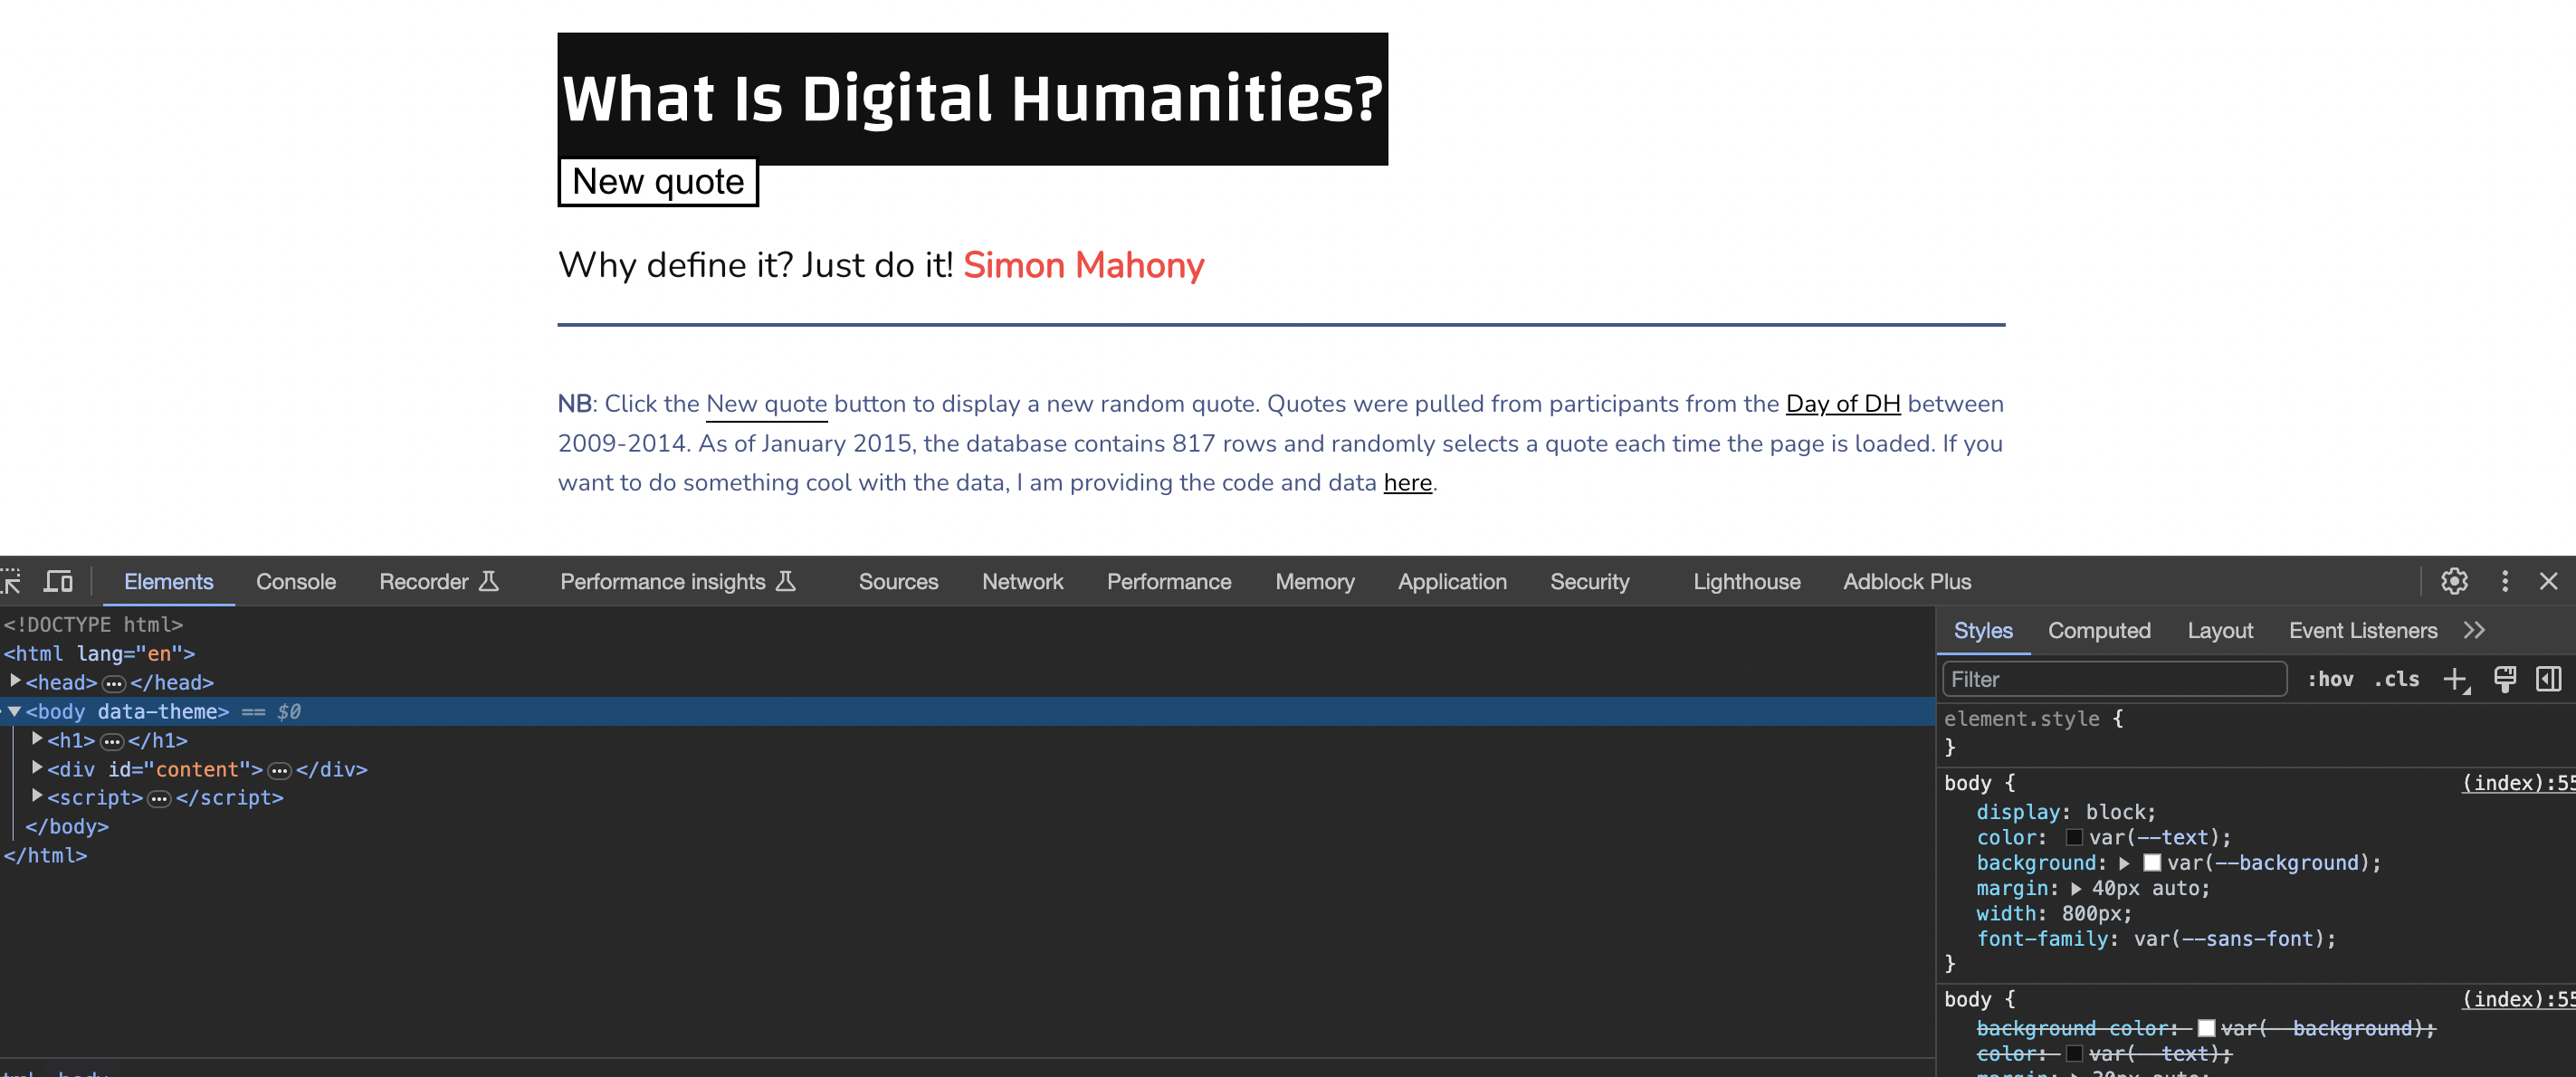
You’ll notice that on every website we inspect, the first line is <!DOCTYPE html>. This is called a document type declaration and it tells the browser what type of document it is. In this case, it’s an HTML document. Then we see the <html> tag, which is the root element of an HTML page. This element contains two other elements: <head> and <body>. The <head> element contains metadata about the document, while the <body> element contains the actual content of the document. While there are some exceptions, most of the time the <head> element comes before the <body> element, and most websites use both.
If click the small arrow in the corner, we can start selecting elements. I’m trying to select the black box that says “What is Digital Humanities?”.
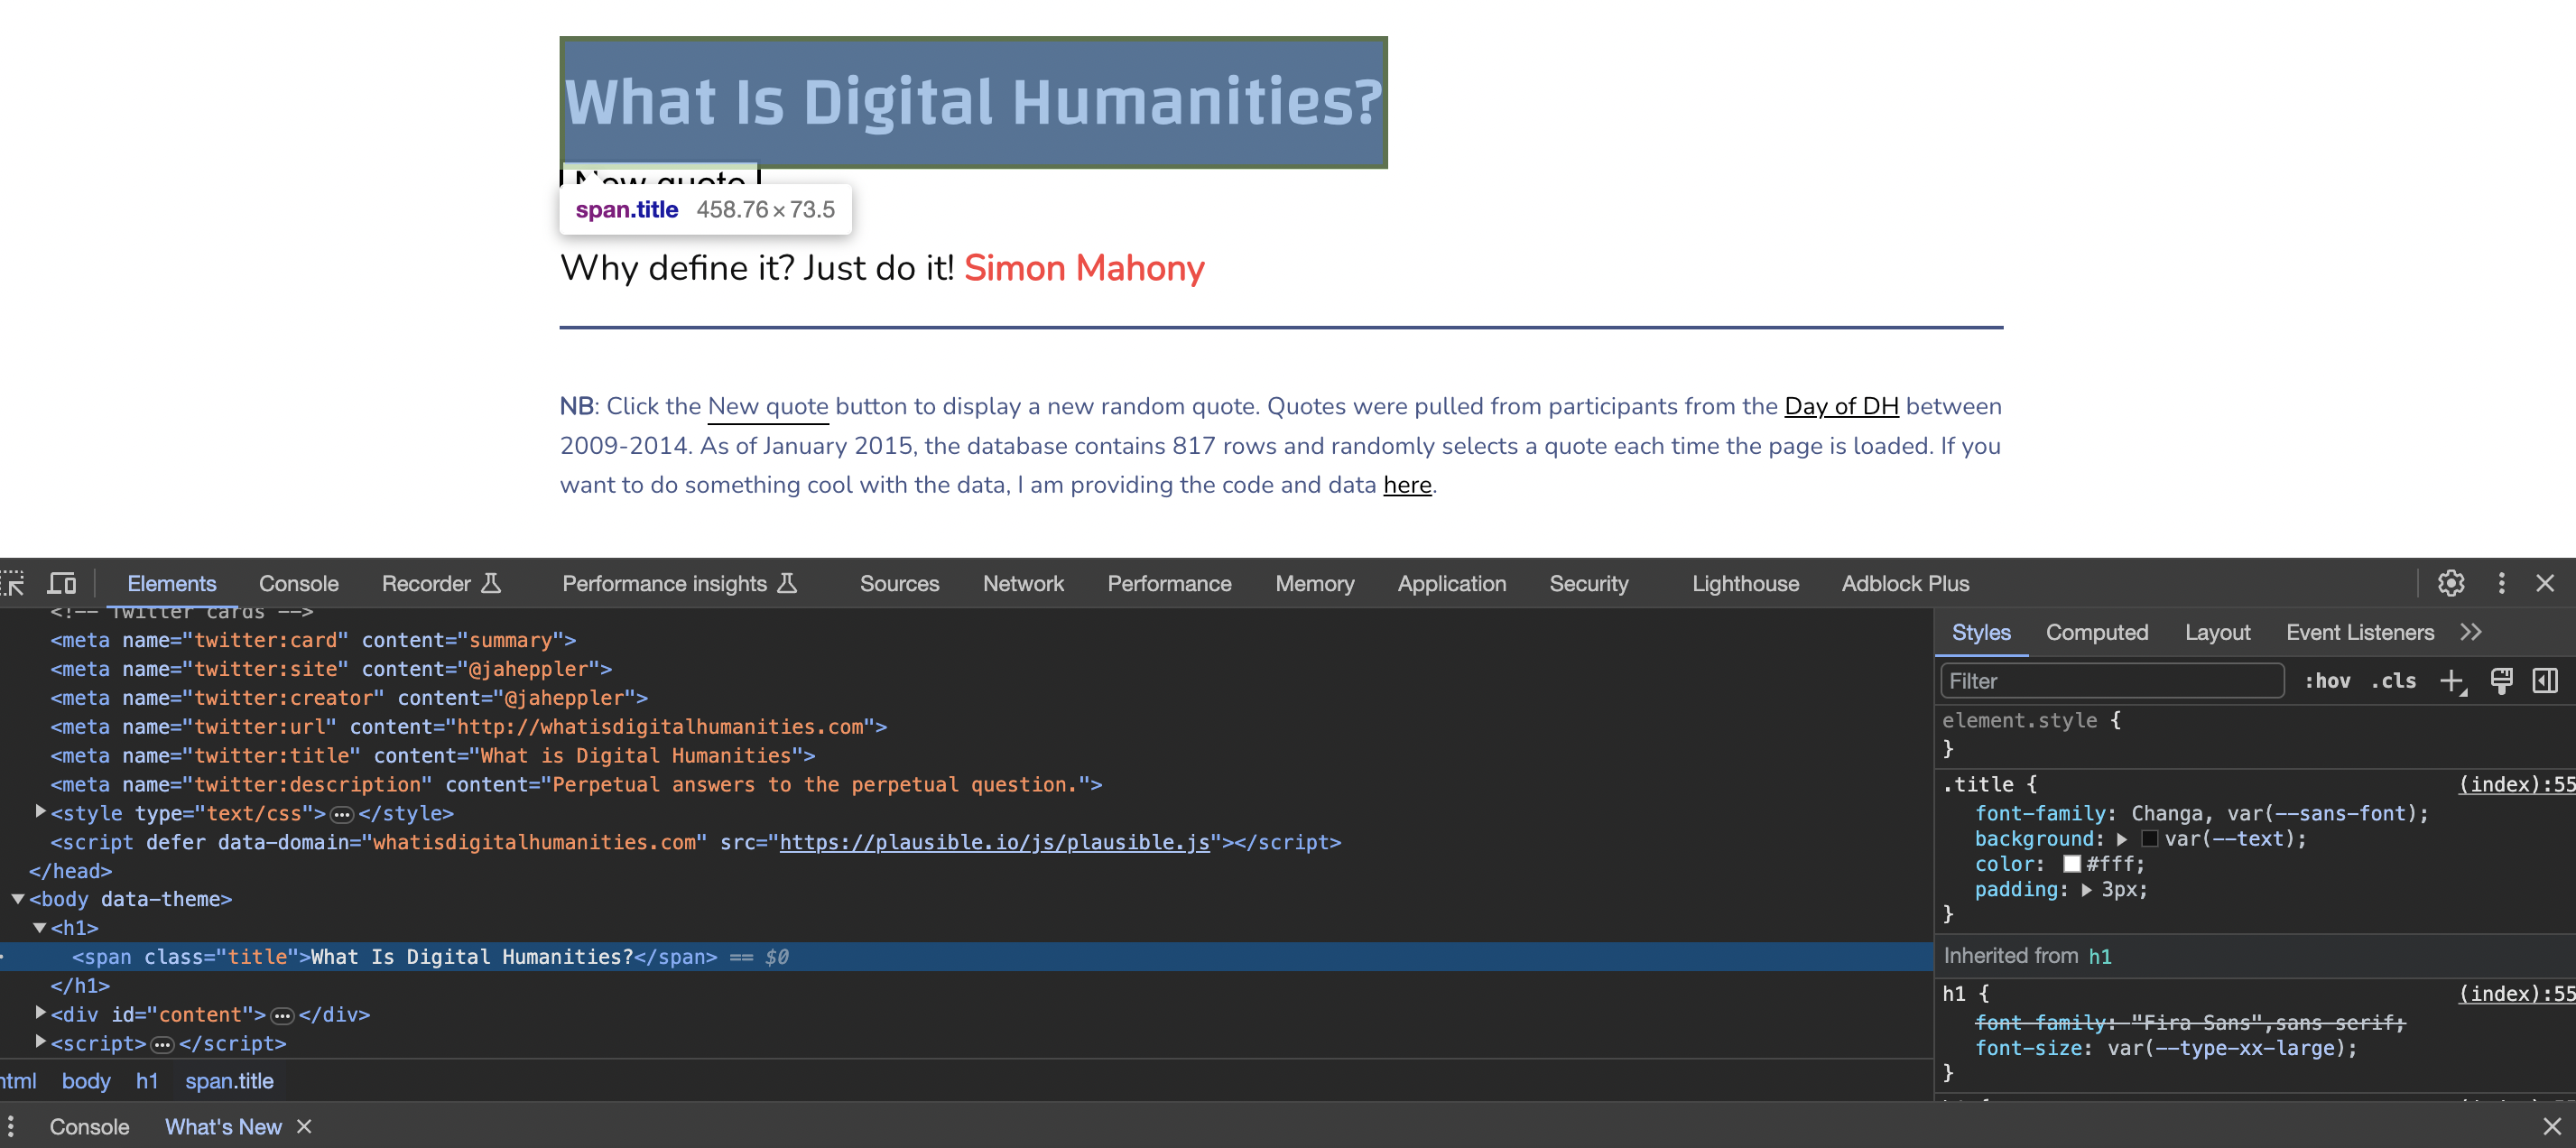
While selecting elements is exciting, it can also be powerful. For example, I could change the very text or color of this element through editing it in the inspector.
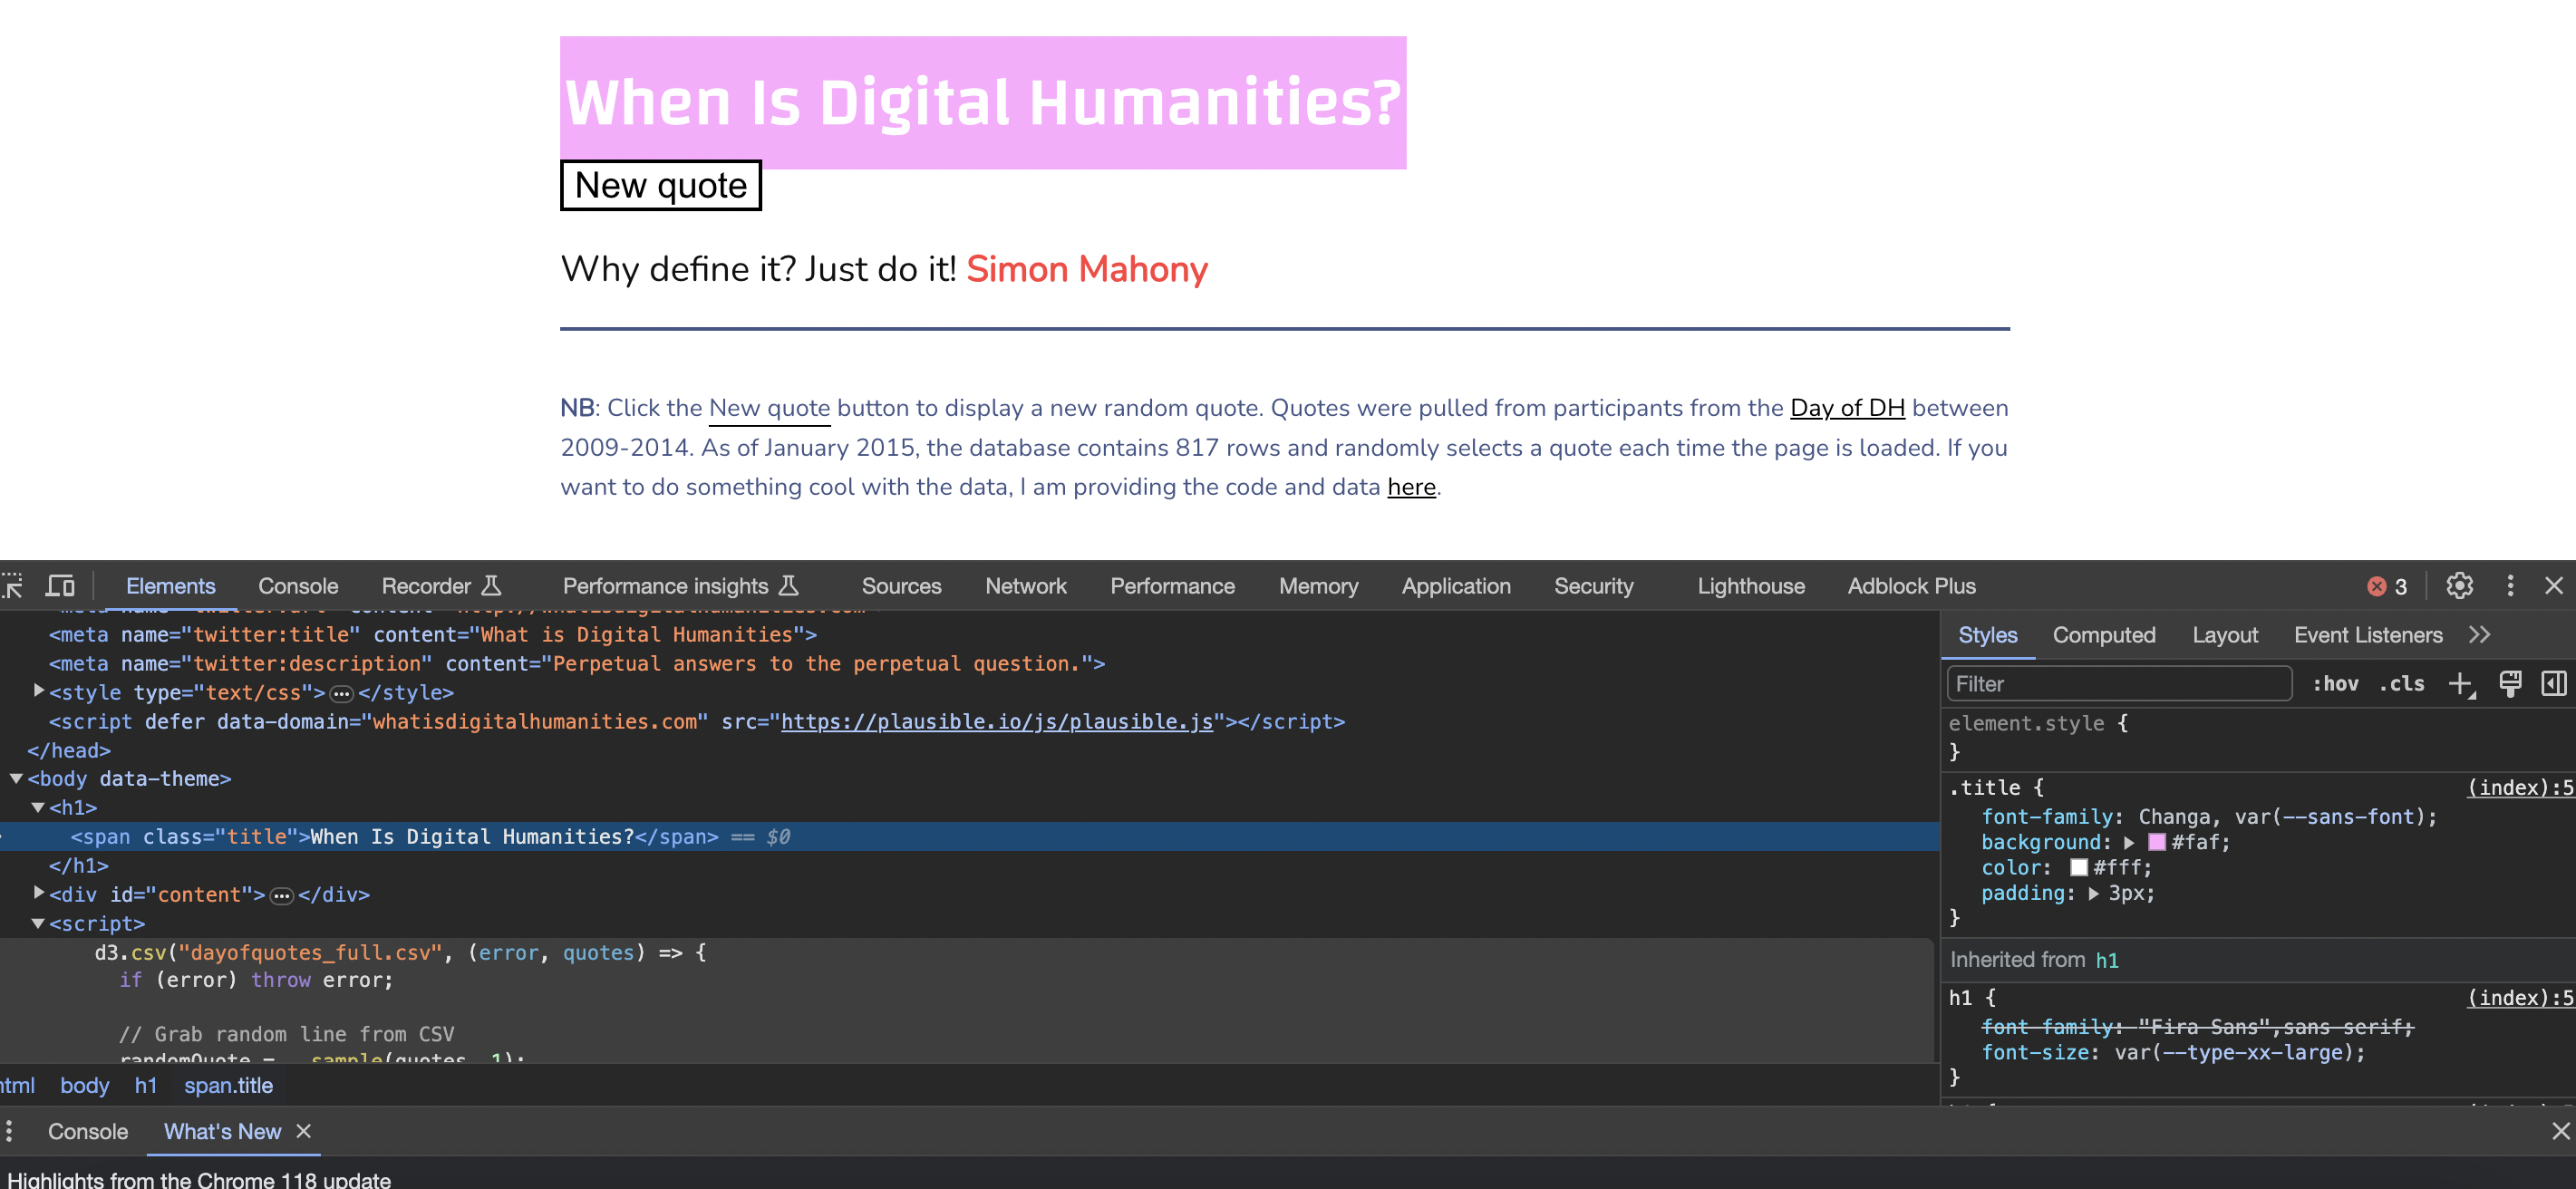
Now if I reload this page, I’ll lose that change, so this is not permanent. But it does give us a sense of how we can style our webpages.
In this example, I altered two part of the HTML document:
The span element with the class title:
<span class="title">When Is Digital Humanities?</span>
And then the styles that are applied to that class:
.title {
    font-family: Changa, var(--sans-font);
    background: #faf;
    color: #fff;
    padding: 3px;
}
This code is something called CSS, which stands for Cascading Style Sheets. CSS is a style sheet language that essentially tells the computer how to style and display a document, whether that’s an HTML or Markdown document. We have already used it when we added the style attribute to our <div> element. One way to think about it is that HTML is the structure of the document, while CSS is the style of the document (similar to styling fonts or positioning images in a Word Document for example).
Much like HTML, CSS has a defined structure that is comprises a selector (in our case the .title) and a declaration block (the curly brackets), where you write your style rules. The selector specifies which HTML elements the rules apply to, and the declaration block contains one or more declarations separated by semicolons. Each declaration includes a CSS property name and a value, separated by a colon.
selector {
    property: value;
    property: value;
    property: value;
}
So in our example, once again the selector is .title and the declaration block contains three declarations: font-family, background, and color. Each declaration has a property name and a value. For example, the font-family property specifies the font family to use (you could change it to something like Garamond or Papyrus if you wanted), and the background property specifies the background color to use (which is what we changed from black to pink). A great resource for learning more about CSS is the Mozilla docs https://developer.mozilla.org/en-US/docs/Learn/CSS/First_steps/What_is_CSS.
To get a better sense of what this code looks like, we can look directly at the index.html file directly in the GitHub repository https://github.com/hepplerj/whatisdigitalhumanities.
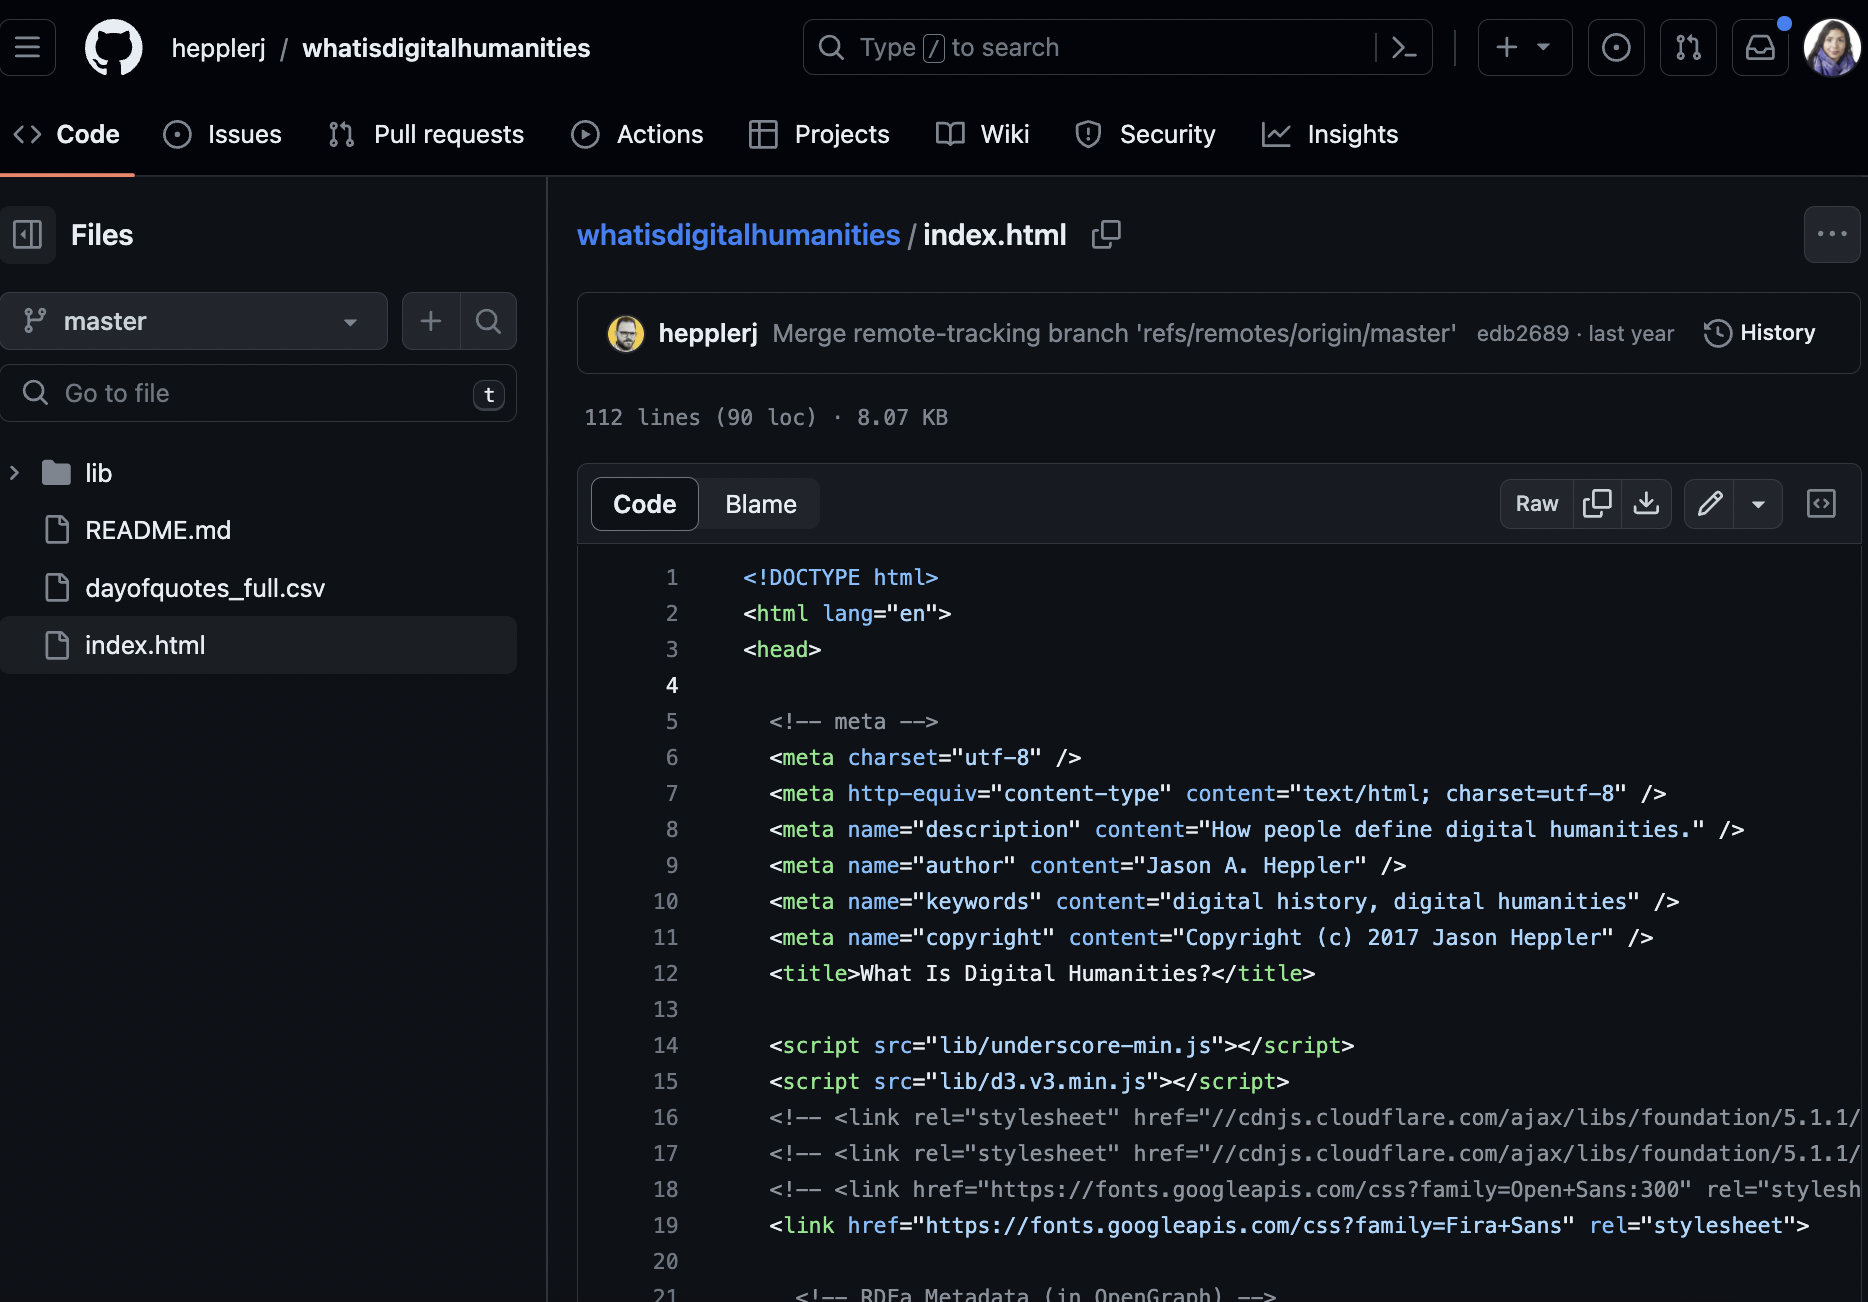
Seeing the full document, we can find both the span element we edited, as well as see how it fits within the overall structure of the HTML document. There’s also a number of other elements that we haven’t discussed yet, but I want to highlight two of them: <style> and <script>.
If we search for the <style> tags, we can see it is located between lines 42 and 58 that it contains the following code:
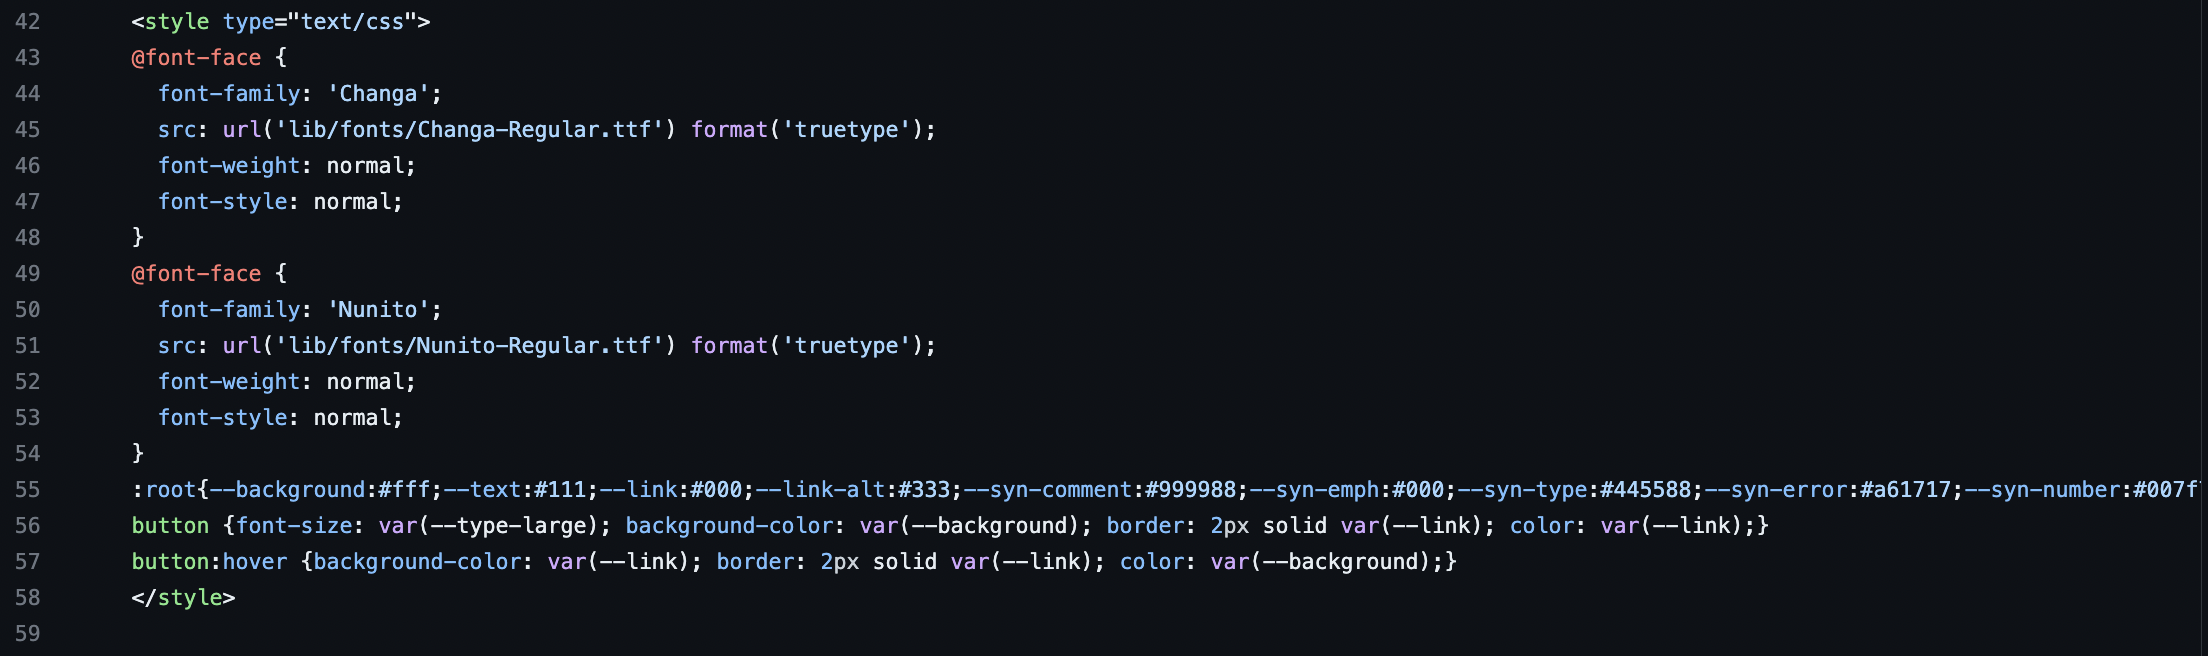
Some of this code looks similar to what we saw in the inspector, but the rest is difficult to read. To help us, we can turn once again to our trusty friend, ChatGPT (or your prefered AI chatbot).
Copying the style code into ChatGPT, I gave it the following prompt:
I have a website called whatisdigitalhumanities.com and I am trying to understand how it has been built. Here is a subset of the code from the `index.html` that is in the `style` element. Please explain the following code to me, but know that I have no prior knowledge of this topic. I'm particularly interested in knowing what exactly this code does and why someone would write code like this.

# Paste the code here
And here’s what it came up with (toggle to see the full answer)
Certainly! The code you’ve provided is written in CSS (Cascading Style Sheets), which is a language used to describe the presentation of a document written in HTML. CSS describes how elements should be rendered on screen, on paper, in speech, or on other media. Let’s break down the different parts of the code you’ve provided:
@font-face
This is a CSS at-rule used to define custom fonts to be used on the website. In your code, there are two custom fonts being defined: ‘Changa’ and ‘Nunito’. The src property specifies the path to the font file, and the format('truetype') indicates the type of font format being used.
:root
The :root pseudo-class matches the root element of the document, which is the html element. Inside :root, CSS custom properties (also known as CSS variables) are being declared. These variables store values that can be reused throughout the document. For example, --background is set to #fff (white), and --text is set to #111 (a very dark gray, almost black).
[data-theme=”dark”]
This selector targets elements with a data-theme attribute that has the value “dark”. It’s a way to apply a different set of styles when the dark theme is active. The variables defined here override the ones set in :root when the dark theme is applied.
#darkModeToggle
This targets an element with the ID darkModeToggle, which is likely a button or switch that allows users to toggle dark mode on and off. The styles here define its position and appearance.
body, h1, h2, h3, h4, h5, a, ul, etc.
These are type selectors that apply styles to HTML elements directly. For instance, body styles apply to the entire body of the document, a styles apply to all anchor (link) elements, and h1, h2, h3, etc., apply to different levels of header elements. These styles define things like colors, fonts, margins, and padding.
::-webkit-details-marker, .body th, .limiter, .pad1, etc.
These are a mix of pseudo-elements and class selectors. Pseudo-elements like ::-webkit-details-marker apply styles to specific parts of an element (in this case, the default disclosure triangle in details elements in WebKit browsers). Class selectors like .limiter apply styles to any element with that class.
@media These are media queries that apply styles only when certain conditions are met, such as the screen width being within a specified range. This is used for responsive design to ensure the website looks good on devices of all sizes.
.code, li code, .m, .s, .no, .k, etc. These class selectors apply styles to elements with the respective classes, often to style code snippets or certain text elements with specific colors to differentiate them, like syntax highlighting in a code editor.
button, button:hover
These selectors define the styles for button elements. The button:hover selector applies styles when the user hovers over a button with their mouse, providing a visual cue that the button is interactive.
Why write code like this?
CSS is used to enhance the user experience by providing a visually appealing and functional interface. It allows web developers to:
- Apply custom styles to their web pages, making them look unique.
- Define responsive designs that adapt to different screen sizes and devices.
- Implement theme toggling (like dark mode) to enhance accessibility and user preference.
- Ensure that the presentation of the content is consistent across different browsers and platforms.
So here we can see that the .title code we altered is actually part of a larger set of code that is used to style the entire website. This example hopefully shows how powerful and complex web development can be.
A great example of CSS in action is the CSS Zen Garden, which shows how the same HTML document can be styled in a variety of different ways. Another great example is this CodePen that shows how CSS can be used to create a 3D airplane (I found it via this blog post).
CSS therefore can be used to style our webpages, but it can also be used to add interactivity to our webpages.
The main other tag that we should pay attention to is the script element is the other way that interactivity happens on most websites. If we search for the <script> tags, we can see it is located between lines 80 and 109 that it contains the following code:
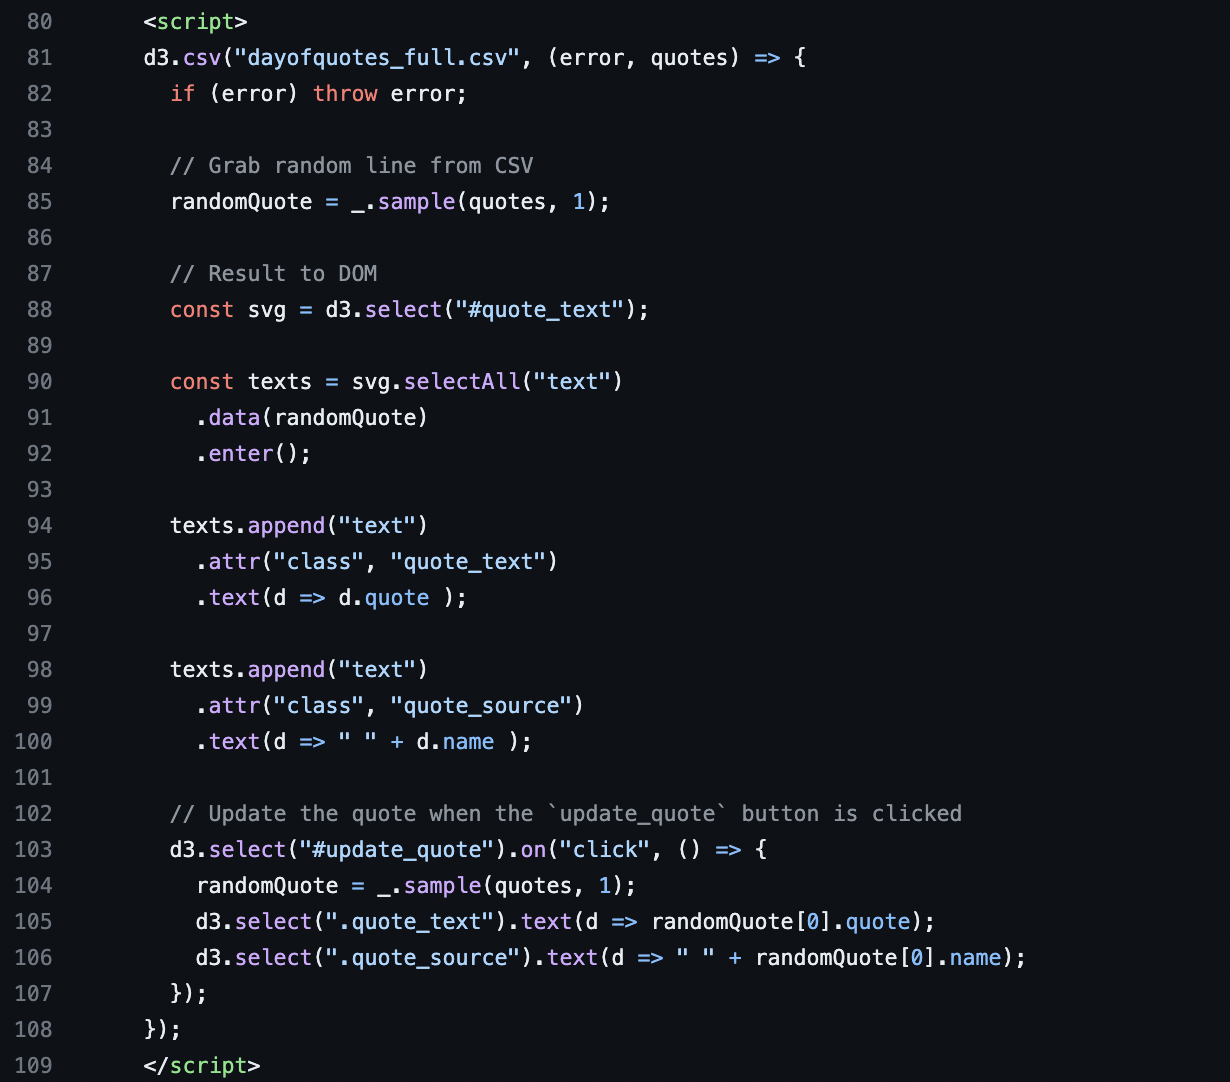
This code is in a language called JavaScript. This code is using a JavaScript library called jQuery, which is a library that makes it easier to write JavaScript. Unlike HTML or CSS, JavaScript is a programming language (the distinction is not crucial to know but can be helpful when learning about different DH methods). At this point, most of the web is powered by JavaScript, so it is incredible powerful and ubiquitous.
To help us understand what this code is doing, we can once again turn to ChatGPT. I gave it the following prompt:
I have a website called whatisdigitalhumanities.com and I am trying to understand how it has been built. Here is a subset of the code from the `index.html` that is in the `script` element. Please explain the following code to me, but know that I have no prior knowledge of this topic. I'm particularly interested in knowing what exactly this code does and why someone would write code like this.

# Paste the code here
The initial response was quite complex but you can still see it below (toggle to see the full answer)
The script you’ve provided is written in JavaScript and uses the D3.js library, which is a powerful tool for creating dynamic and interactive data visualizations in web browsers. It also uses Lodash (indicated by _), which is a utility library that makes JavaScript easier by taking the hassle out of working with arrays, numbers, objects, strings, etc.
Here’s what each part of the script is doing:
Loading Data
d3.csv("dayofquotes_full.csv", (error, quotes) => {
  if (error) throw error;
  ...
});
This part of the script uses D3’s csv method to load data from a CSV (Comma-Separated Values) file named “dayofquotes_full.csv”. The callback function (error, quotes) => {...} is executed once the data is loaded. If there’s an error during the loading process, it throws the error, which will stop the execution and typically print an error message to the console.
Displaying a Random Quote
randomQuote = _.sample(quotes, 1);
Using Lodash’s sample function, the script selects one random item from the quotes array.
Appending Text to the DOM
const svg = d3.select("#quote_text");

const texts = svg.selectAll("text")
  .data(randomQuote)
  .enter();

texts.append("text")
  .attr("class", "quote_text")
  .text(d => d.quote );

texts.append("text")
  .attr("class", "quote_source")
  .text(d => " " + d.name );
This part of the script selects an SVG element with the ID quote_text and binds the randomQuote data to text elements within that SVG. It then enters the data-join, which is a way of joining data to DOM elements. For each quote, it appends two text elements to the SVG: one for the quote text and one for the quote source (the person who said the quote). It sets the class for each text element so that they can be styled with CSS.
Updating the Quote
d3.select("#update_quote").on("click", () => {
  randomQuote = _.sample(quotes, 1);
  d3.select(".quote_text").text(d => randomQuote[0].quote);
  d3.select(".quote_source").text(d => " " + randomQuote[0].name);
});
This part sets up an event listener for a click event on an element with the ID update_quote. When the element is clicked, the script selects a new random quote and updates the text content of the elements with the classes quote_text and quote_source to display the new quote and its source.
Why Write Code Like This?
The purpose of this script is to:
- Dynamically load and display content from a data file (in this case, quotes).
- Provide interactivity to the website, allowing users to see a new random quote every time they click the “update_quote” button.
- Use D3.js to bind data to the DOM, which is a common pattern for creating data-driven documents. This is especially useful for visualizations, as it allows the data to directly drive the presentation.
- Enhance the user experience by providing fresh and interesting content each time the user interacts with the quote section.
This script is a good example of how modern web technologies can be used to create interactive and dynamic web pages that engage users with content.
I asked ChatGPT to simplify the response and it came up with the following:
Imagine a website as a tree with many branches. Each branch and leaf could be a piece of text, a picture, or a button. This tree is what we call the DOM, which stands for Document Object Model. It’s a way of describing the structure and contents of a webpage in a way that programming languages like JavaScript can understand and manipulate.
Now, let’s break down what the script does step by step:
Loading the Quotes
The script starts by asking for a list of quotes from a file named “dayofquotes_full.csv”. Think of this like opening a book to find a bunch of quotes.
Showing a Random Quote
Once it has the list of quotes, the script picks one at random. This is like closing your eyes and pointing to a random quote in the book.
Putting the Quote on the Page
Next, the script places this random quote onto the webpage. It finds the place where the quote should go (like putting a bookmark on a page) and writes the quote there.
Changing the Quote
The script also waits for you to ask for a new quote by clicking a button on the page. When you click the button, it picks another random quote from the list and changes the current quote to the new one. It’s like flipping to another page in the book and reading a different quote.
Why Do It This Way?
The reason for writing a script like this is to make the webpage interactive and interesting. Instead of seeing the same quote every time, you get a surprise each time you click the button. It’s a way to keep the website fresh and engaging for visitors.
Now we can start to understand that the code in the script tag is what controls what happens on each page load, whereas the code in the style tag controls what the page looks like.
These three technologies, HTML, CSS, and JavaScript, are the three pillars of the web. They are what make the web interactive and dynamic. They can also often make websites slow to load (for example, large JavaScript files can take a long time to load) and difficult to maintain (until recently, each line of code was written by humans).
In the case of whatisdigitalhumanities, we can even see this effort by exploring the insights page on the GitHub repo, which shows the following graph of the number of commits over time.

In-Class Assignment
Now that we all have a foundation for understanding web technologies, working together in groups or collectively as a class, we will try to uncover the web technologies used in our primary project and reading this week: “.Break .Dance.” Sx Archipelagos, no. 2 (July 10, 2019) https://archipelagosjournal.org/issue03/parham/parham.html.
See if you can answer the following:
- What web technologies does Parham use in this piece? Can you find the actual files or GitHub repository for this project?
- How does Parham’s project differ from
whatisdigitalhumanities.comin terms of its structure and technologies used? - How does Parham create interactivity in this piece? What technologies does she use to do so?
Web Technologies Assignment(s)
For this week’s assignment, you have two options:
- Inspecting Minimal Computing in a DH Project or Tool
For this assignment, the goal is to find a DH project or tool that you are interested in and inspect the website in the browser to try and assess how it has been built (you might even see if you can find the GitHub repository for it). In your investigation, you should try and answer the following questions:
- What web technologies (that is HTML, CSS, or JavaScript) were used to build the tool? Are there files that end in
.html,.css, or.js? What about files you don’t recognize? - Do you think this tool or project was built using the principles of minimal computing? Why or why not? What evidence do you have to support your claim?
You can use screenshots to support your assessment, but you should also include a link to the website and the GitHub repository (if you can find it). You are also welcome to use AI tools to help you assess and investigate the web technologies. You can post your findings as either a Markdown file, Google Doc, or simply a straight comment in the following GitHub discussion thread: https://github.com/ZoeLeBlanc/is578-intro-dh/discussions/9.
- Create a (DH) HTML Page
For this assignment, the goal is to try making an HTML page. You can build from the example we created in class, or can start from scratch. For this assignment, you’ll need to use some sort of text editor or IDE (or you can work directly in the GitHub interface, though that can be a bit tedious), but ultimately you can use which ever one you prefer (again I highly recommend Visual Studio Code). In your HTML page, you should try and include the following:
- The standard structure of an HTML page (so the
<!DOCTYPE html>declaration,<html>tag,<head>tag, and<body>tag) - At least one heading (so
<h1>,<h2>,<h3>,<h4>,<h5>, or<h6>), one div,one paragraph (so<p>), and one link (so<a>) - Try to include either some styling (so a
<style>tag) or some interactivity (so a<script>tag).
You are welcome to use AI tools to help you generate the HTML code, but you should try to make sure you understand what the code is doing. You can upload your HTML page directly to GitHub (or Google Drive if GitHub is being difficult) and share a link to it in the following GitHub discussion thread: https://github.com/ZoeLeBlanc/is578-intro-dh/discussions/9.
Additional Resources
- Jonathan Blaney, “Introduction to the Principles of Linked Open Data,” Programming Historian 6 (2017), https://doi.org/10.46430/phen0068.
- William J. Turkel and Adam Crymble, “Understanding Web Pages and HTML,” Programming Historian 1 (2012), https://doi.org/10.46430/phen0018.
- Dennis Tenen and Grant Wythoff, “Sustainable Authorship in Plain Text using Pandoc and Markdown,” Programming Historian 3 (2014), https://doi.org/10.46430/phen0041.
- Sarah Simpkin, “Getting Started with Markdown,” Programming Historian 4 (2015), https://doi.org/10.46430/phen0046.