Introduction to Websites
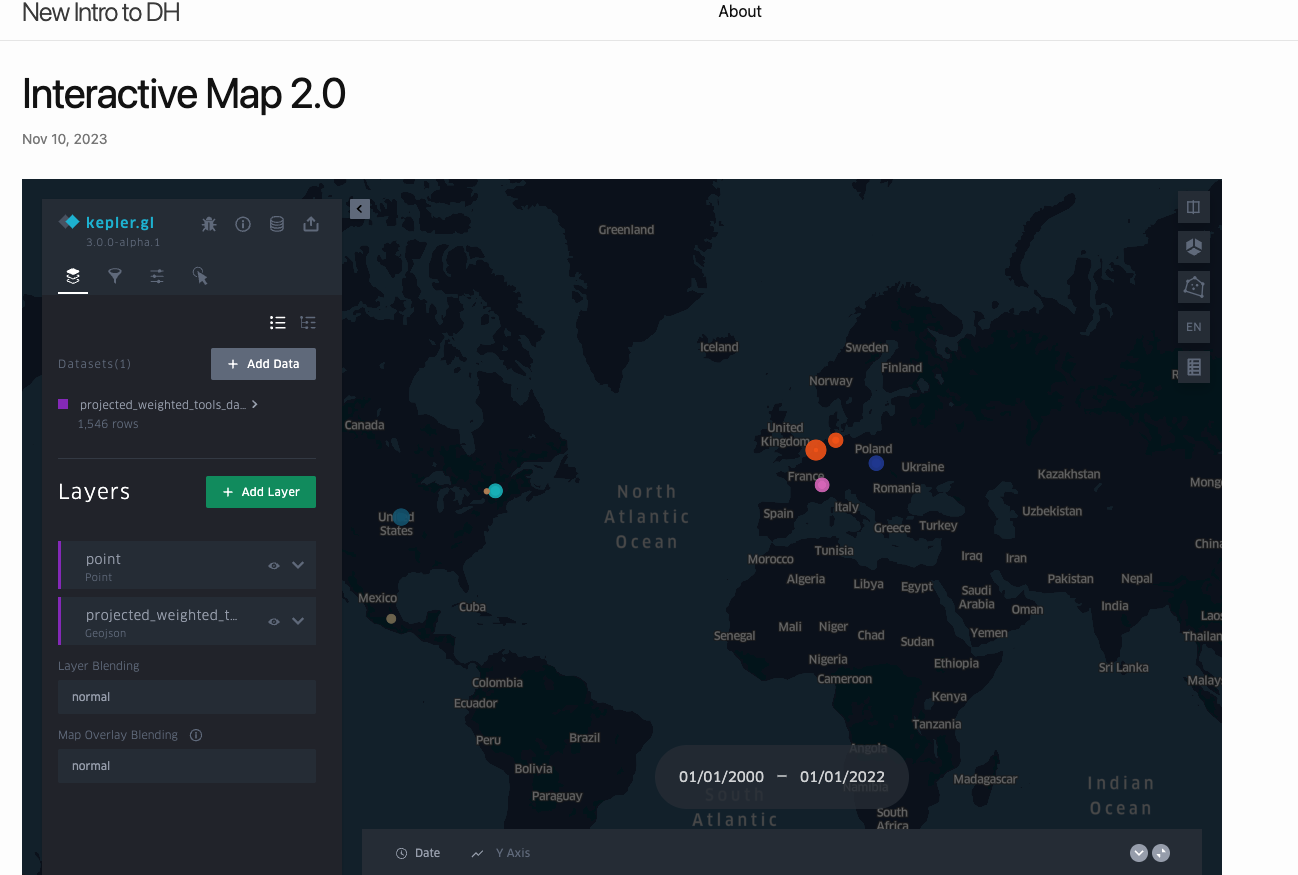
Interactive Map 2.0
In our assignment last week, we created an HTML version of our Kepler.gl map and explored in our browser. However, we did not discuss how the map was embedded into this course website.
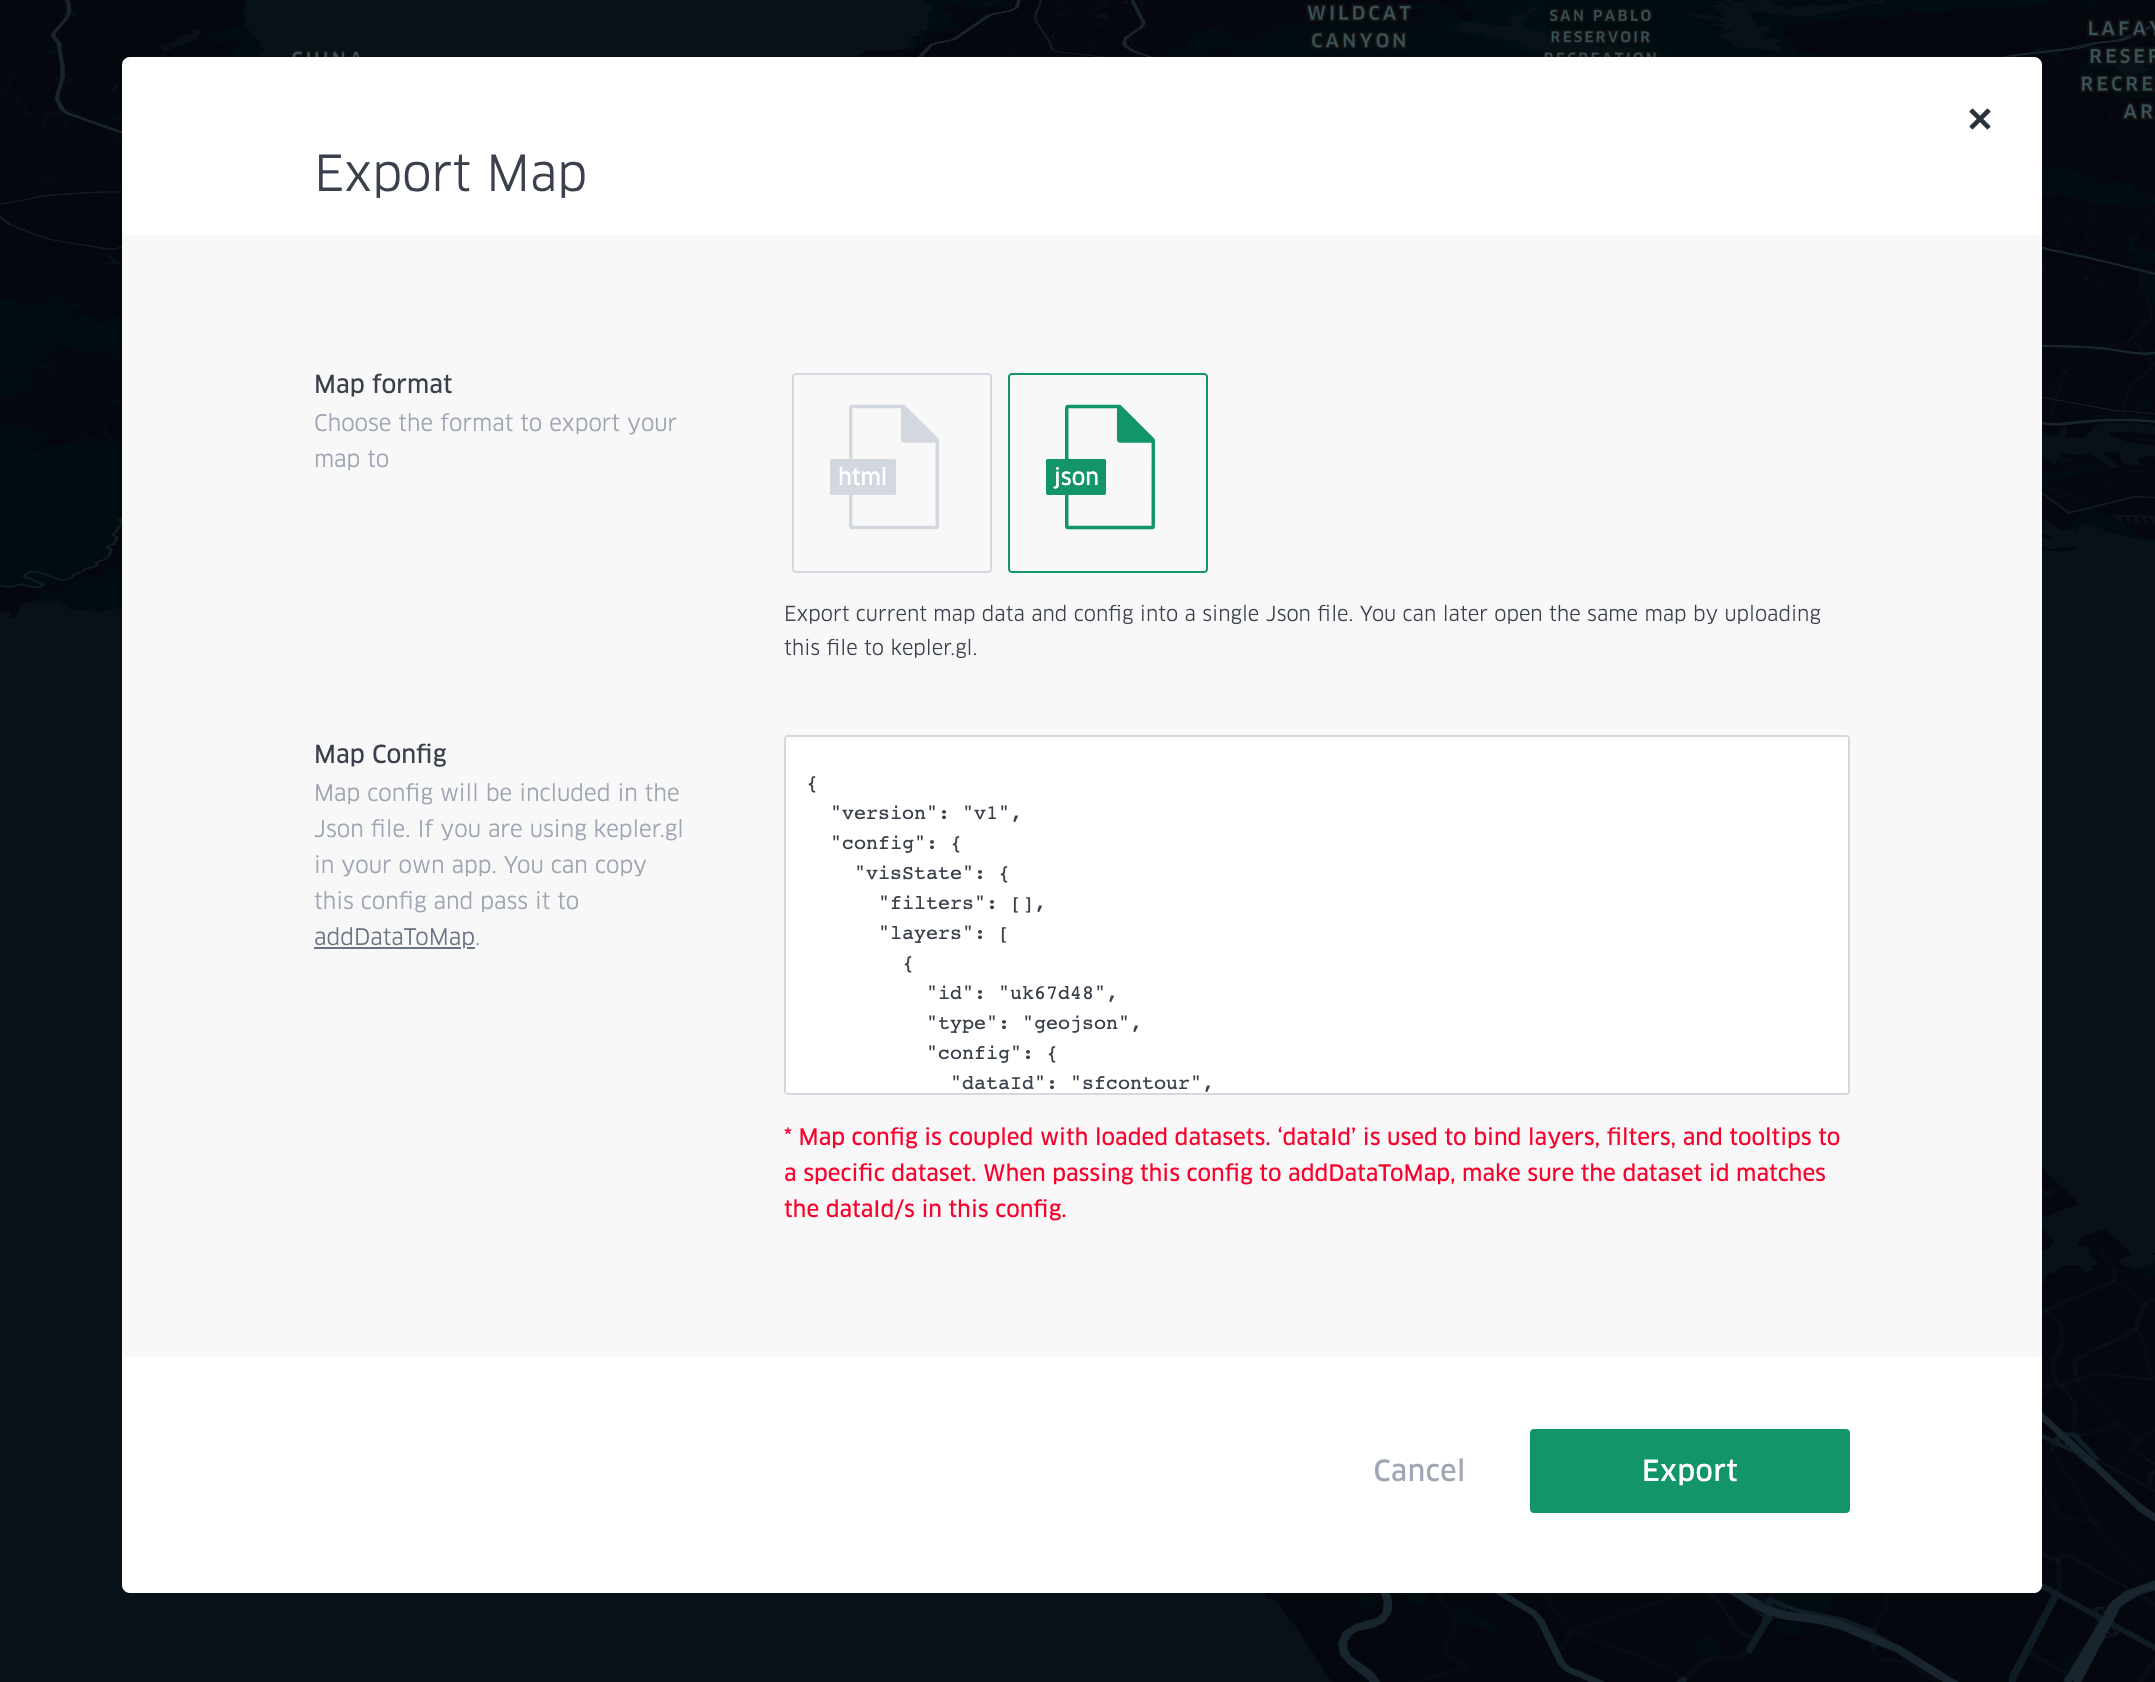
Initially, instead of downloading an HTML version of the map, I downloaded the JSON file, an option you can see here:
Subsequently, I uploaded it to something called a GitHub gist. Gists are a way to share individual code snippets and files with others, rather than entire projects. Somewhat confusingly, though GitHub gists are part of GitHub, they are not part of a GitHub repository. You can read more about gist here.
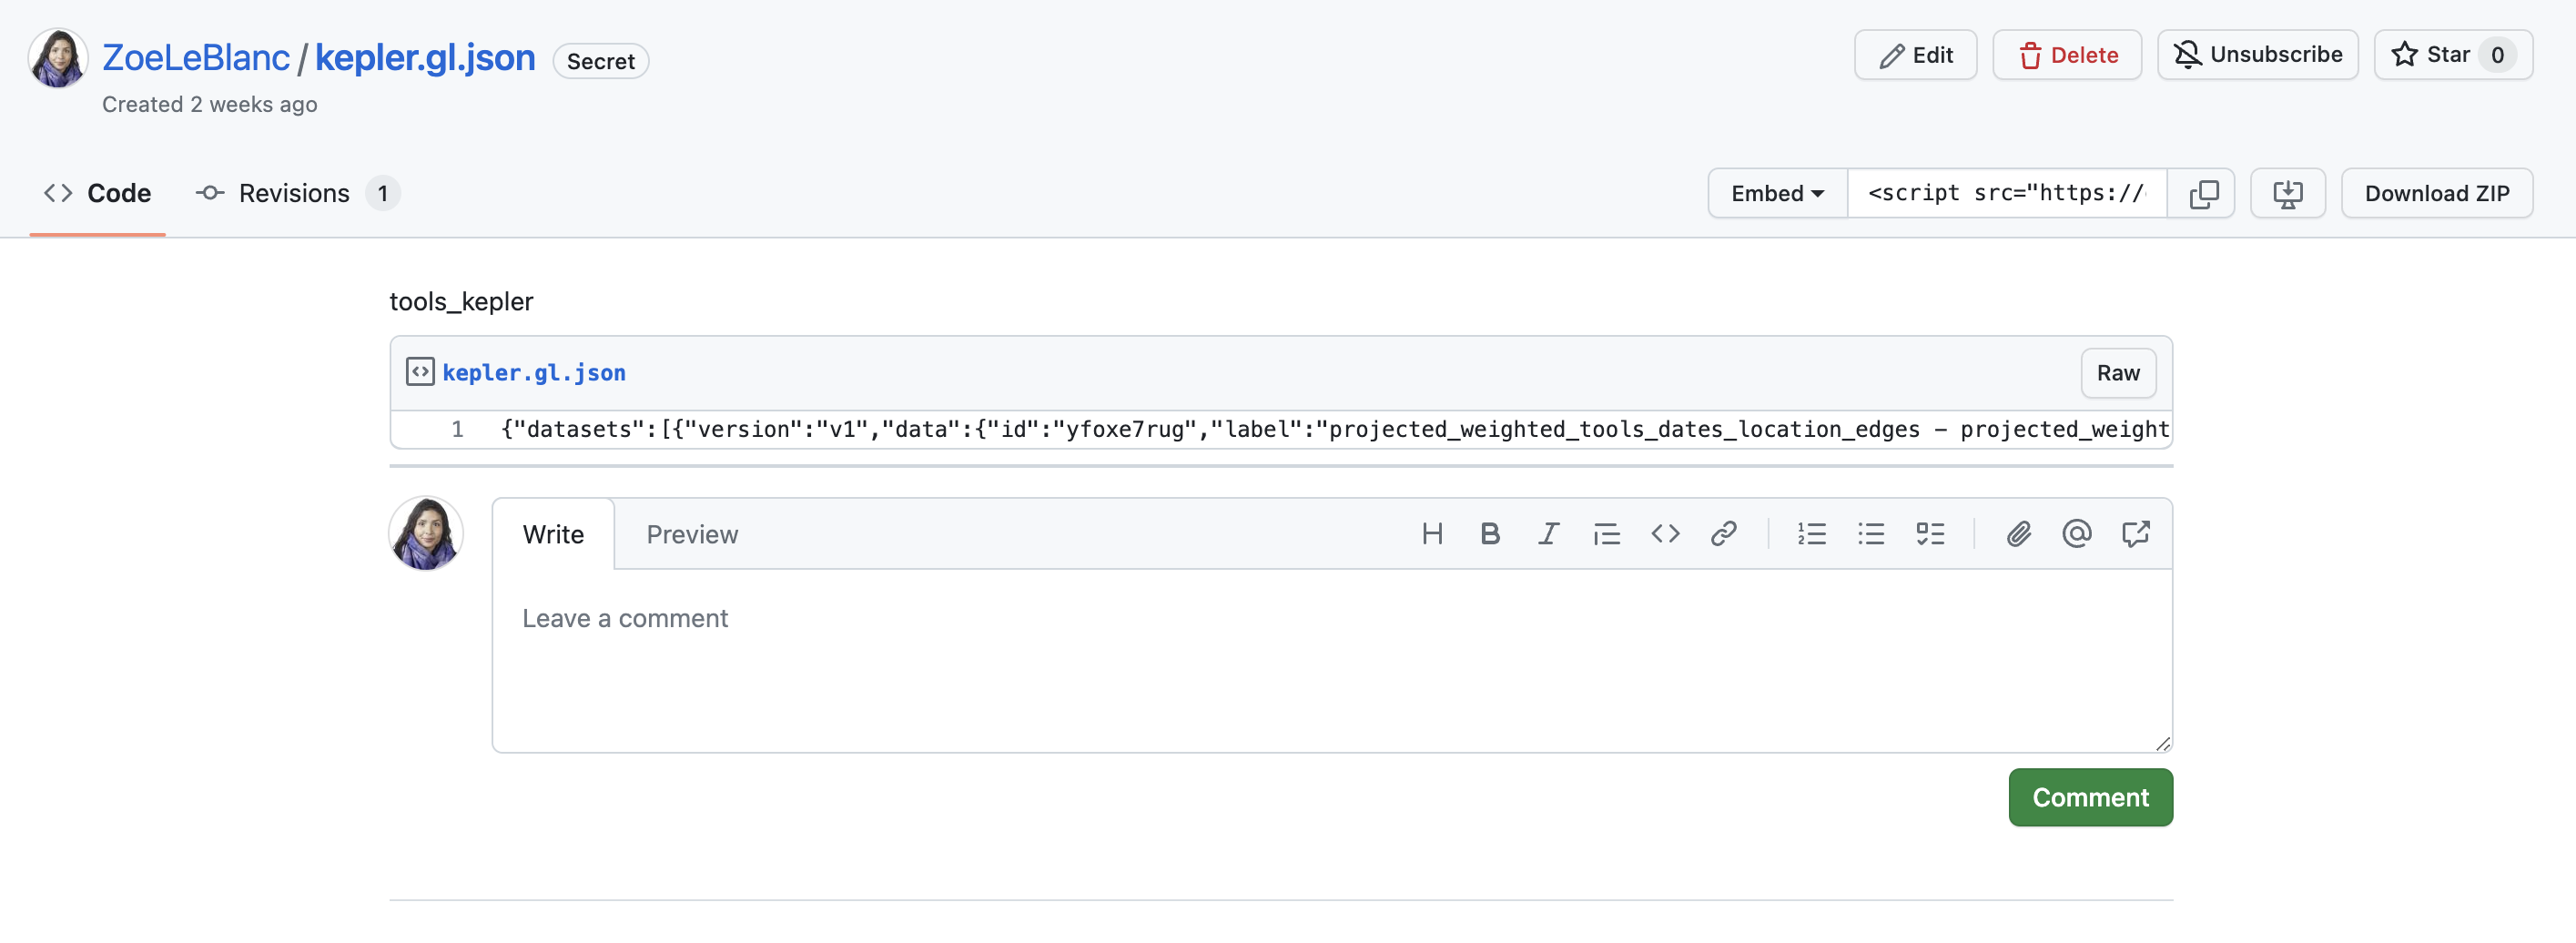
This is what my gist looks like, and you’ll notice I created a secret one. That’s because this code contains my Mapbox token, so I don’t want to share that publicly, as others might use it and either exhaust all my free map loads or, worse, lead to MapBox charging me for excessive usage.
So, taking my downloaded JSON file, I simply pasted it into my gist and saved it (again as a secret gist).
Then, I simply copied the link to the gist (in this case https://gist.githubusercontent.com/ZoeLeBlanc/32daed91a4eb0038640891b95e78029c/raw/580a8252b3757387e0fc5ae309e88a3c921f9c06/kepler.gl.json) and pasted it into the following code:
<figure>

  <iframe src="https://kepler.gl/#/demo?mapUrl=https://gist.githubusercontent.com/ZoeLeBlanc/32daed91a4eb0038640891b95e78029c/raw/580a8252b3757387e0fc5ae309e88a3c921f9c06/kepler.gl.json" style="border:0px #ffffff none;" name="myiFrame" scrolling="no" frameborder="1" marginheight="0px" marginwidth="0px" height="900px" width="1200px" allowfullscreen=""></iframe>

</figure>
You’ll notice in this HTML we are using some new elements (figure and iframe) along with attributes we’ve seen before (like style) and several new ones (src, name, scrolling, frameborder, marginheight, marginwidth, height, width, allowfullscreen).
While this code is more complex, a high-level overview reveals that it uses the figure element to create a container for our map, and the iframe element to embed the map into our page. The src attribute specifies the map’s location for the browser, while the style attribute dictates the map’s display. The other attributes are used to determine the map’s size.
To replicate this approach, you could simply copy this code into our first_page.html file and observe the results when opening that page in a browser.
However, even though I can see it and you can view it via my Zoom screen, it is not currently visible on the internet. To achieve that, we need to explore how the web works.
What is the Web and How does it Work?
We all use the web constantly, but what exactly is it?
Turning to our reliable source of information, Wikipedia, we find the following definition:
From Wikipedia: “The World Wide Web (WWW), commonly known as the Web, is an information system where documents and other web resources are identified by Uniform Resource Locators (URLs, such as https://www.example.com/), which may be interlinked by hypertext, and are accessible over the Internet.[1][2] The resources of the WWW are transferred via the Hypertext Transfer Protocol (HTTP) and may be accessed by users by a software application called a web browser and are published by a software application called a web server.”
While this is technically a definition, there’s a lot to unpack here.
What are Uniform Resource Locators (or URL)?

This diagram is from the Mozilla Web Docs, which provide a great overview of the topic https://developer.mozilla.org/en-US/docs/Learn/Common_questions/Web_mechanics/What_is_a_URL. You’ve already encountered URLs when we created an a tag in our HTML page.
<a href="https://www.google.com/">Google</a>
This is a type of Hyperlink or Link that allows us to link to other webpages. In our case, we created something called an external link because we linked to a webpage that is not part of our website. But you can also create internal links that link to other pages on your website, or anchors that link to specific parts of a webpage (this is how the sidebar to navigate this page functions). You can read more about hyperlinks here https://developer.mozilla.org/en-US/docs/Learn/Common_questions/Web_mechanics/What_are_hyperlinks.
But URLs are more than just links; they are the way we access webpages. Mozilla describes URLs as akin to postal addresses, an analogy I find helpful. Just as you need an address to send a letter, you need a URL to send a request to a webpage. Before delving into the anatomy of URLs, understanding domain names and the web’s functionality is beneficial.
While we often talk about the cloud, the concept of the web was originally based on the idea of a web of interconnected computers.
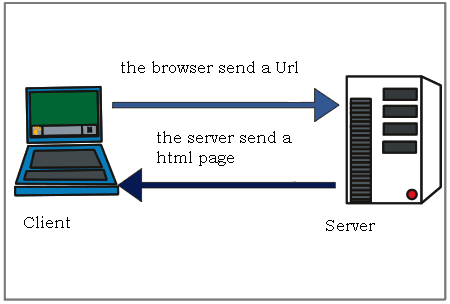
While this is a simplified explanation, essentially each computer operates as both a client and a server. A client is a computer that requests data from a server, and a server is a computer that provides data to a client in response.
Although our current internet is vastly more complex, this core idea of a client requesting data and a server hosting and sending data remains central to how the web functions. For those interested in a more detailed history of the internet, I highly recommend this timeline from the Computer History Museum, covering developments from the 1960s to the 1990s https://www.computerhistory.org/internethistory/ and also happy to recommend additional readings.
As we discussed last week, much of the data sent from servers to clients consists of HTML documents, but it can also include images, videos, audio, or virtually any type of data.
So, besides understanding that we have clients and servers, the other core concept is understanding how these computers communicate with each other, using something called the Hypertext Transfer Protocol (HTTP).
What is HTTP?
You’ll notice that almost every URL starts with http:// or https://. This indicates the the protocol used by the client and server use to communicate with each other. This standard was developed in the early days of the web, and allows for the client and server to understand each other.
I particularly like Julia Evans’ Zine on HTTP for explaining this concept:

This might seem technical, but the core idea is that when we enter a URL for a webpage (like google.com) into a web browser (like Chrome), we’re actually sending an HTTP request to a server that hosts the HTML files and data. If the server validates our request (with a 200 OK status), it grants access to the webpage.
There’s a number of different types of status codes, that you can see here:

But the most important are either 200 which means the request was successful, or 404 which means the request was not successful.
So, if you’ve ever seen an error message when you go to a webpage saying the page doesn’t exist or 404 Not Found, that means that you received a 404 error, which is a type of status code you get back from an HTTP request when the server could not find the requested resource.
Now we can look more closely at the components of URL, through the Mozilla example here https://developer.mozilla.org/en-US/docs/Learn/Common_questions/Web_mechanics/What_is_a_URL#scheme.
So first we have the scheme or protocol, which tells the browser how to communicate with the server:

It’s important to note that websites, web browsers, and search engines are all software applications that utilize the HTTP protocol to communicate with web servers, but they differ in function:
- a website is a collection of web pages and related content that is identified by a common domain name and published on at least one web server, like our course website. A website might have internal and external links on it as well.
- a web browser is a software application that is used to access websites and view web pages, like Google Chrome or Firefox or Safari. So while you can open any HTML document in a web browser, you can also use a web browser to access websites that are hosted from other servers.
- a search engine is a web service like Google or DuckDuckGo that allows users to search for content on the web, usually accessed from a web browser. These search engines often crawl websites via URLs to index the content of the web.
So now that we have some terminology, we can look at some of the rest of the URL.
What is a Domain Name?
Next we have the authority or domain name, which is the name of the server that hosts the website:

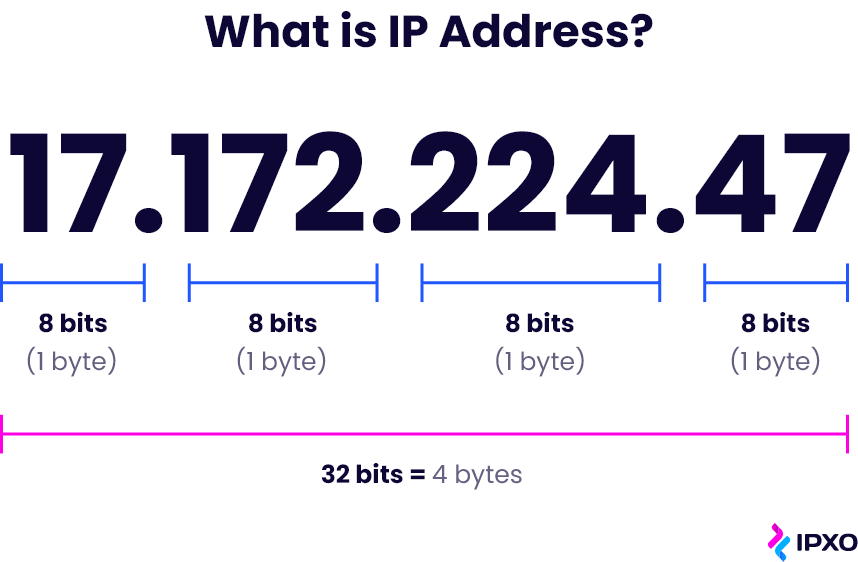
Originally, when you used the internet you would access other websites using something called an IP address, which is a series of numbers that identifies a particular computer on the internet. You can see an example of an IP address here:
For example, I mentioned in class the 1995 thriller movie The Net starring Sandra Bullock as a systems analyst who “must use her computer skills to uncover the truth and clear her name.” In the movie, she searches using IP addresses which you can watch a clip of here: https://youtu.be/M1K-B8QVLyo?t=242.
IP Addresses are still used today, but they are not very human readable or user friendly (though we will be seeing some in action today), so instead, we use domain names. Domain names are part of the Domain Name System (DNS) which is often described as a “phone book” or “address book” that translates IP addresses of servers into easier to understand domains.
Here’s an example of a domain name:

In this explanation from Mozilla https://developer.mozilla.org/en-US/docs/Learn/Common_questions/Web_mechanics/What_is_a_domain_name, they outline that there are two general main components to a domain name:
- the top-level domain (TLD), which is the last part or suffix of the domain name, like
.comor.orgor.edu. These are registered and managed by a central organization called ICANN (Internet Corporation for Assigned Names and Numbers). As you can imagine, there’s a long history and fraught politics around TLDs, since they are often tied to nation states (for example,.ukor.ca). Noteably, while there is.usfor the United States, most US websites use.comor.govif they are government-related. If you’re curious to learn more I would recommend this blog post on dead-tlds https://astrid.tech/2022/04/05/1/dead-tlds/ and checking out the rich literature on Internet Governance with books like Milton Mueller’s Networks and States or Laura DeNardis’ The Global War for Internet Governance. - the other part of a domain name is the second-level domain (SLD), which is the part of the domain name that is to the left of the TLD, like
mozillainmozilla.org. These are managed by domain name registrars, like GoDaddy, and are registered by individuals or organizations. One key thing to understand is that you can purchase a domain name through registrars but not in perpetuity. This leads to not only needing to renew your domain names, but also to the rise of domain name speculation, where people purchase domain names in the hopes of selling them for a profit. You can read more about this in this fascinating article by Ingrid Burrington on visting a Domain-Names Conference https://www.theatlantic.com/technology/archive/2017/02/domain-names-dot-horse/516438/.
So in the case of the mozilla example, we have a subdomain developer and a second-level domain mozilla and a top-level domain org.
Another example is this course website, which is available at the subdomain of my website zoeleblanc.com, which finally brings us to our core part of today’s lessons: static sites.
Static Sites
So now that we understand the basics of how the web works, we can start to explore how we make websites. As you’ve started to read about, something called static sites are an incredibly popular approach to making websites (though I want to emphasize it is one of many options).
One of the things we have yet to discuss much is something called hosting. That’s essentially how servers (aka computers) make their data available to clients. Most websites have a database that stores the data, and then a server that hosts the website. However, static sites are different because they don’t have a database, and instead are just a collection of files that are hosted on a server.
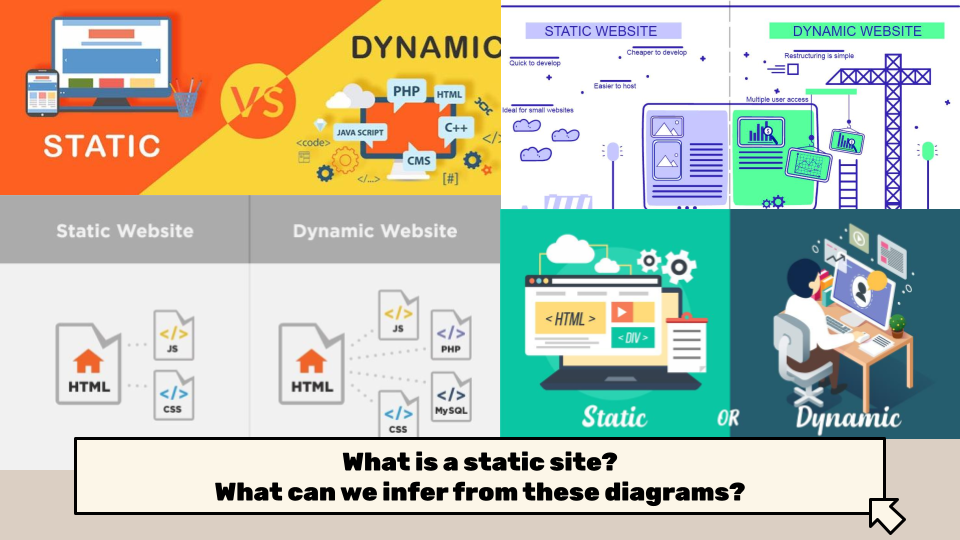
From these infographics, we can see some differences between dynamic and static, but to be honest this distinction is a bit more blurry than it might seem. For example, static sites still need to be hosted on a server, and they can still have dynamic elements (like a search bar or a comment section). But the core difference is that static sites don’t have a database, so you never need to have login credentials to access the site.

Part of why static sites are so popular is that they are safer to host (without a database you can’t get hacked for example), are often cheaper to host (since they are just files and not complex databases), and can be easier to load over the web (though that depends on the size of the files). But they are not always the answer for every DH project. As we have read, though static sites are technically minimal computing, they often require lots of labor to build and maintain them.
The core thing to know is that static sites are not the only way to host websites, and that there are many other options, including dynamic sites, which are often built with something called a content management system (CMS), using services like Wordpress or Squarespace. Ultimately, the choice of how to build a website should always be informed by the principles of minimal computing, but that does not always mean a static site is the right answer.
Static Site Generators
Now that we understand that Static Sites are a type of website, we can explore how to make them. To make a static site, we need to use something called a static site generator. Fundamentally, a static site generator takes some form of plain text file (like Markdown) and transforms it into html files. These generator libraries will also let you style your website using a combination of modular HTML files, Style Sheets, and Javascript scripts.
A google search for static site generators returns millions of medium and quora posts debating which static site is the best, but few of these actually delve into the mechanics. Almost every programming language has a static site generator, and each has its own strengths and weaknesses. One key thing to help inform your choice of which static site generator to use is ensuring that the library is actively supported. That means taking a look at the GitHub repository and seeing how frequently it is updated, how many open issues there are, and how many contributors there are.
Most static site generators rely on similar patterns for how to manipulate your data, even if the details differ. To get a static site generator on your computer, means the first step is to usually download a code library. These libraries contain the code to transform your data, and they are almost always available to see on Github if you want to delve deeper.
Creating a Jekyll Site
One of the most popular static site generators is Jekyll, which is built in the programming language Ruby. You can see the documentation for Jekyll here https://jekyllrb.com/docs/ and the GitHub repo here https://github.com/jekyll/jekyll.
I will be demo-ing how to create a Jekyll site using the command line, but you can also use a GUI (graphical user interface) like Github Desktop or GitKraken. Using both the Jekyll documentation https://jekyllrb.com/docs/ and my handy ChatGPT, I’ve created the initial commands for creating a Jekyll site.
The following commands should work once you have everything correctly installed:
- Install Jekyll and Bundler Gems:
Open your terminal and run the following command:
gem install jekyll bundler
- Create a New Jekyll Site:
Navigate to the directory where you want your site to be created and run. In my case, I want to create a site called new-intro-dh but you can name this project anything (it doesn’t need to be the same as your domain name either). Also remember to think thoughtfully about where you store your files (maybe in Documents or Desktop). You can always check where you are with the command pwd (or on Windows echo %cd%) and move around with the command cd (or on Windows cd..):
jekyll new new-intro-dh
- Change Directory:
Move into the directory of your new Jekyll site:
cd new-intro-dh
- Build the Site and Make it Available on a Local Server:
bundle exec jekyll serve
Some of these commands you’ve seen before, like cd, but the rest are new. You don’t really need to understand them but to sum it up:
- First, we install the necessary code libraries for our static site (you can see some of these files here in the GitHub repository https://github.com/jekyll/jekyll)
- Then, we use those libraries to make a new Jekyll site that is a directory of files and code (essentially the command
jekyll newis built into the Jekyll library) - Then, we move into that directory
- Finally, we use another command build the site and make it available on a local server
You might see some angry warning messages but you can ignore them as long as you see the following lines:
Server address: http://127.0.0.1:4000/
Server running... press ctrl-c to stop.
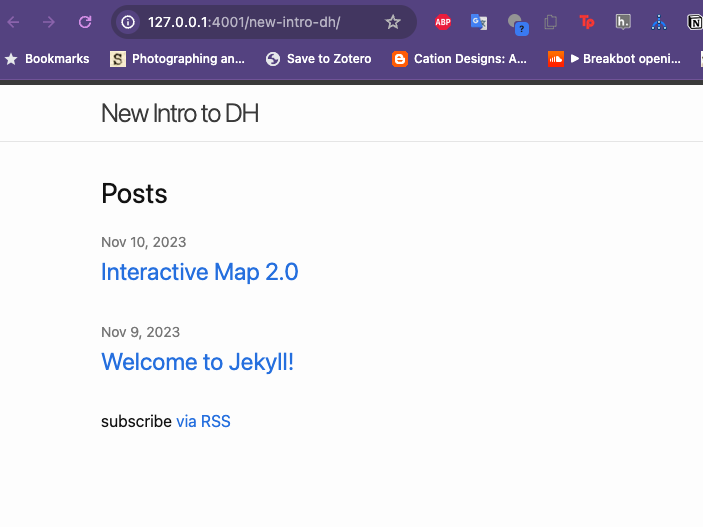
Those lines tell us that our computer is now acting as a server for our site and so if we click on http://127.0.0.1:4000/ or copy it into our web browser, we should see our new site in the browser, which should look like the following:
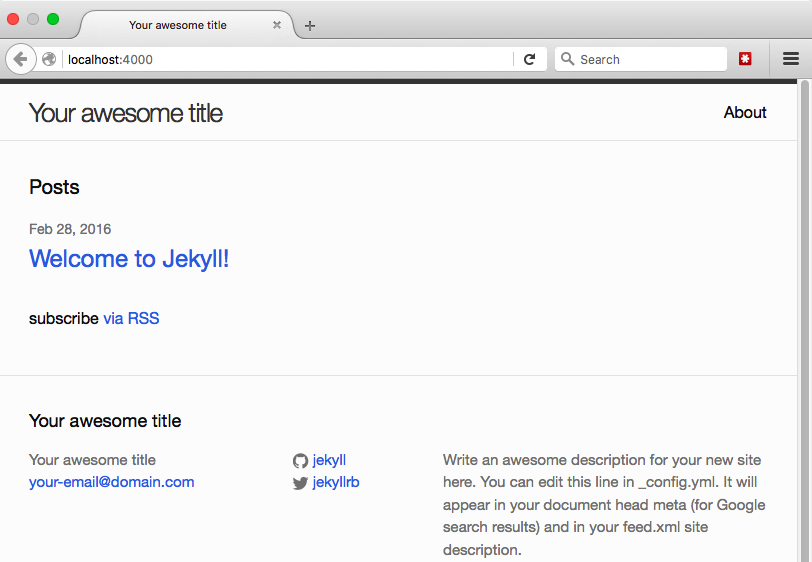
In many ways, this site is the exact same as the HTML files you all created, but there’s a few differences. First, if we had looked through our directory before doing the bundle exec jekyll serve command, we would have seen that there was no folder called _site and that while there were HTML files, there weren’t any of our About page or blog posts. That command essentially tells Jekyll to take those Markdown files and create HTML files from them, and then put those HTML files in the _site folder. Which is why this type of static site generator is so popular: it saves you the time of having to manually create HTML files.
We don’t have time today to full explore all the parts of this site, but I do want to highlight a few things:
_config.yml
Almost all static site generators have a configuration file that allows you to set some basic parameters for your site. In Jekyll, this is the _config.yml file. You can see that this file has a number of parameters, including the title of the site, the description, the url, and the baseurl. Here’s an example of the default Jekyll config:
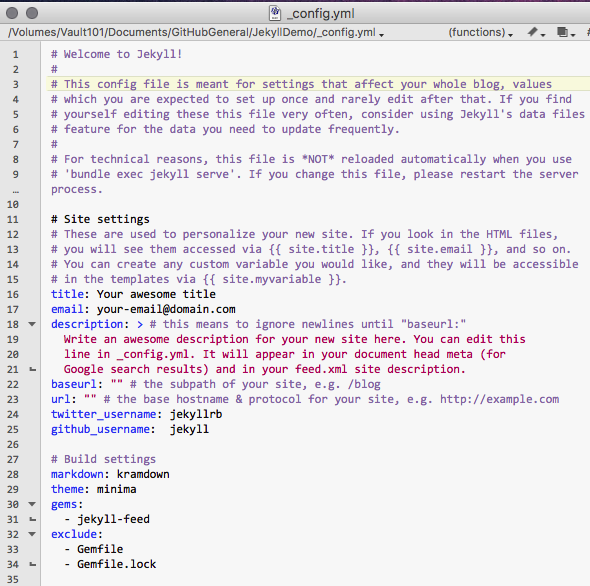
So, we could change the title and domain of our website through this file. Instead of changing the URL though, I want to change the baseurl, because I want to host this from my zoeleblanc.com domain as a subdomain.
title: New Intro to DH
baseurl: /new-intro-dh
Now if we regenerate our site, can see that our site is available at http://127.0.0.1:4001/new-intro-dh/ with out new title.
postsdirectory
The other main attraction of static sites is that they are excellent for blogging, because almost every static site option has a directory called posts (sometimes seen as _posts).
If we open up the example in our new site, we’ll see the following:
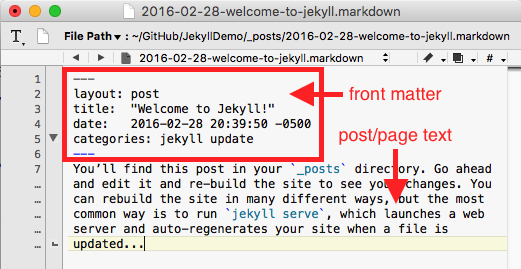
My main goal here is to show you how I can embed my Kepler map into this page, so I’m going to create a new file (using the touch command), make sure to name it similarly to the existing post example in the folder (so date followed by topic in the filename), and then fill in the rest of the metadata and add my code.
---
layout: post
title:  "Interactive Map 2.0"
date:   2023-11-10
categories: jekyll update
---

<figure>

  <iframe src="https://kepler.gl/#/demo?mapUrl=https://gist.githubusercontent.com/ZoeLeBlanc/32daed91a4eb0038640891b95e78029c/raw/580a8252b3757387e0fc5ae309e88a3c921f9c06/kepler.gl.json" style="border:0px #ffffff none;" name="myiFrame" scrolling="no" frameborder="1" marginheight="0px" marginwidth="0px" height="900px" width="1200px" allowfullscreen=""></iframe>

</figure>
Once completed and saved (always remember to save!), I should be able to reload the site in the browser and see the interactive map as a part of my new site.
Now the final step is to host this site on the internet.
Hosting a (Jekyll) Site with GitHub Pages
As we’ve discussed today, there are many options for hosting websites (Wordpress, Squarespace, etc.). That’s also true for Static Sites, with many DHers liking Reclaim Hosting for hosting their websites and purchasing domain names.
Today, we’re instead going to use GitHub Pages. GitHub Pages is a free service that allows you to host static sites on GitHub. You can read more about GitHub Pages here https://pages.github.com/.
To host a Jekyll site on GitHub Pages, we need to do a few things:
- Create a GitHub Repository (Somewhat Optional)
First, we need a GitHub repository for where we want to store our website files. You could use your existing repository for this course or create a new one.
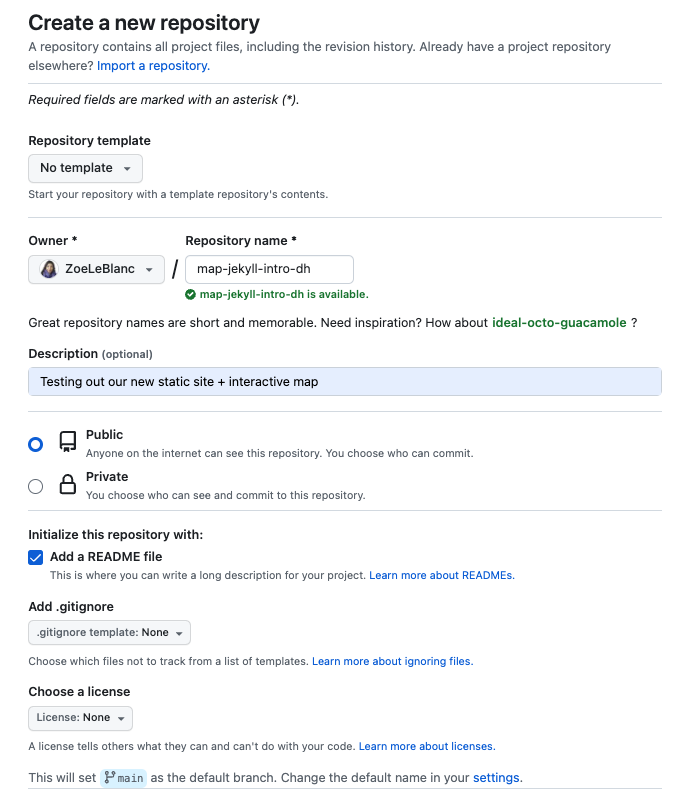
If you do create a new repository, be sure to make it public and add a README.md file.
- Update our Jekyll Gemfile
Before, we add our files we need to make a small change so that GitHub correctly renders our website (this is what went wrong with my example in class 😅).
If you open your Gemfile, you should see the following:
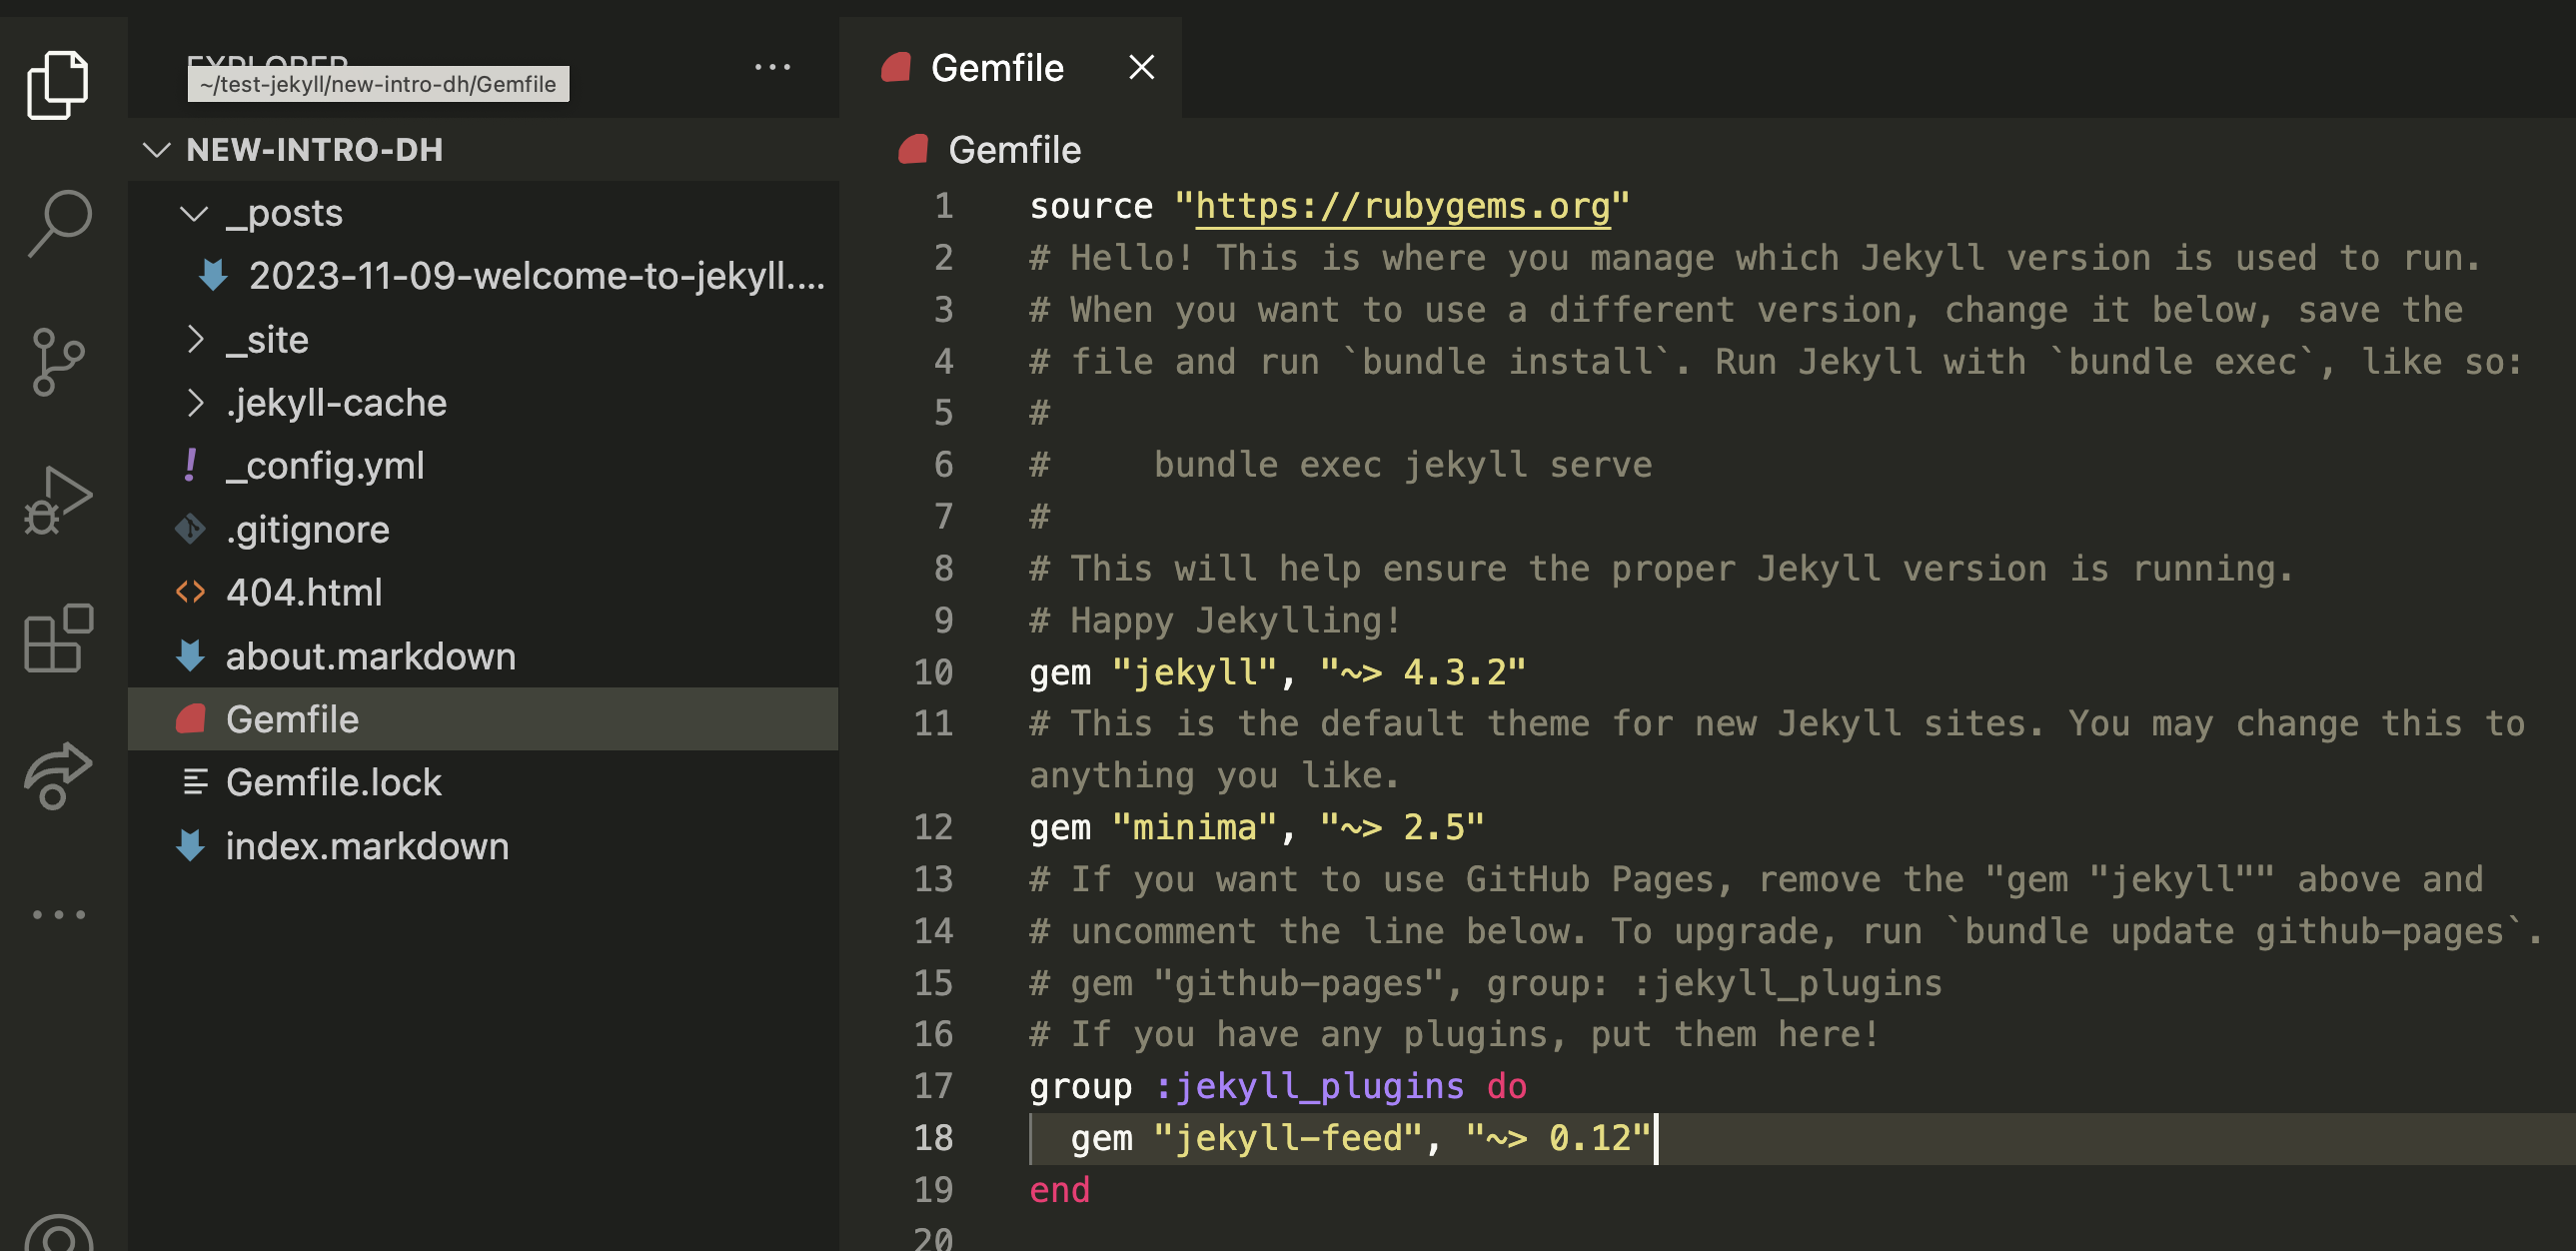
You’ll notice that’s there an automated message saying that we should add a line to our Gemfile to make sure that GitHub Pages correctly renders our site:
# If you want to use GitHub Pages, remove the "gem "jekyll"" above and
# uncomment the line below. To upgrade, run `bundle update github-pages`.
# gem "github-pages", group: :jekyll_plugins
# If you have any plugins, put them here!
So to follow those instructions we need to make sure there’s a # symbol before this line:
gem "jekyll", "~> 4.3.2"
Then we need to remove the # symbol from this line:
# gem "github-pages", group: :jekyll_plugins
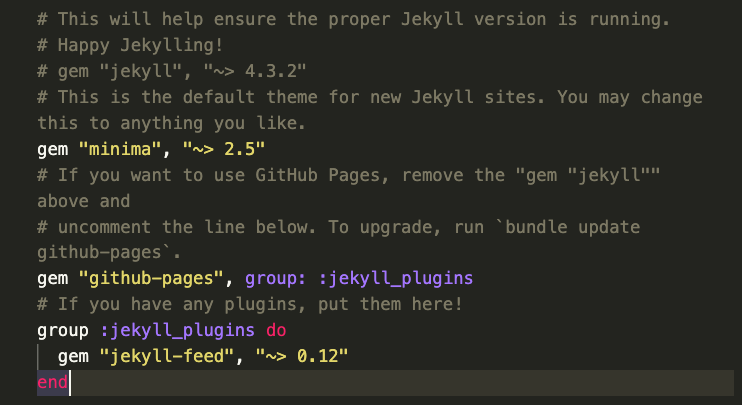
So the final result should look like the following:
Finally, we need to run the following command to update our Jekyll site:
bundle update github-pages
If you get an error with that command, I would recommend trying either bundle update or bundle install instead.
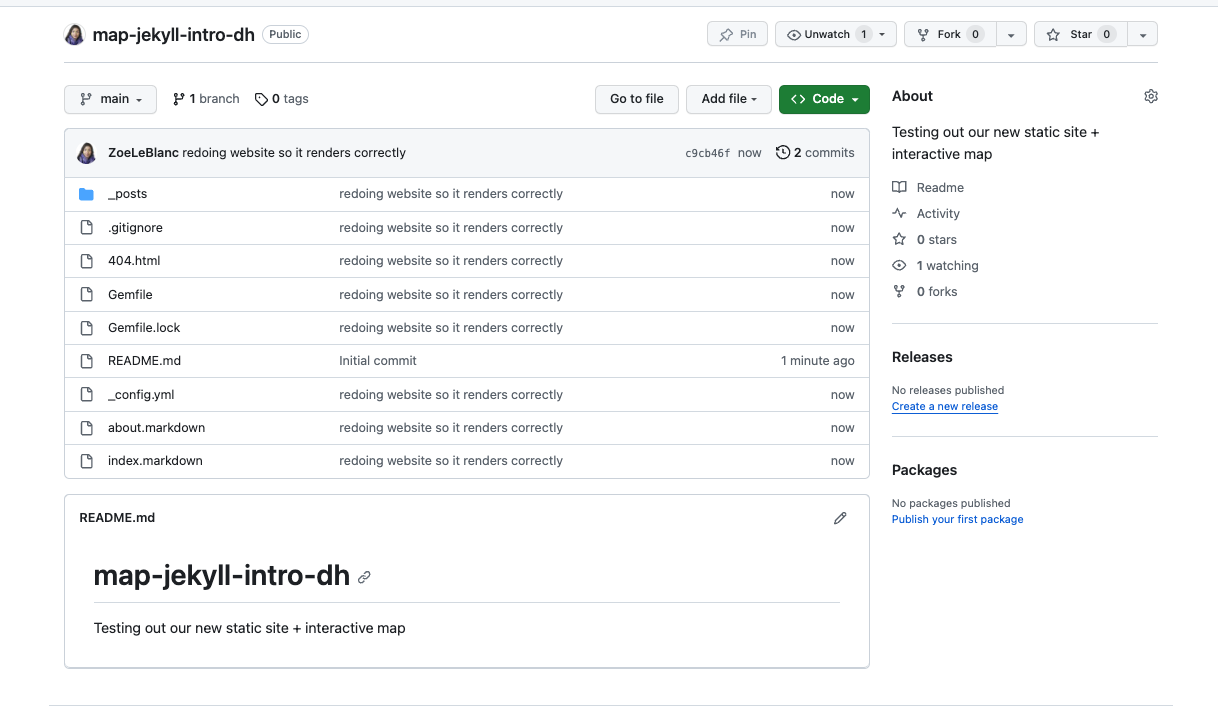
- Push/Add our Jekyll Site to GitHub
Once we have our GitHub repository and our updated Gemfile, we can now add our Jekyll site to GitHub. You can do this through the .dev interface or through using ChatGPT to generate the correct commands (or ask the instructor for assistance).
Regardless of how you get your files into GitHub, we want our final repository to look like the following:
- Configure GitHub Pages to publish our website
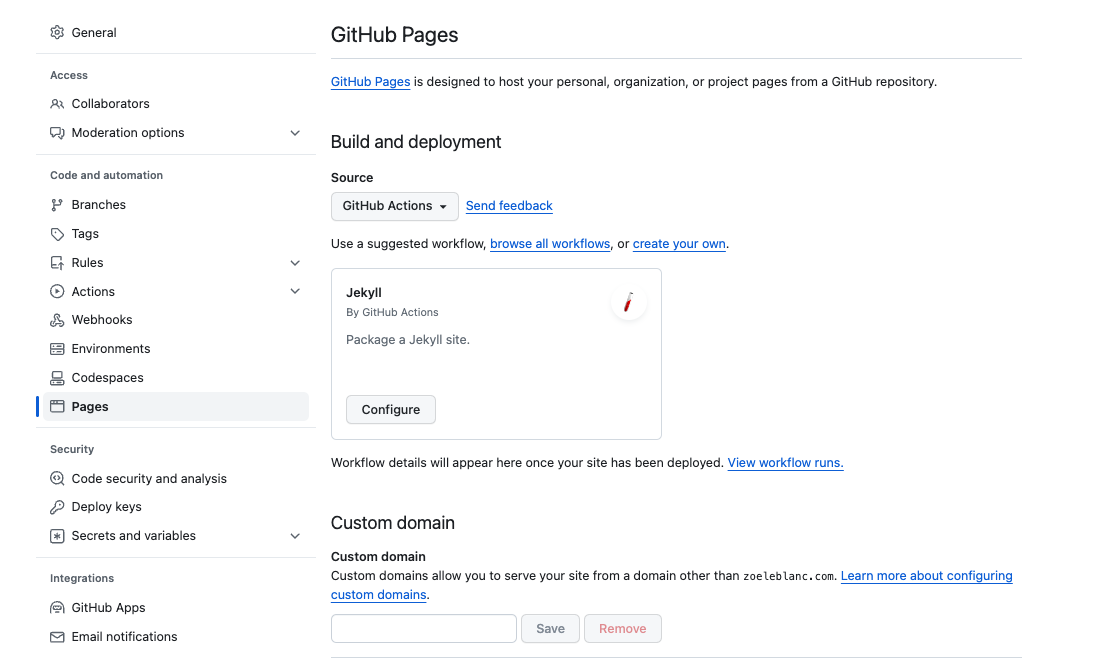
Once we have this all added, the final piece is to go into our settings and configure GitHub Pages to publish our website. You can do this by going to the Settings tab and then scrolling down to Pages:
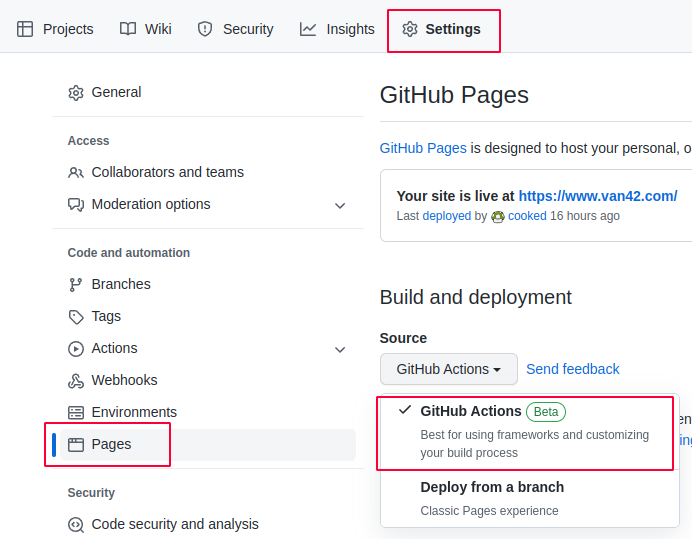
To make our site run, we need to select the GitHub Actions option under Build and deployment:
Selecting this option will open another page that looks a bit intimidating:

You don’t need to change anything on this page, but simply just press the green Commit changes button and then GitHub will start building your site. If you give a minute or two, when you go back to the Settings tab and scroll down to Pages you should see a green box saying your site is published and a link to your site.
If you instead get a message like this in actions:
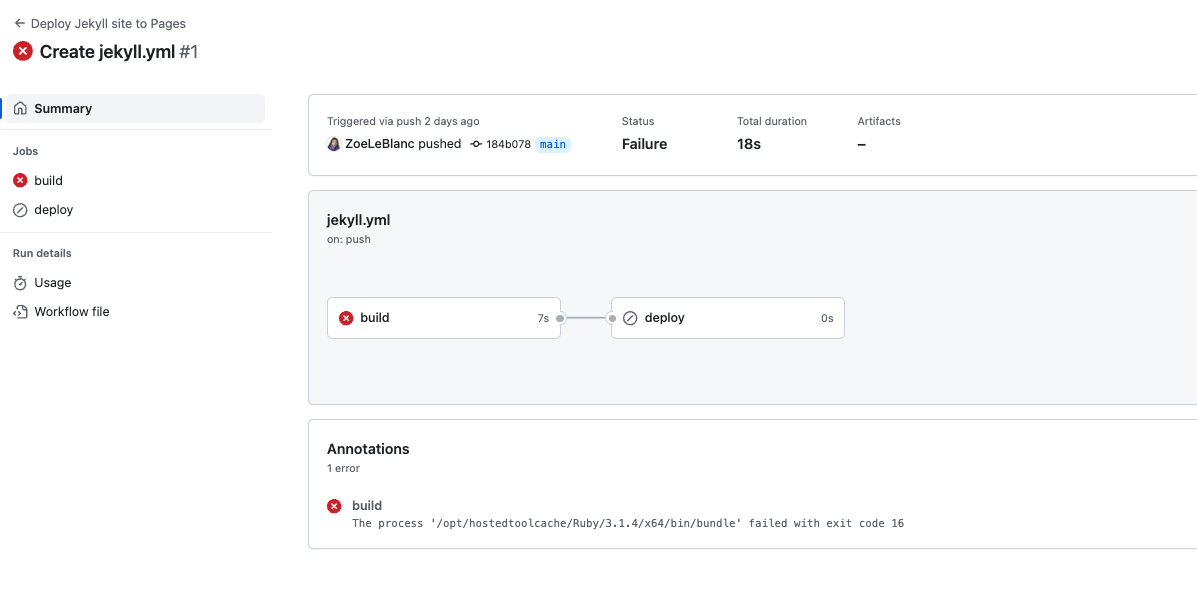
It means that GitHub failed to build your website. This error message is not super important to understand but to fix it you need to run the following line of code in your Terminal in the directory (aka folder) with your Jekyll site, which I learned from the following StackOverflow post (which is a very helpful forum for coding questions) https://stackoverflow.com/questions/72331753/ruby-and-rails-github-action-exit-code-16:
bundle lock --add-platform x86_64-linux
Then you need to commit and push your changes to GitHub (or use github.dev to replace the existing files). Once you do that, GitHub should start building your site correctly. If you get any other error message, please don’t hesitate to reach out to the instructor for help, and just remember that these types of issues though frustrating are not representative of your ability to do this work. In fact, an HCI professor wrote an excellent post about how this type of configuration errors can deter students (you can read a bit about that here https://www.kevinbrowne.ca/command-line-bullshittery-and-other-realities-of-computing/).
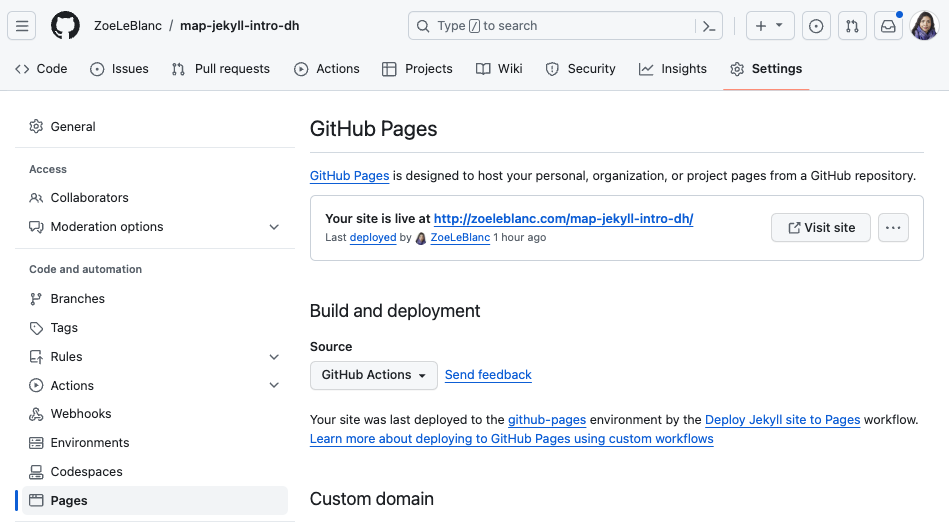
Now you can see all this code in my repository https://github.com/ZoeLeBlanc/map-jekyll-intro-dh and visit the website at http://zoeleblanc.com/map-jekyll-intro-dh/.
Now this entire example only works because I already have a domain name for my website (aka an address) but before you can have a subdomain, you need a domain. So let’s talk about how to get a domain name (for free!).
Creating a Custom Github.io Website
As a user on GitHub, you can create a custom website that is hosted on GitHub Pages. This is a great option for creating a personal website, or a website for a project. This website is hosted at the github.io domain name so you don’t have to pay for a domain name. However, to make this domain you need to create a repository with a specific name: your username. So for example, my GitHub username is ZoeLeBlanc so I need to create a repository called ZoeLeBlanc.github.io. However, to help demonstrate this functionality, I created a new a username called TestZoe, so my repository is called testzoe.github.io.
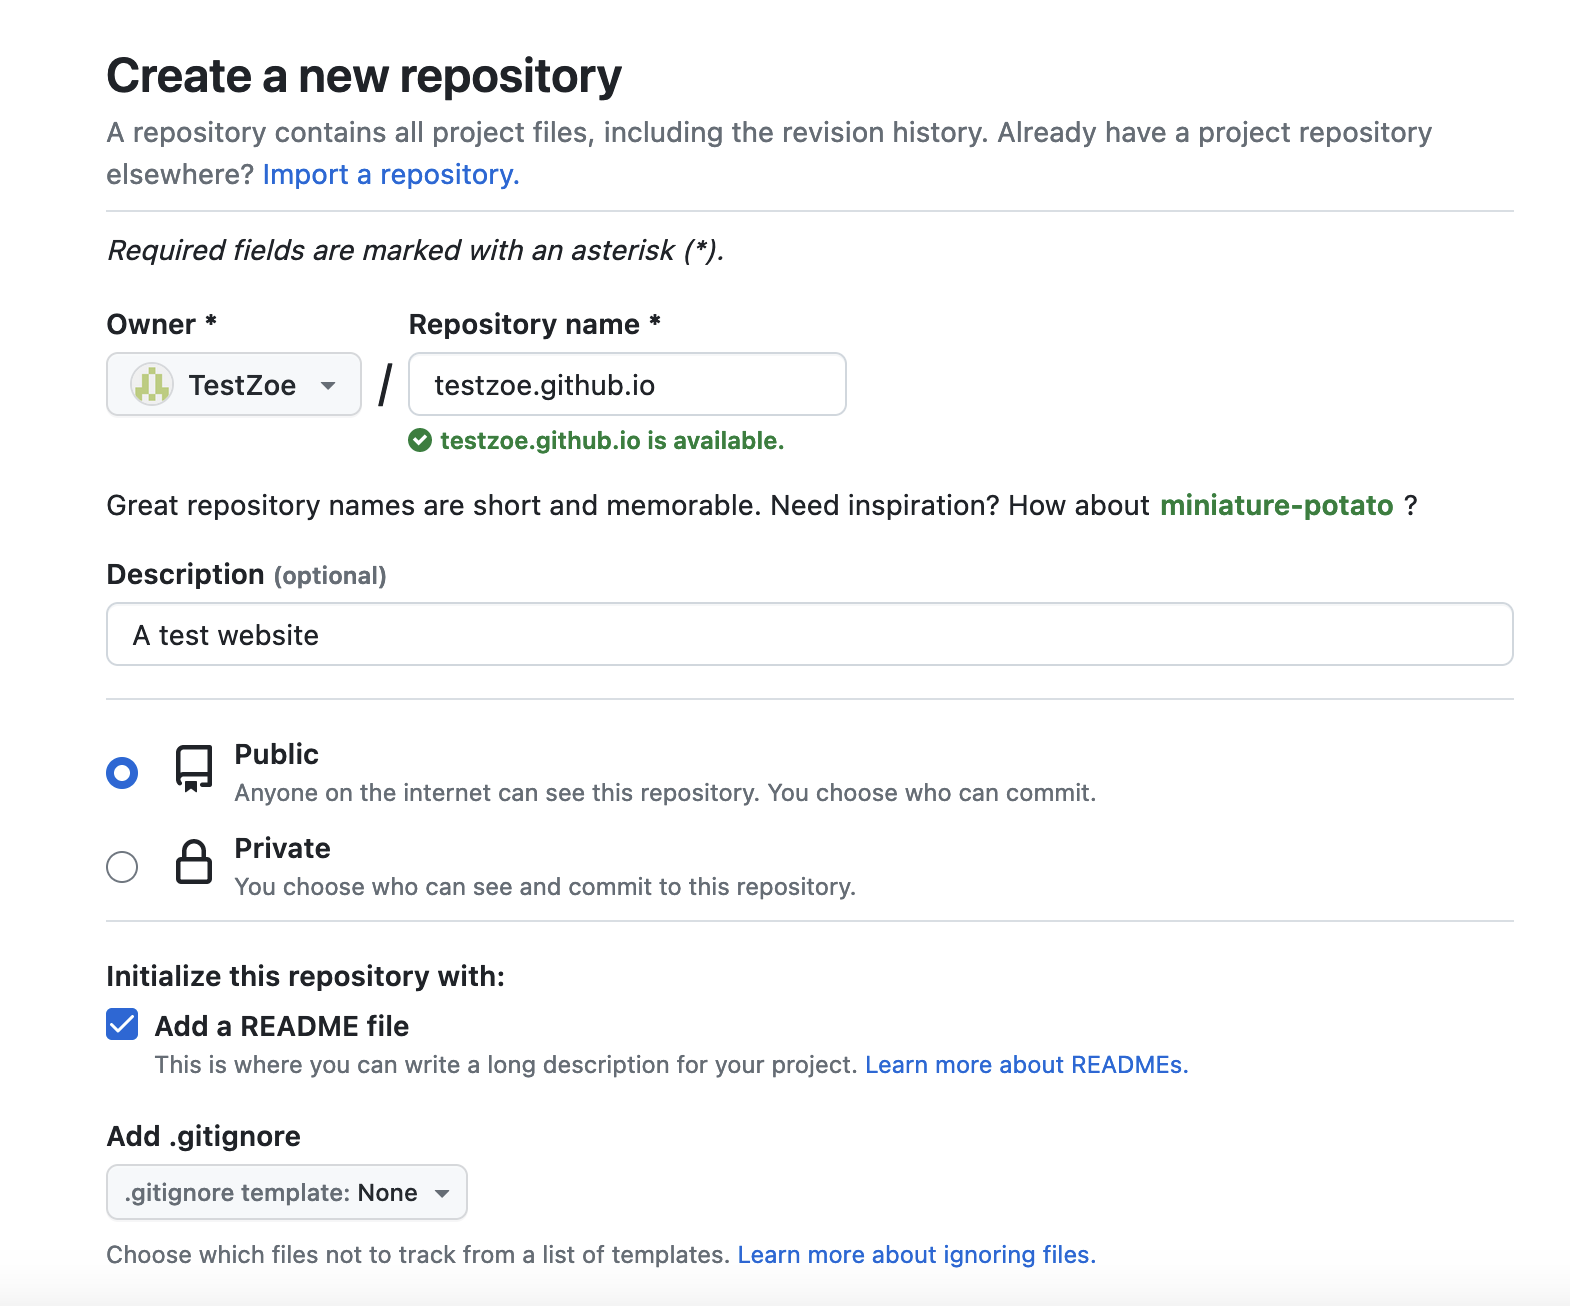
When you create your repository, you need to make sure it is Public and you can add a README.md (though that is optional).
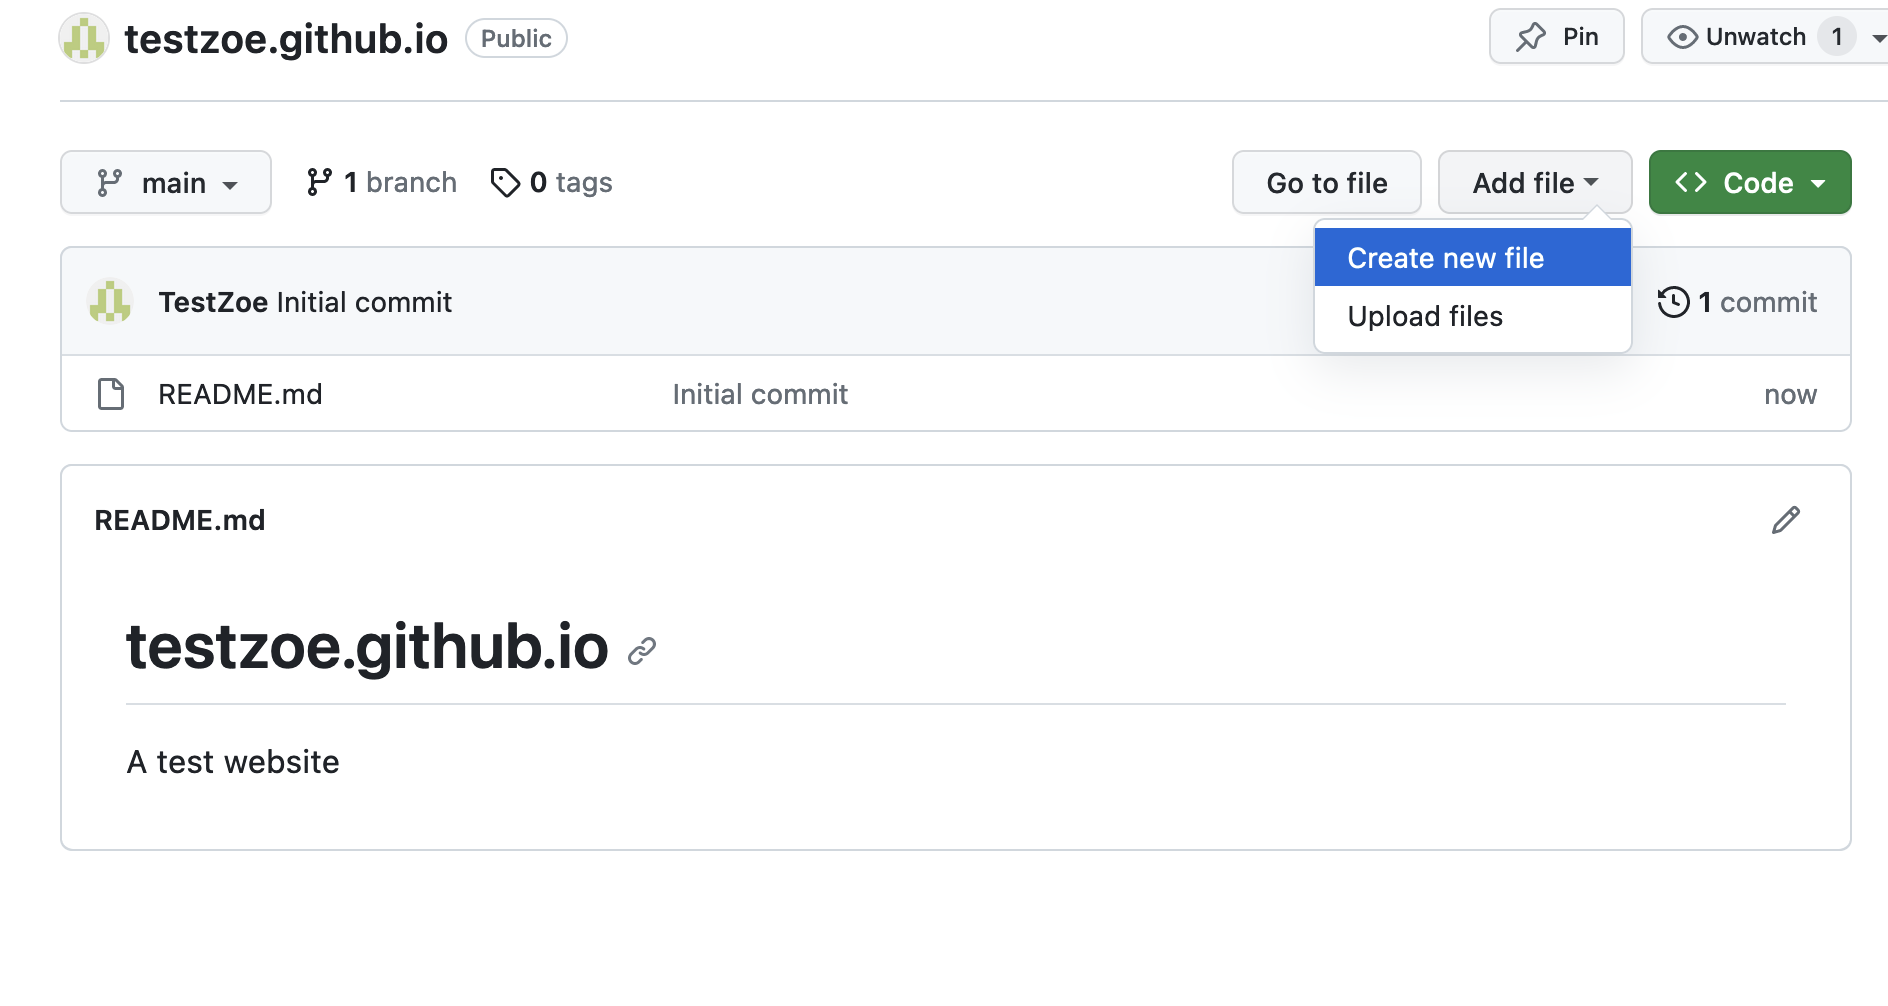
Once you have your repository, the next step is to add some web files. The most basic file you can add is an index.html file.
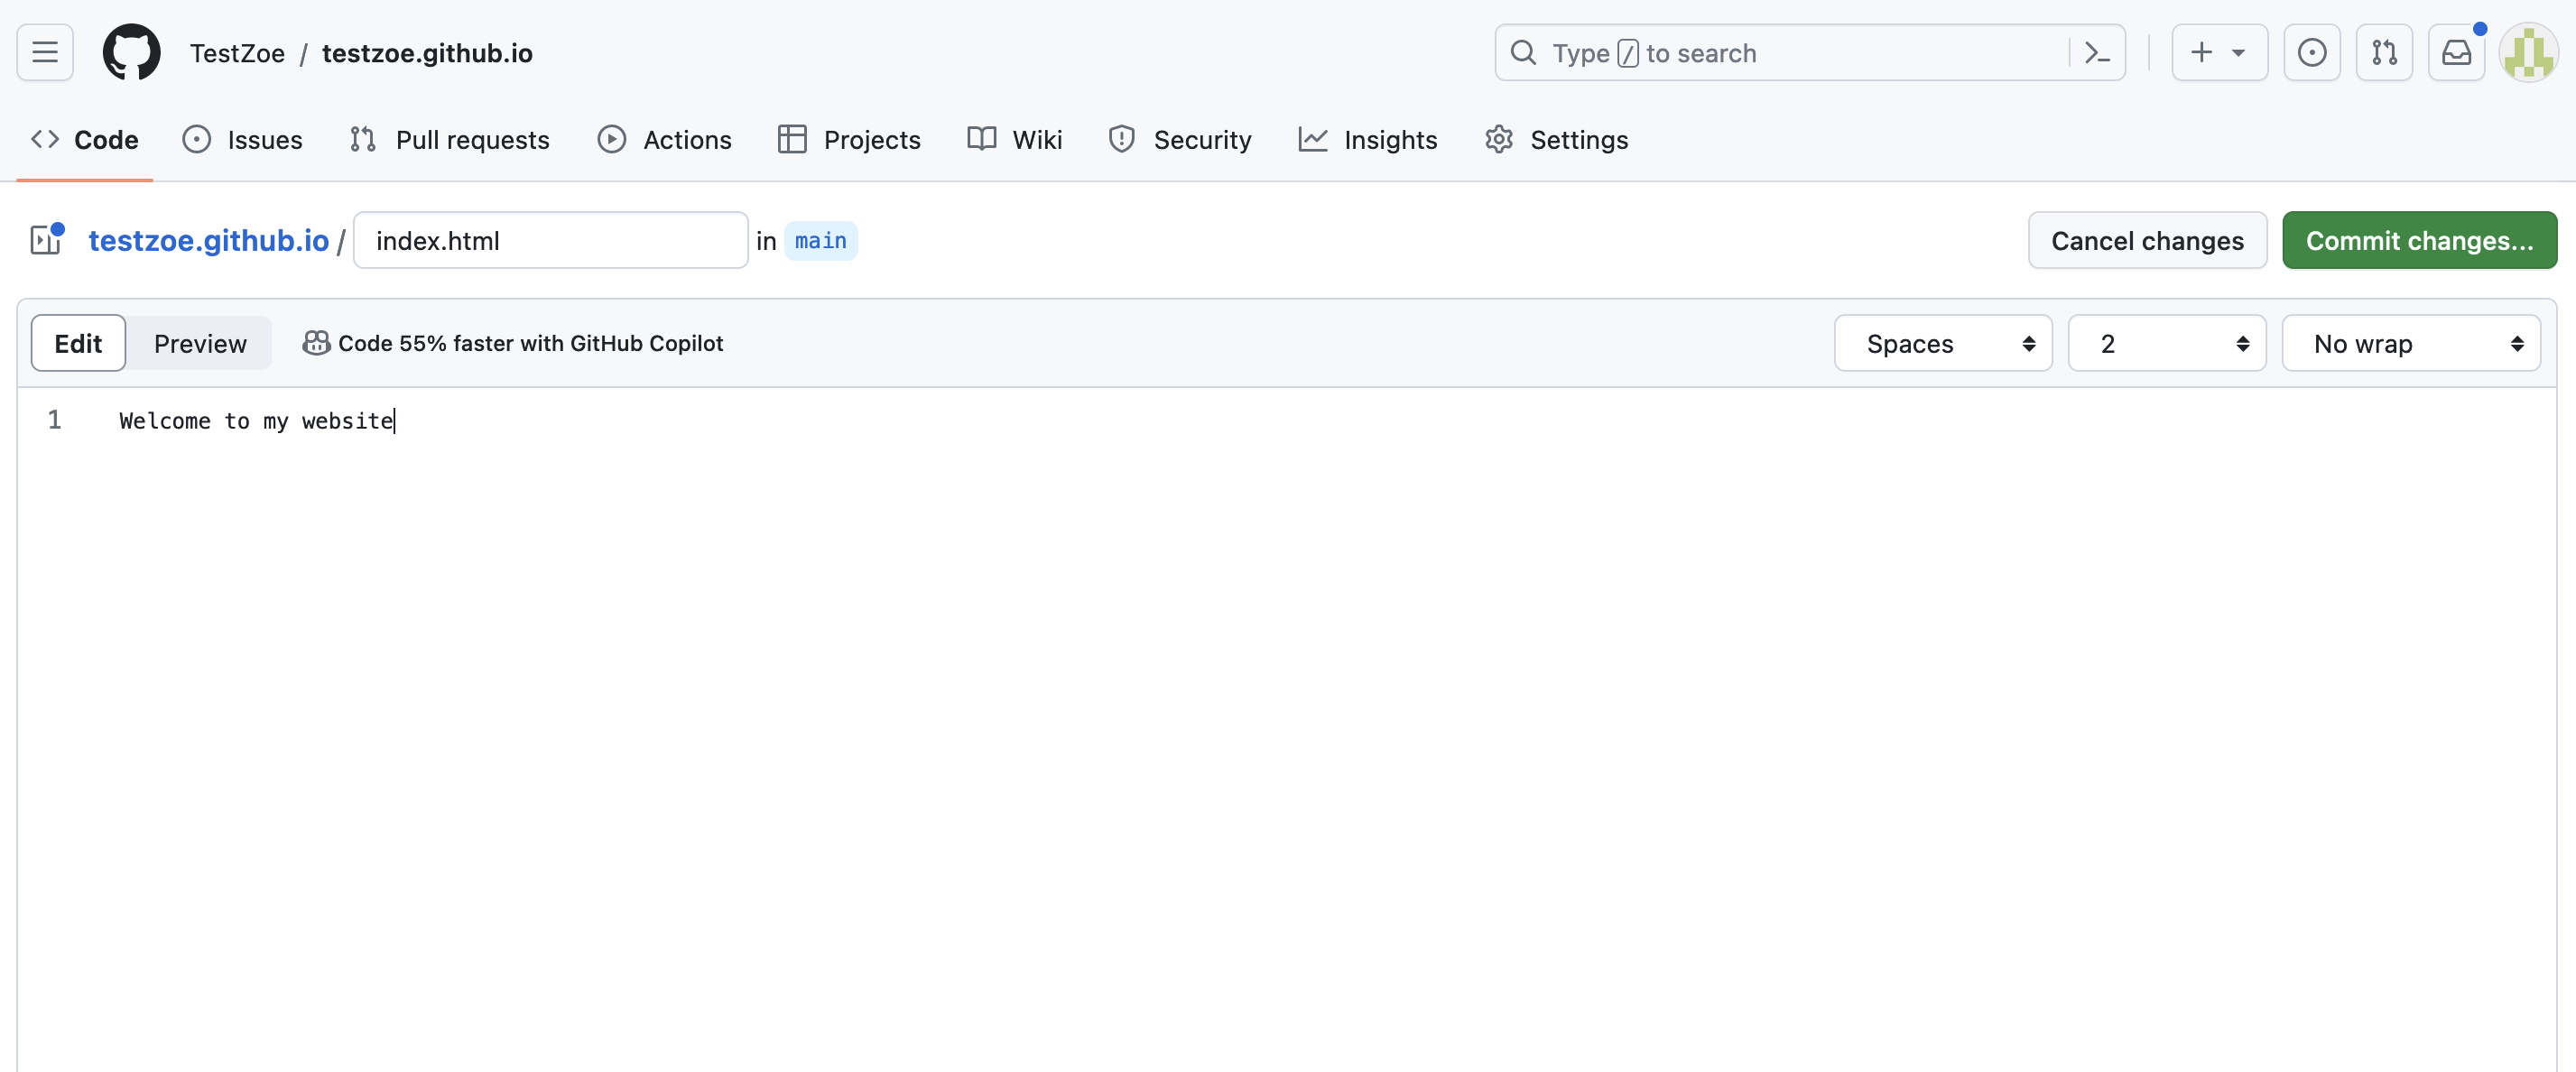
Once you’ve created your index.html file, you can either leave it blank or add some HTML code. Now the key thing is to remember to commit your HTML page. Remember committing is how we save things on GitHub. So you can either commit via the command line with your Terminal or via the GitHub website.
Now, GitHub should start automatically hosting your website at https://yourusername.github.io.
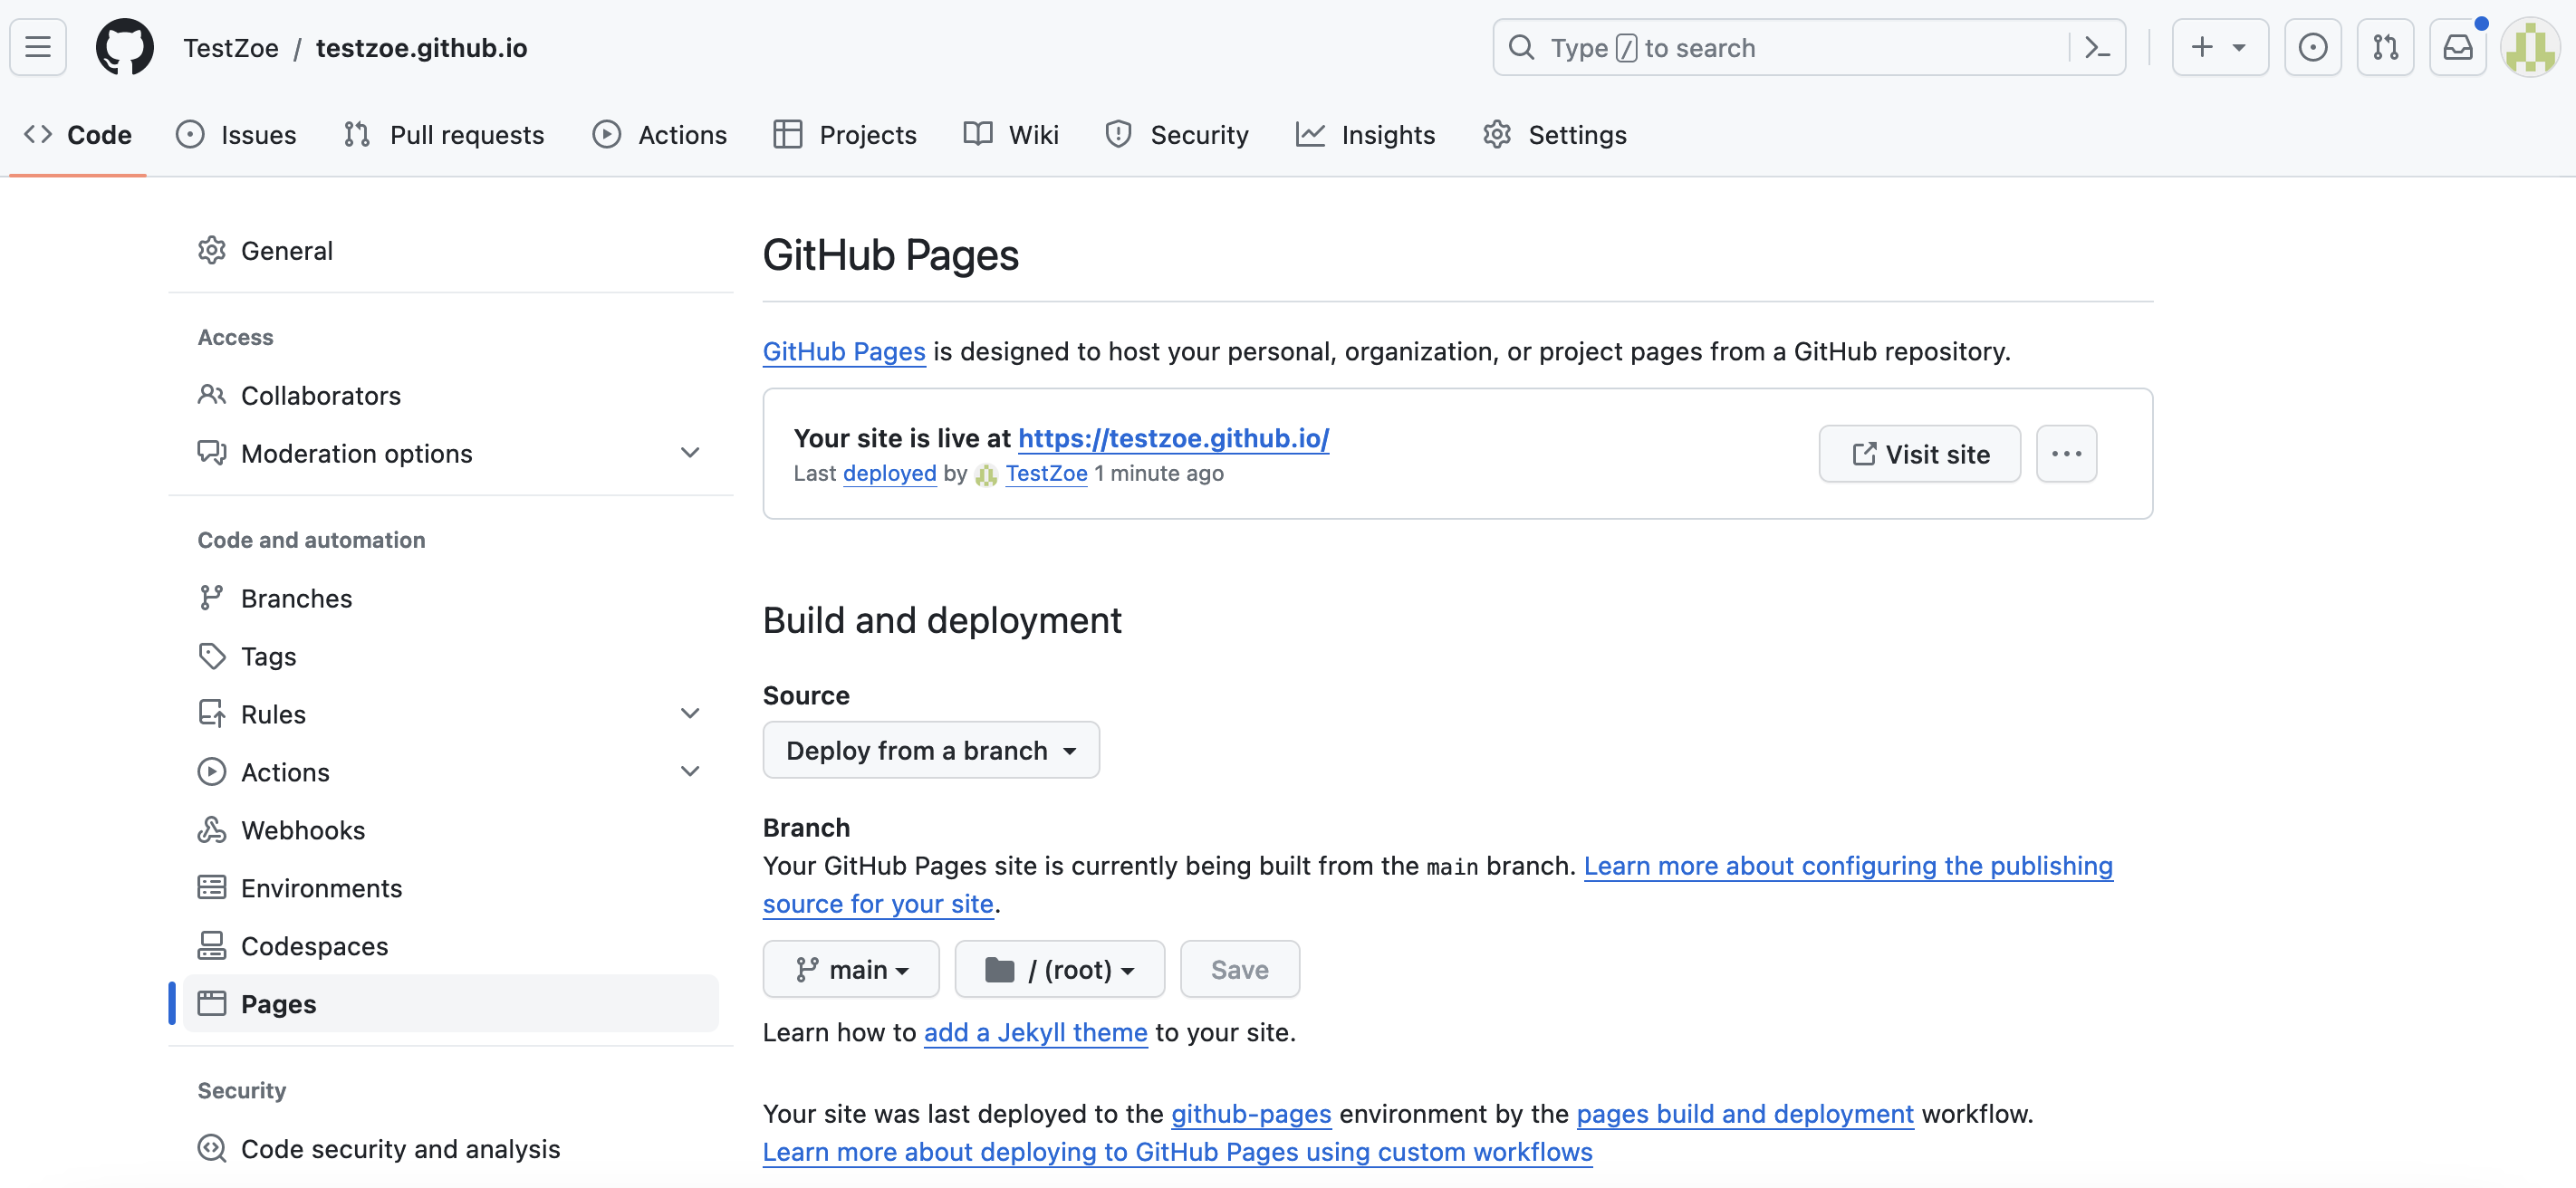
You’ll notice you don’t need to configure any Actions (though you can for HTML), and that’s because this is a special type of repository on GitHub, so any HTML files you add will automatically be hosted but that will not happen in other repos.
You can still see how GitHub is deploying your site by clicking on the tab called Actions:
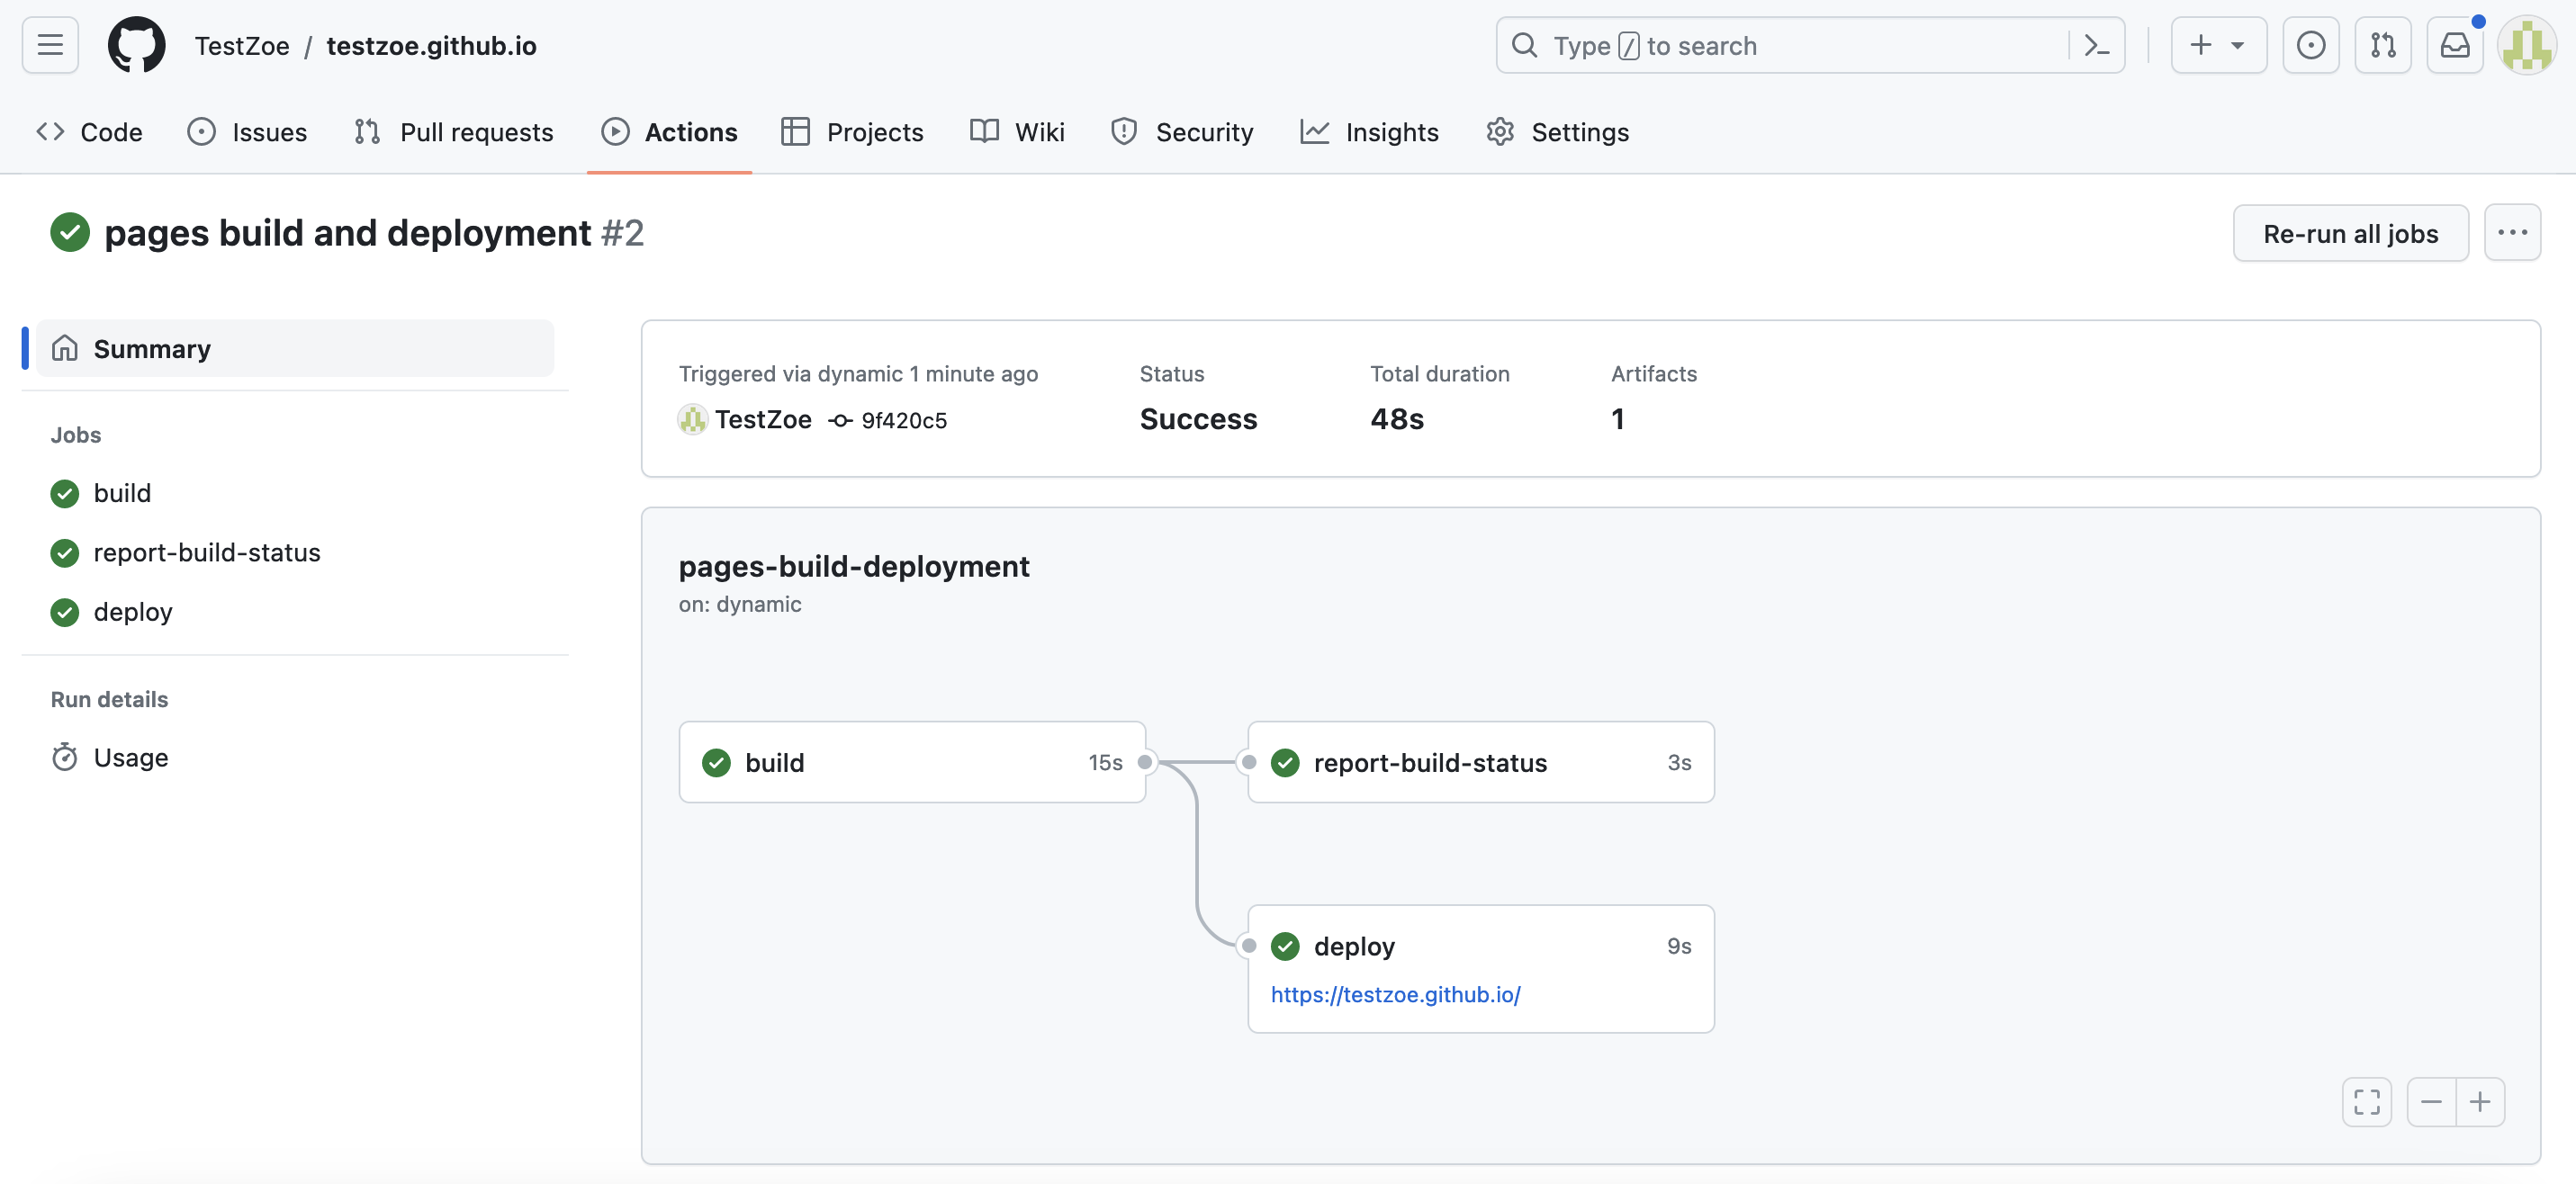
You should see some green lines and checks, all of which indicates your site is live.
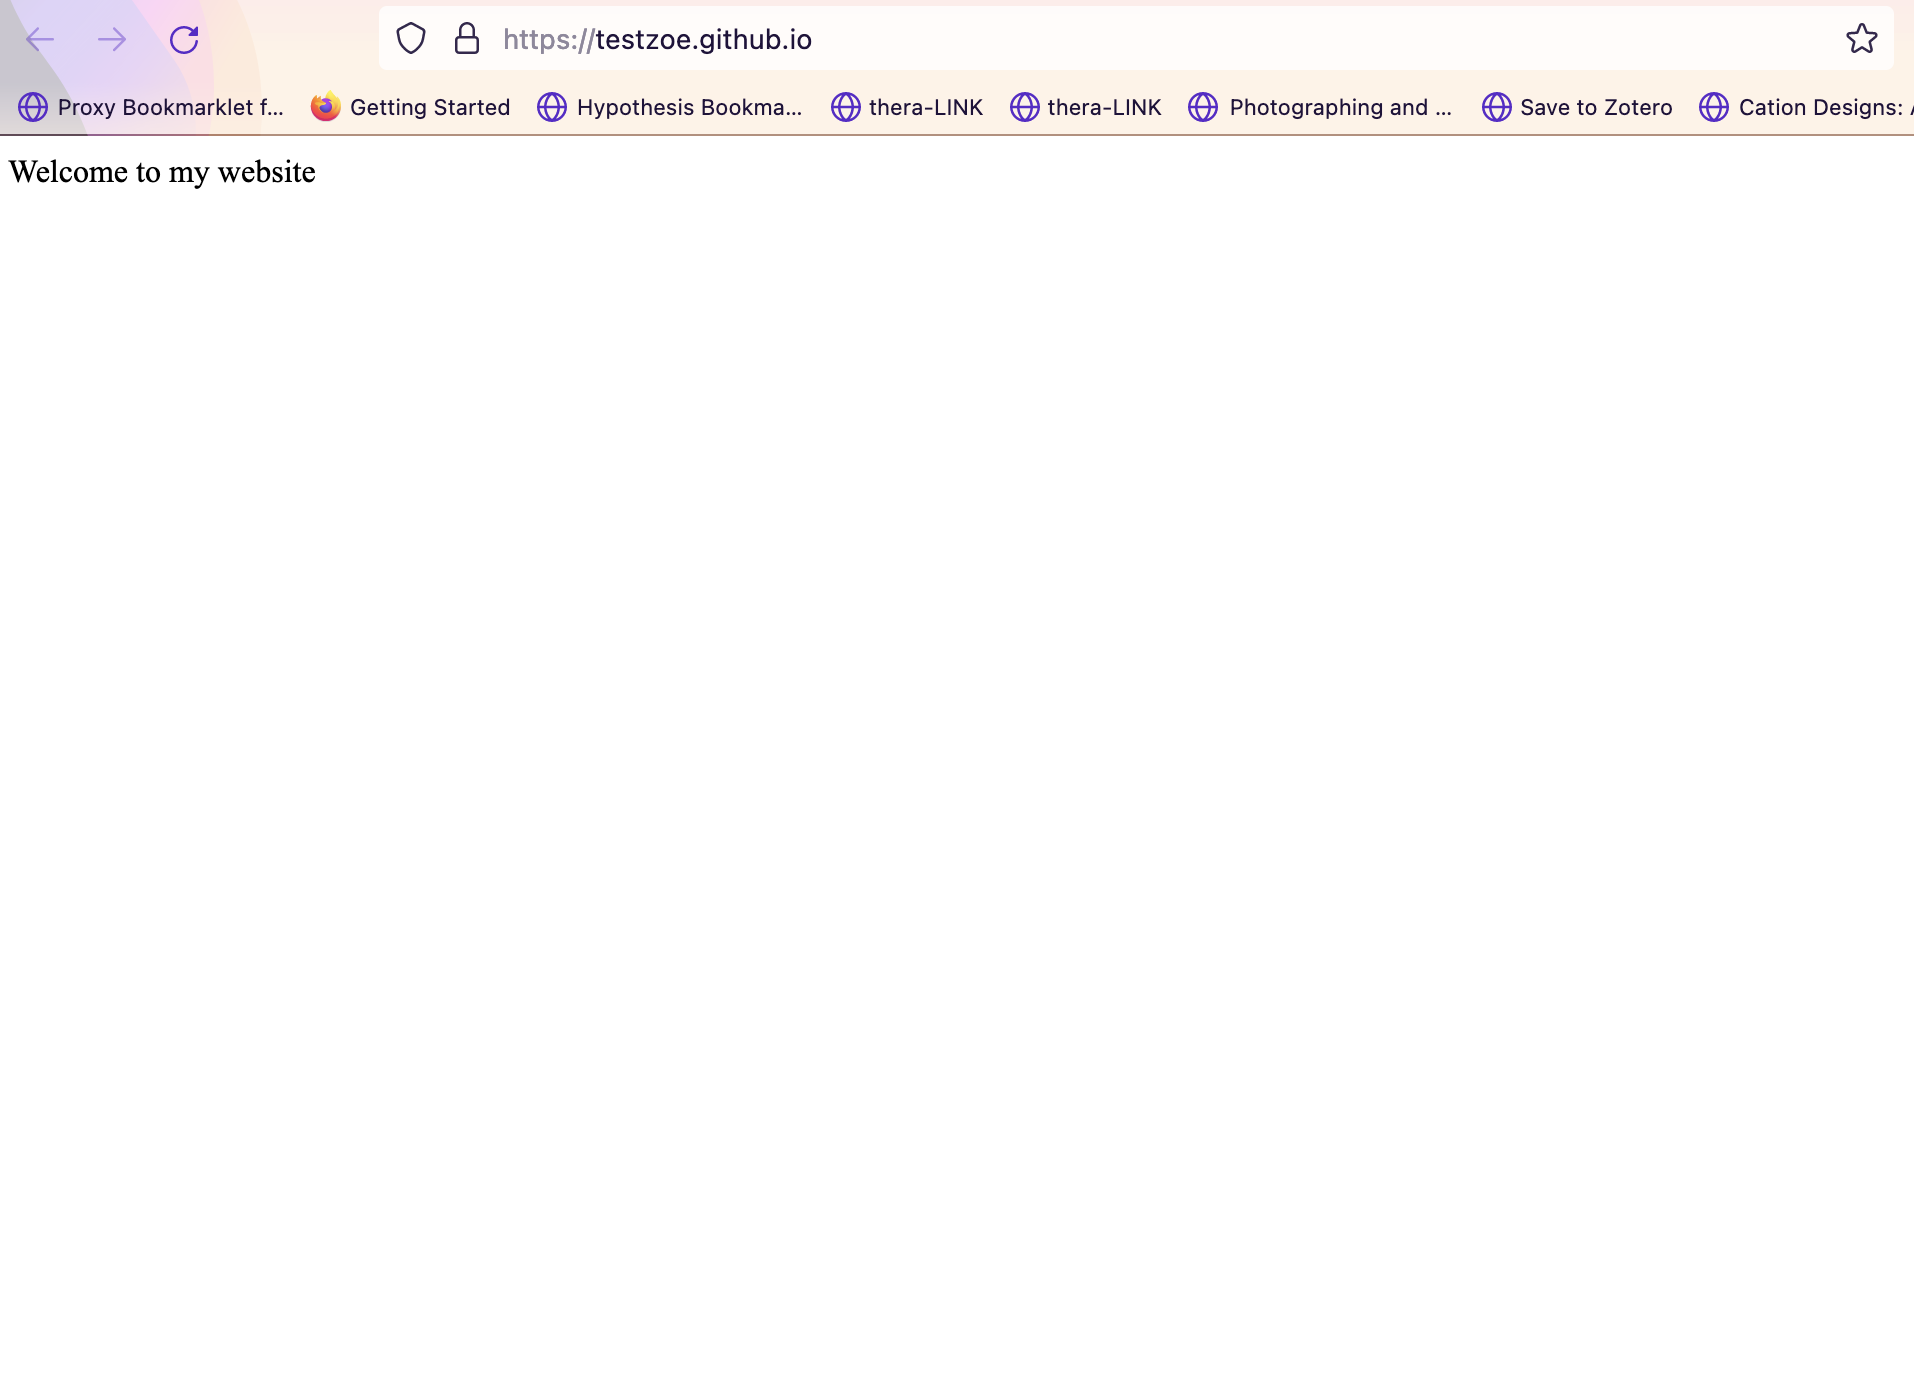
You can find see this live here https://testzoe.github.io/.
So, hopefully following these steps will help you create your initial website. You can do the similar steps above for a Jekyll site with your github.io repository, just be sure to update your Gemfile, add your files, and then configure GitHub Pages to publish your site with the Github Actions for Jekyll. If you get stuck or have questions, don’t hesitate to reach out to the instructor for help.
You might also look at the following resources for more information:
- GitHub’s documentation on GitHub Pages https://docs.github.com/en/pages/getting-started-with-github-pages/about-github-pages
- GitHub’s documentation on Jekyll and GitHub Pages https://docs.github.com/en/pages/setting-up-a-github-pages-site-with-jekyll
- Library Carpentries Lesson on GitHub Pages https://librarycarpentry.org/lc-git/05-github-pages.html
At Home/In Class Static Assignment(s)
- Try to take your HTML page and Host Via GitHub Pages
Rather than having a blank HTML page, try to copy your content from the HTML homework from last week and host it via GitHub Pages. You can do this via the Command Line or github.dev. If neither are working, reach out the Instructor for assistance (likely you’ll need to download GitHub’s Desktop app or give the instructor permissions to collaborate on your repository).
- Try to take your Jekyll site and Host Via GitHub Pages
Now once you have your HTML page hosted, the next step is considering how you might want a website at this URL rather than just a homework assignment. Either through following the steps outlined above or by using this example Jekyll site via Google Drive available here, try to customize a website that includes your HTML homework as a post, and then add that to GitHub Pages. Remember to delete your original index.html. If you do use the Google Drive option, you do not need to install Jekyll or Ruby on your computer but that means you cannot see the site locally on your computer, so customization will be a bit more difficult. If you get stuck, reach out to the instructor for assistance.
Once your link is live, post it to our final GitHub discussion forum https://github.com/ZoeLeBlanc/is578-intro-dh/discussions/10.